The rules mention a four-player (two vs two) variant in a few places. This variant is not available on yucata.
The ability of the Royal Guard changed in the Nobility expansion. Yucata uses the new version of the Royal Guard
at the publisher's request. The other Nobility content is not available on yucata.
Show
→ summary only
→ detailed version only
In War Chest you take on the role of medieval battlefield commanders, vying to gain control
of tactical battlefield locations.
To succeed you must successfully manage not only your armies on the
battlefield, but those that are waiting to be deployed. Each round you will
draw 3 Unit Coins from your bag and then take turns using them to perform
actions. Each coin shows a military unit on one side and can be used for one
of several actions. The game ends when one player has placed all of their Control Markers. That player
is the winner!
Components
74
Unit Coins
4
Royal Coins
16
Unit Cards
16
Faction Control Markers
1
Double-sided Initiative Marker
4
Bags
1
Board
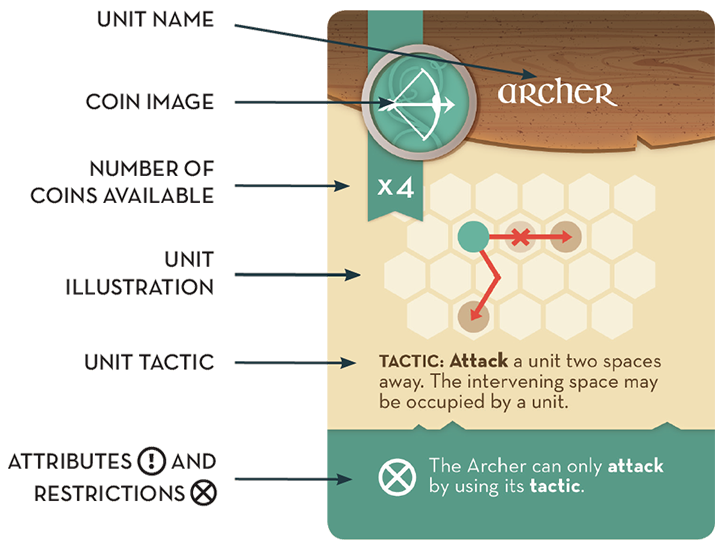
Unit Card Anatomy
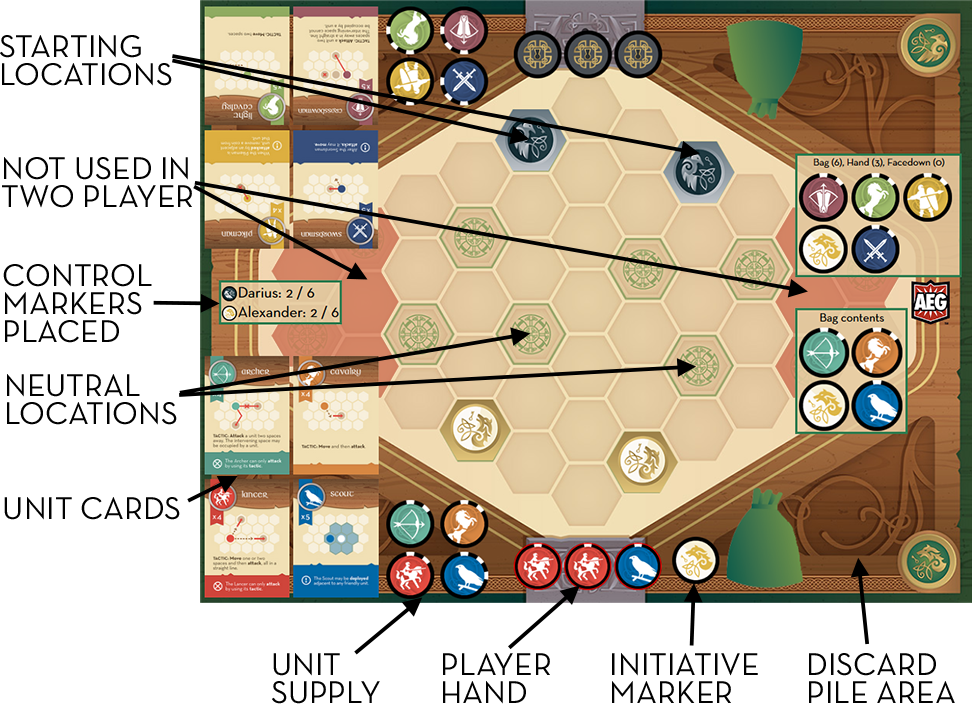
Place the board in the middle of the play area. For a two-player game each
player chooses a faction and takes 1 matching bag, 1 Royal Coin, and 6
Control Markers. Put your faction’s Royal Coin into your bag, and place one
of your Control Markers onto each of the two matching starting locations on
the board. The other locations are neutral at the start of the game.
Shuffle the 16 Unit Cards and deal 4 face-up in front of each player.
These are the 4 units that player will have available this game.
Give each player the Unit Coins, matching their 4 Unit Cards. Put 2 Unit
Coins of each type into your bag, together with the Royal Coin. Put the rest
of your Unit Coins in piles next to the matching unit cards. These form your
supply. Any unused Unit Coins should remain in the box.
Flip the Initiative Marker. The player whose faction matches the face-up
side of the marker takes initiative (and the marker). You are now ready
to begin.
Note: In a two-player game, you will not use the outer areas of the board
indicated by the darker hexes (shown as red areas in the example). Place the
Royal Coins, the bags, and the Control Markers that you are not using back
into the box. These components are only used in the four-player game. A two-player
set up will look like the example above.
More pre-determined set ups can be found in a section below
Set Ups Inspired by Famous Battles.
An advanced variant for drafting from random units can be found at the
end of the rules.
Game Overview
A game of War Chest is played over a series of rounds. Each round is
divided into two phases:
- Draw Coins
- Use Coins
How to Win
The game continues until one player has placed
all of their Control Markers on locations. Locations are a special
kind of hex, indicated on the board with green knotwork symbols.
The player or team to have all of their Control Markers placed on
locations is the winner.
The game continues until one player has placed
all of their Control Markers on locations. That player is the winner.
Draw Coins
At the start of the round, each player draws 3 coins from their bag and puts
them in their hand, hidden from their opponent. At any time that you need to
draw coins and your bag is empty, refill it with the coins in your discard pile.
Then shuffle the coins in your bag and continue drawing until
you have 3 coins in your hand.
At the start of the round, each player draws 3 coins from their bag.
At any time that you need to
draw coins and your bag is empty, refill it with the coins in your discard pile.
Not enough coins?
In very rare circumstances you may have only one or two coins
between your hand and discard pile. If this happens, draw the coins
that you have. During the Use Coins phase this round, you will not
perform the usual three actions. After you’ve played your last coin,
your opponent continues to play coins and take actions until their
hand is empty.
Use Coins
There are three kinds of actions that allow you to use coins drawn from
your bag. Starting with the player with the Initiative Marker, you and your
opponent now take turns taking actions using the coins in your hands,
one at a time, until both your hands are empty. Each coin can used be used
to perform a single action.
Note, each player will need to keep an area separate to their supply that will
be their discard pile. It is from the discard pile that you refill your bag when
you need more coins, not from the supply . There are nine possible actions,
broken into three classes:
1. Placement actions:
Place a Unit Coin face-up onto the board to deploy or bolster a unit.
Deploy: You may deploy a coin to the board, creating the unit
of that type.
Bolster: You may place a coin to bolster the matching unit
already on the board, making it harder to remove following
an attack.
2. Discard a coin facedown actions:
Discard a coin facedown into your discard pile to claim initiative, recruit,
or pass.
Claim Initiative: You may discard any coin facedown to your
discard pile to take the Initiative Marker from your opponent.
This means you will go first during the next round.
Recruit: You may discard any coin facedown to your discard
pile to recruit a new coin from the supply.
Pass: You may discard any coin facedown into your discard
pile and pass. If you pass, you are not required to pass with
subsequent coins. You may use any remaining coins as normal.
3. Discard a coin face-up actions (Maneuvers):
Discard a Unit Coin face-up into your discard pile to maneuver the matching
unit on the board (this will either be a move, attack, control, or use of a
unit’s tactic).
Move: You may discard any coin face-up into your discard pile
to move the matching unit on the board.
Control: You may discard any coin face-up into your discard
pile to have the matching unit control the location it currently
occupies.
Attack: You may discard any coin face-up into your discard
pile to have the matching unit attack an adjacent enemy unit.
Tactic: Some units have tactics, indicated by text on the card.
For example, Cavalry’s tactic allows it to move and then
attack. You may discard any coin face-up into your discard
pile to have the matching unit perform its tactic.
The royal coin
The Royal Coin does not have a matching unit. It can only be used
to perform facedown actions (or the tactic on the Royal Guard unit.)
Placement Actions
Deploy
You may deploy a coin to the board, creating the unit of that type.
-
Choose a coin from your hand and place it face-up into an empty
location that you control.
- You cannot deploy a unit if all locations you control are occupied.
-
You cannot perform a bolster, move, attack, control, or tactic action
with a unit until it has been deployed.
-
You may only have one unit of each type on the board at a time. This
means you cannot deploy a unit if you already have a unit of that type on
the board.
-
If the last coin of a unit is removed from the board following an attack
(see below), you may later re-deploy a new unit of that type.
Bolster
You may place a coin to bolster the matching unit already on the board,
making it harder to remove following an attack.
-
Choose a coin from your hand and add it face-up on top of the matching
unit on the board.
-
A unit may be bolstered any number of times. There is no limit to the
height of a unit stack.
-
All coins in the stack belong to the unit. If the unit is moved, for instance,
move the entire stack.
Discard a Coin Facedown Actions
The facedown discard actions play a significant role in the game.
Knowing when to recruit and when to maintain your bag at a level
that keeps your maneuvering options consistent is a key decision point.
Claim Initiative
You may discard any coin facedown to your discard pile to take the
Initiative Marker from your opponent. This means you will go first during the
next round.
-
Choose a coin from your hand and put it facedown into your discard pile
(do not show it to your opponent).
- Take the Initiative Marker and put it in front of you.
-
If you already have the Initiative Marker, or had it earlier this round, you
may not perform this action. The Initiative Marker may only transfer
between players once per round.
Recruit
You may discard any coin facedown to your discard pile to recruit a new coin
from the supply.
-
Choose a coin from your hand and put it facedown into your discard pile
(do not show it to your opponent).
-
Take any one coin from your supply, show it to your opponent, and put it
face-up into your discard pile.
- This coin will be shuffled into your bag in a later round.
-
The Unit Coin you recruit does not need to match the coin you spent to
recruit it.
Pass
You may discard any coin facedown into your discard pile and pass. If you
pass, you are not required to pass with subsequent coins. You may use any
remaining coins as normal.
Discard a Coin Face-up Actions
Collectively all actions that involve discarding a coin face-up are
known as maneuvers. Maneuvers are at the heart of the game.
Maneuvering your units correctly and at the correct time is one of
the critical aspects of game play.
Move
You may discard any coin face-up into your discard pile to move the
matching unit on the board.
- Choose a coin from your hand and put it face-up into your discard pile.
-
Move the matching unit one space on the board, into an adjacent,
empty space.
- If all of the spaces adjacent to a unit are occupied, it cannot move.
Control
You may discard any coin face-up into your discard pile to have the
matching unit control the location it occupies.
- Choose a coin from your hand and put it face-up into your discard pile.
-
If the matching unit occupies a neutral location, place one of your
Control Markers onto that location.
-
If the matching unit occupies a location controlled by your opponent,
return their Control Marker to them and replace it with one of your
Control Markers.
-
You may not control a location you already control. Each location can
contain only one control marker.
- If you place your last control marker onto the board, you win.
Attack
You may discard any coin face-up into your discard pile to have the
matching unit attack an adjacent enemy unit.
-
Choose a coin from your hand and put it face-up into your discard pile.
The unit matching this coin is the attacker.
-
Choose an enemy unit, which is adjacent to the attacker. This unit is
the target.
-
Remove one coin from the target and put it back in the box, even if it is
the only coin in the unit stack (note: the coin goes into box not back into
the supply or discard pile).
-
This means that if the target was not bolstered (i.e. it was a single coin
rather than a stack), the unit is no longer deployed on the board (it is
destroyed). You may use another coin later to re-deploy another unit of
the same type.
Tactic
Some units have tactics, indicated by text on the
card. For example, Cavalry’s tactic allows it to move
and then attack. You may discard any coin face-up
into your discard pile to have the matching unit
perform its tactic.
-
Choose a coin from your hand and put it face-up into your discard pile.
-
Execute the tactic described on the matching
unit’s unit card.
Attributes and Restrictions
In addition to tactics (indicated by TACTIC on the Unit Card) some units
have special attributes (indicated by  )
and/or restrictions (indicated by
)
and/or restrictions (indicated by  ).
Attributes and restrictions do not need to be executed like tactics,
but instead describe additional things that the unit can or cannot do in other
circumstances. For example, the Footman can have two units deployed (an
attribute) and the Archer cannot attack other than using its tactic, i.e. it
cannot attack adjacent units (a restriction).
).
Attributes and restrictions do not need to be executed like tactics,
but instead describe additional things that the unit can or cannot do in other
circumstances. For example, the Footman can have two units deployed (an
attribute) and the Archer cannot attack other than using its tactic, i.e. it
cannot attack adjacent units (a restriction).
In addition to tactics some units have special attributes and/
or restrictions. Attributes and restrictions do not need to be
executed like tactics, but instead describe additional things
that the unit can or cannot do in other circumstances.
Coins that are discarded face-up remain face-up and visible to an
opponent until the point at which they are reshuffled into the bag.
An awareness of which coins an opponent has discarded is an important
tactical consideration in War Chest.
For experienced players we recommend drafting Unit Cards rather than
having them dealt randomly. During set up, deal 8 random unit cards face up
in the middle of the play area. Flip the Initiative Marker to see which player will
draft first. The first player chooses and takes one Unit Card, then the second
player takes two Unit Cards, then the first player takes two, and so on, until
the first player is left with the last card. The player who chose second takes
the Initiative Coin to begin the game. This variant allows players to try to
develop a style of army with distinct strategies based on unit interactions.
One of the interesting features of War Chest is to have set ups that are
inspired by famous battles. Here are some good starting set ups that allow
players to jump straight into the game – and might just allow you to change
the course of history!
Battle of Gaugamela 331 BCE
Gaugemela was a decisive battle in the campaigns of Alexander the Great
against the Persian Empire. The battle was fought on wide-open ground
where the Persian forces hoped to use their superior numbers and small
force of war chariots. However, this ground also suited the Macedonian
phalanx, who advanced on the Persian center. The Greek left flank under
command of Parmenion was hard-pressed, but held. Alexander was able
to lure a large amount of the Persian cavalry out to his right flank with his
own light cavalry, creating a gap in the Persian lines, into which the Greeks
were able to launch a decisive attack at the Persian centre. This assault
threatened to envelope and kill the Persian Emperor Darius, forcing him to
flee the field - and his army followed.
Greek Units
- Knight, Light Cavalry, Pikeman, Marshall
Persian Units
- Cavalry, Footman, Mercenary, Royal Guard
Battle of Bannockburn 1314 CE
Bannockburn is unusual for a medieval battle in that it actually went on
for two days - though, much of the main action was on the second day. It
was a decisive battle in the First Scottish War of Independence. The Scots,
commanded by Robert the Bruce, emerged early on the 24th June, and after
kneeling in prayer, attacked the English armies. An early charge by the Earl
of Gloucester and a small cavalry force was thwarted by Scottish schiltrons
and Scottish light cavalry dispersed the English archers that were trying to
support the charge. The poor arrangement of the English camp was making
it difficult for them to deploy their heavy cavalry and archers, and the Scottish
attack pressed home, driving the English forces into the Bannock Burn, where
many drowned. With the fighting at its thickest, apprentices and followers from
the Scottish baggage train charged into the fray, causing the English to rout.
English Units
- Archer, Cavalry, Lancer, Footman
Scottish Units
- Light Cavalry, Pikeman, Warrior Priest, Swordsman
Battle of Crécy 1346 CE
Crécy took place on 26th August, and was one of three critical English
victories in the Hundred Years War. Edward III deployed his armies
effectively, using slopes and neighboring features to both reduce the
effectiveness of the French heavy cavalry and to prevent his army from
being flanked. His main strength was his archers, equipped with longbows.
Edward also ordered his knights to dismount and fight on foot. A sudden rain
storm began as the French armies advanced, and caused problems for their
Genoese crossbowmen, and created sodden ground for the French cavalry.
Despite many gallant, repeated charges from French mounted knights
late into the evening, they could not break the English position, and after
having two horses killed beneath him, Phillipe, the French king, conceded the
battlefield.
English Units
- Archer, Ensign, Knight, Royal Guard
French Units
- Cavalry, Crossbowman, Lancer, Scout
Archer
Can the Archer attack an adjacent unit?
No, the Archer cannot attack using the normal attack action. It can only
attack using its tactic, which specifies that the target of the attack is two
spaces away.
Berserker
When I take consecutive maneuvers with a Berserker, do I need to also
discard a coin from my hand for each one, as well as removing a coin from
the unit?
No, you only need to discard one coin to execute the Berserker’s tactic.
The consecutive actions are specifically paid for by the removal of coins
from the unit.
Crossbowman
Can the Crossbowman attack an adjacent unit?
Yes. It may use its tactic, which specifies a unit that is two spaces away, in a
straight line with no intervening units, but it has no restriction on making a
normal attack instead of using its tactic.
Ensign
Can the Ensign move a unit to any other space that is within two spaces of
the Ensign, regardless of distance?
No, it only gives the other unit a normal move action (i.e. it can move
only one
space
to a space that is also within two spaces of the Ensign).
Does the attribute of the Berserker trigger after a move granted by
the Ensign?
Yes, it does.
Footman
When I use the Footman’s tactic, can the maneuver actions performed by
the two separate Footman units be different?
Yes, they can. You could for example discard a Footman coin to control a
location with one unit, and move another.
Lancer
Can the Lancer use its tactic to move two spaces in a straight line and
then choose not to attack?
No, the Lancer must have a target it can legally attack at the point at which
you choose to use its tactic. For example, a non-bolstered Lancer could not
be moved two spaces ending adjacent to a knight, because it cannot attack
the Knight at the point that you wish to use its tactic.
Can the Lancer attack an adjacent unit?
No, it may only attack using its tactic, which specifies it must both move
and attack.
Light Cavalry
Can the Light Cavalry move just one space?
Yes, it may use either a normal move (one space) or its tactic (two spaces).
Marshall
Can the Marshall grant a normal attack to any unit within range, or allow
a unit to carry out an attack using its tactic?
No. The unit has to be able to make a normal attack, so the Marshall cannot
give an attack to Archers or Lancers, nor does it allow any other kind of
special attack criteria granted by a tactic.
Do the attributes of the War Priest, Berserker and Swordsman trigger
after an attack granted by the Marshall?
Yes, they do.
Mercenary
What happens if the Mercenary unit is not on the board when I recruit a
Mercenary coin?
The Mercenary’s attribute is only of use if the Mercenary unit is already on
the board when you recruit the coin. The attribute gives the Mercenary unit
a free maneuver specifically, not a free action of another kind. You cannot,
for instance, use the attribute to deploy the Mercenary or to recruit a coin.
Pikeman
Does the Pikeman’s ability trigger if it only has one coin in its stack, and
what happens if the attacking unit only has one coin in its stack?
The Pikeman’s attribute happens at the same time as the attack. In other
words it happens regardless of the outcome for either unit. It is also
important to note that Pikeman’s ability is not an attack, so it will also
affect an attacking Knight.
Warrior Priest
What happens if I cannot use the coin drawn with the Warrior Priest
after it controls or attacks?
You can always use a coin, as you could simply discard it to pass. The coin
has to be used, and used immediately, but can be used for any of the three
action types.
Starting Locations
Can I take control of another player’s starting locations?
Yes, starting locations can be captured in the same way as any other
location controlled by another player.
Yucata has collaborated with the publisher to bring you these variants. (They are not
mentioned in the original published rules.)
Preview Second Hand
When you draw your very first hand in the game, you also draw your second hand of three
coins. That hand is set aside. You may look at this hand prior to playing your first
round.
Choose Play Order
This variant only applies to the advanced set up, where units are drafted at the
start of the game.
Flip a coin before the game. The winner can choose
either their draft position (first or second) or their starting play
position (first or second). The player that loses the toss makes the choice for
whichever option the other player did not choose to make.
Elimination Draft
This variant only applies to the advanced set up, where units are drafted at the
start of the game.
Before the draft starts, lay out 10 cards. The player who is
drafting first excludes one card from the draft, followed by the other player. The
draft then proceeds as normal.
Hints for handling
Click on the green bags to view the bag contents. Clicking on your bag will show you the coins
left in your bag. Clicking on your opponent's bag will show you the identity of all of her coins whose
locations are unknown to you, including those in the bag, her hand, and facedown discards.
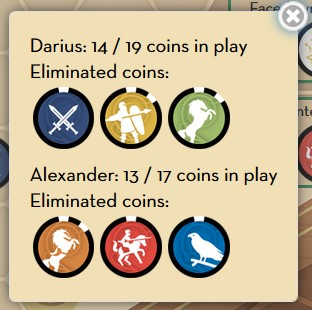 Click on the scoreboard (rectangle on the left side of the game window with player ids and placed
control marker count) to view information about coins that have been eliminated from the game.
Click on the scoreboard (rectangle on the left side of the game window with player ids and placed
control marker count) to view information about coins that have been eliminated from the game.
 To claim initiative, click on the initiative marker that your opponent holds, which appears between her
hand and the green bag. If the initiative marker has a small lock indicator, that means that the
initiative has already changed hands this round and cannot move again until next round.
To claim initiative, click on the initiative marker that your opponent holds, which appears between her
hand and the green bag. If the initiative marker has a small lock indicator, that means that the
initiative has already changed hands this round and cannot move again until next round.
In extremely rare circumstances, the game can get into a state where neither player can make any
progress towards capturing more control points and ending the game. In this case,
the game ends in a
draw
. This will happen when both players hold only the royal coin in their hand or bag and both
unit supplies are empty.