VOLT - General game info
VOLT
1-4 players, 30-45 minutes, 10 years and older
AuthorEmerson Matsuuchi (EmersonM)
IllustratorsAnnika Brüning
Marina Fahrenbach
Steven Hamilton
Published byHeidelBÄR Games
Online since 2020-03-14
Developed by (Stonecrusher)
Boardgamegeek211454
Yucata.de owns a license for the online version of this game. A big "thank you" to the copyright owners (publisher and/or author and illustrator) who make it possible to have this game for free online here!
Note: This online implementation uses slightly changed rules!
VOLT - Rules
If you are reading these rules for the first time, ignore the text along the right hand side. These rules serve as a summary to help you quickly familiarize yourself with the game.

Show → summary only → detailed version only → both summary and detailed version

VOLT
  1. VOLT-rulebook-training game.pdf
  2. RFL Manual.pdf
  3. VOLT-FAQ-en-2.0.pdf
  4. VOLT-rules-Championship with Killbots-en.pdf

Welcome to the ultimate Robot Fighting Experience!
Are you ready for the spectacle of glorious mechanical gladiators crashing into each other? Can you withstand the screaming metal and destructive laser fire?
Do you have what it takes to become an operator and join the Robot Fighting League (RFL)?
Let the training begin!

COMPONENTS

Place the box bottom in the center of your play area. Each Operator (player) sits on one side of it.

PLAYER COMPONENTS

Each operator chooses a color and the matching robot and takes all of the following pieces:

  • OVERVIEW CARD (white back)
  • ROBOT CARD (white back) and the matching ROBOT
  • MONITOR
  • SCREEN
  • CONTROLLER
  • DICE (2x red, 2x blue)

UNNEEDED COMPONENTS

The following components are not needed for the training game. Leave them in the tray or set them aside:

  • ALL UNUSED PLAYER COMPONENTS
  • ALL CARDS without a white back
  • GAME BOARD C/D
  • MINE TOKENS in all colors

ADDITIONAL COMPONENTS

Keep all of these components handy:

  • STARTING NUMBERS - Collect one starting number per player (e.g. collect starting numbers 1 to 3 if you're playing with 3 players).
  • VOICTORY POINT TOKENS - One side shows a number from 1 to 6, which determines where it is placed in play. Each token is worth 1 victory point!
  • DAMAGE TOKENS - Each token represents 1 damage.
  • ARENA PILLARS
  • GAME BOARD A/B
SETUP

The arena is surrounded by a WALL (box and plastic corners).

The arena itself is made up of SPACES. Each robot always occupies one space (even if parts of it reach into other spaces). Each space can hold only one robot.


At Yucata the Controllers of all players are always aligned to your point of view, i.e. the top on a Controller always corresponds to the North direction in the arena, no matter which Controller you're looking at.

Be the first to collect 3 victory points (VP).
Be the first to collect 3 victory points (VP). You can collect VP by destroying other robots and by being on a VP space with a VP token in Phase 3: Resolution.
PLAYING THE GAME

VOLT is played in rounds, each consisting of 4 phases.

Phase 0: PREPARATION

Execute these steps in order:
  1. Place 1 VP token. Skip this step if the arena already has 3 VP tokens.
  2. Remove damage tokens
  3. Reboot robots outside the arena
  4. Return starting numbers
  5. Put up screens
Execute these steps in order:
  1. Place 1 VP token: One operator draws a VP token and places it, number side up, on the VP space of the same number. Skip this step if the arena already has 3 VP tokens.
  2. Remove damage tokens: Operators return all damage tokens from destroyed robots back to the supply.
  3. Reboot robots outside the arena: Place robots, that are outside the arena, on one of their starting spaces (beginning with the robot with starting number 1, etc.).
  4. Return starting numbers: All operators return their starting numbers. Put each starting number, number side up, on a different arena pillar.
  5. Put up screens: All operators place their screens in front of their controllers.

Phase 1: PROGRAMMING

PLACE DICE

Place 1 die on each control unit of your controller on a key matching their color.

Do not roll your dice. Place the faces of your choice.

BLUE DICE: MOVE

A can only be placed on a blue key.

Robots cannot move diagonally!

The chosen key is the direction your robot will move toward.

RED DICE: FIRE

A can be placed on any key.

The chosen key is the direction your robot will fire toward (line of fire).

TAKE A STARTING NUMBER

The player with the highest sum of dice from the previous round gets the lowest, the player with the lowest sum the highest starting number. In case of a tie, the order stays unchanged.

PLACE DICE

One operator says "3, 2, 1, go!" At "Go!" every operator starts programming their robots simultaneously.

CONTROL UNIT

Each controller has 3 control units.


Each control unit is marked in its center with a number (I, II, III), which is surrounded by 8 keys.

The keys represent the directions that your robot can move or fire toward. It can shoot in all directions, but it can move only in the directions marked by blue keys (orthogonal).

Place 1 die on each control unit of your controller. You have 2 (move) and 2 (fire); so you won’t place one of your dice each round.

Do not roll your dice. Place the faces of your choice.

To place dice correctly, you only need to place them on a key matching their color. You must choose numbers now as well, but they only matter in Phase 2: Activation.

BLUE DICE: MOVE

A can only be placed on a blue key.

Robots cannot move diagonally!

The chosen key is the direction your robot will move toward.

RED DICE: FIRE

A can be placed on any key.

The chosen key is the direction your robot will fire toward (line of fire).

Note: The facing of your robot is irrelevant. Only the dice on your controller determine the directions in which your robot will move or fire.

EXAMPLE – DICE PLACEMENT

Your controller is parallel to your side of the arena.

Your robot moves to the right. Your robot fires to the front-left. Your robot fires to the back.

TAKE A STARTING NUMBER

When you have placed 1 die on each of your control units and do not want to change them, take one available starting number from an arena pillar and place it on your monitor, number side up. (Starting numbers determine activation order if there is a tie.)

Once you take a starting number, you cannot change the dice on your controller anymore. When every operator has taken a starting number, everyone lifts their screen and continues to the next phase.

Because of the asynchronous play style at Yucata.de it makes no sense to take a starting number after finishing programming. Therefore at Yucata the starting numbers are assigned to the players based on the dice they had placed on their controller in the round before. The sum of each player's dice decides who gets which starting number:
The player with the highest sum gets the lowest, the player with the lowest sum gets the highest starting number. In case of a tie, the relative order of starting numbers between the players involved in the tie stays unchanged.

Phase 2: ACTIVATION

ACTIVATE DICE

First activate everyone’s dice on control unit I, then on control unit II, and finally on control unit III.

ACTIVATION ORDER OF DICE

Activate the dice on all control units of the same number (I, II, III) in this order:

  1. Die number: lowest first
  2. Die color: before
  3. Starting number: For same number and color, lowest starting number first

Important: You must activate all dice on your controller, even if it harms you!

ACTIVATING A BLUE DIE:
MOVE

  • Your robot moves 1-6 spaces equal to the number on your die in the direction shown by its key.
  • Do not move the VP tokens and do not collect it. This happens in Phase 3: Resolution instead!
  • Push other robots in the direction of your movement, possibly as chain reaction. Walls stop all movement.
  • If your robot pushes another robot into a pit, that robot is destroyed, removing it from the arena. For this, take 1 VP token.
  • If your robot moves itself into a pit, it is destroyed and nobody takes a VP token.

ACTIVATING A RED DIE:
FIRE

  • Lasers hit the first robot or wall in the line of fire. Lasers cannot penetrate robots or walls. Lasers are not stopped by pits or VP tokens
  • A hit deals 1 damage. If your laser hits a robot, its operator takes 1 damage token from the supply and puts it on their monitor.
    If their robot now has 3 damage tokens on its monitor, it is destroyed, removing it from the arena. For this, take 1 VP token from the supply and put it on your monitor.

Important: The laser has unlimited range. The number on the only determines how fast your robot fires.

CHECK FOR PROGRAMMING ERRORS

If dice are placed incorrectly—e.g., multiple dice placed on one control unit, a placed on a non-blue key, or a die placed in between keys - remove all dice on this control unit. If a control unit has no dice, the robot does nothing with that control unit.

The CHECK FOR PROGRAMMING ERRORS is omitted at Yucata because here it is already assured during programming that the dice can only be placed on legal keys.

ACTIVATE DICE

Each die on a control unit represents 1 command, which is now executed. First activate everyone’s dice on control unit I, then on control unit II, and finally on control unit III. After all dice on all control units have been activated, continue with Phase 3: Resolution.

ACTIVATION ORDER OF DICE

Activate the dice on all control units of the same number (I, II, III) in this order:

1. Die number: Activate dice in order from lowest number (1) to highest (6).
2. Die color: If multiple dice have the same number, activate of this number first before activating of this number.
3. Starting number: If multiple dice have the same number and color, activate these dice in order from lowest starting number (1) to highest (4).

Important: You must activate all dice on your controller, even if it harms you!

To show that a die has been activated, remove it from your controller.

EXAMPLE – ACTIVATION ORDER

First, all operators look at control unit I:

  1. The red operator’s has the lowest number, so he activates this die first.
  2. Both green and yellow have a . Yellow’s starting number (1) is lower than green’s (3), so yellow activates her die next.
  3. Green activates his die last.

Next, all operators look at control unit II.

ACTIVATING A BLUE DIE:
MOVE

  • Your robot moves spaces equal to the number on your die (1 to 6) in the direction shown by its key.
  • If your robot moves onto a space with a VP token, do not move the token and do not collect it. You only collect VP tokens in Phase 3: Resolution!
  • If your robot moves onto a space with another robot, push that robot one space in the direction your robot is moving in. Likewise, if your robot pushes a robot into a space with another robot, push the third robot as well.
  • If your robot or a pushed robot hits a wall, stop moving your robot and any pushed robots.
  • If your robot pushes another robot into a pit, that robot is destroyed, removing it from the arena. For this, take 1 VP token from the supply and put it on your monitor.
  • If your robot moves itself into a pit, it is destroyed and nobody takes a VP token.

ACTIVATING A RED DIE:
FIRE

  • Lasers hit the first robot or wall in the line of fire. Lasers cannot penetrate robots or walls. Lasers are not stopped by pits or VP tokens
  • A hit deals 1 damage. If your laser hits a robot, its operator takes 1 damage token from the supply and puts it on their monitor.
    If their robot now has 3 damage tokens on its monitor, it is destroyed, removing it from the arena. For this, take 1 VP token from the supply and put it on your monitor.

Important: The laser has unlimited range. The number on the only determines how fast your robot fires.

EXAMPLE – ACTIVATING DICE

Both operators have a 2 die on control unit I.

  1. The is activated (blue before red), so the green robot moves 2 spaces.
  2. The is activated, so the yellow robot fires and hits the green robot.
  3. The hit deals 1 damage to the green robot. Perfect!

Phase 3: RESOLUTION

The robots activate the spaces they are on. In training this only means: If your robot is on a VP space with a VP token, take the token. If the space has multiple VP tokens, take them all.

In order from lowest starting number (1) to highest (4), the robots activate the spaces they are on. In training this only means: If your robot is on a VP space with a VP token, take the token and put it on your monitor. If the space has multiple VP tokens, take them all.

Start the next round.

END OF TRAINING AND VICTORY

End training immediately when an operator takes their third VP token. That operator wins training.

End training immediately when an operator takes their third VP token. That operator wins training.

You are now ready for a full game of VOLT! Read the RFL MANUAL to learn how to proceed.

For weeks you have tinkered with your new battle robot. In training you have put it to the acid test: the power unit is strong and steady, and the laser cuts smoldering holes.
Finally you have your certification from the RFL to fight in an official arena. Time to show them what you and your robot are made of! And maybe one day you will be ready for the RFL Championship.

Have you completed the training scenario at least once? If not, please do so and come back later.

From now on, each robot equips two modules and all arena spaces of the chosen arena are active. Make sure everyone understands their effects, as described in Arena Features.

In a game with fewer than 4 operators, you can use KillBots to keep the pressure high.

And when you are well acquainted with all that, you can determine the very best operator in an RFL Championship.
COMPONENT LIST
  • 4 robot miniatures
  • 16 dice (8 red, 8 blue)
  • 4 screens
  • 54 Cards (36 module cards, 4 champion modules, 4 overview cards, 4 robot cards, 2 KillBot cards, 4 KillBot AI cards)
  • 2 rule books (1 training rulebook, 1 RFL manual)
  • 2 double-sided game boards
  • 4 arena pillars
  • 4 controllers
  • 4 monitors
  • 60 tokens (20 damage tokens, 24 victory point tokens, 12 mine tokens, 4 starting numbers)
SETUP CHANGES

Each operator draws 2 modules of different colors and equips them.

Blue
(Movement)
Yellow
(Tactic)
Red
(Damage)
Blue
(Movement)
Yellow
(Tactic)
Red
(Damage)
  • Choose a game board and set it up as in training
  • Sort the module cards by color and shuffle each deck. Place them near the arena.
  • Each operator draws 2 modules of different colors and equips them by attaching them to their robot card.
    Attach blue modules to the left of your robot card, red modules to the right, and yellow modules to either side.
  • Inform your opponents about the effects of your equipped module cards.

END OF GAME

The game ends immediately when an operator takes their 5th VP token. That operator wins the game.

USING MODULES

Using an equipped module is optional. You can use modules with a die once per control unit or without a die whenever the current situation fits the card text. You can use multiple modules with the same die.

USING MODULES WITH A BLUE DIE

The activated must show a number in the range on the module card.

You can use the module in addition to moving, unless the module card says "instead of moving."

USING MODULES WITH A RED DIE

The activated must show a number in the range on the module card.

You can use the module in addition to firing, unless the module card says "instead of firing."

USING MODULES WITHOUT A DIE

Some modules do not need a die, but can be used in certain situations.

Some modules have a main effect that you can use only if you activate a die, along with more effects that you can use without activating a die.

GOLDEN RULE

If rules on a module card contradict a basic rule, follow the rules on the card.

Unlike the basic move and fire shown on your robot card, using an equipped module is optional. You can use modules with a die once per control unit or without a die whenever the current situation fits the card text. You can use multiple modules with the same die.

Certain conditions must be met in order to use a module.

USING MODULES WITH A BLUE DIE

You can use an equipped module with a blue die icon if you activate a showing a number in the range on the module card.

You can use the module in addition to moving, unless the module card says "instead of moving."

USING MODULES WITH A RED DIE

You can use an equipped module with a red die icon if you activate a showing a number in the range on the module card.

You can use the module in addition to firing, unless the module card says "instead of firing."


Important: The color of a module card may be different from the color of die it requires!

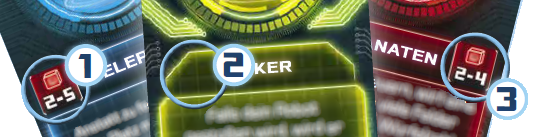
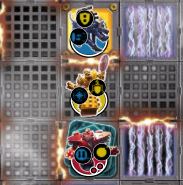
EXAMPLE – MODULE CONDITIONS

  1. Can be used with a red die showing 2 – 5.
  2. No die: The card text defines when it can be used.
  3. Can be used with a red die showing 2 – 4.

USING MODULES WITHOUT A DIE

Some modules do not need a die, but can be used in certain situations (e.g., destruction, damage, push, etc.).

Some modules have a main effect that you can use only if you activate a die, along with more effects that you can use without activating a die.

GOLDEN RULE

If rules on a module card contradict a basic rule, follow the rules on the card.

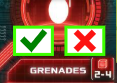
At Yucata the players may decide right before the activation of a die whether they want to use a module:

However in order to speed up gameplay Yucata additionally offers the possibility to set in advance whether/how a module shall be used (permanent setting):

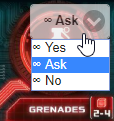
If you're unsure you should keep the permanent setting at "Ask". This is the default and means that preceding the activation of a die which would allow the usage of the module, it becomes your turn so you may then decide whether you want to use it. However in case you already know during your programming phase that e.g. you won't use a module, then change the permanent setting accordingly. You may reset it again during your next turn, but latest during your next programming phase.

Notice: The activation of the dice of the other players may result in situations you haven't expected while programming. Therefore it's better to decide upon the module usage as late as possible. However if you can see in advance that you won't use a module or use it in a certain way, e.g. maximally brake with the Anchor module, then it makes sense to speed up the game via a respective presetting - after all, as players we want to see as fast as possible whether our program does what we had planned and frequent player switches delay that.

GAINING MODULES

Draw a new module of any color if

  • your robot is destroyed and an opponent gains 1 VP.
  • your robot is on a workshop in Phase 3 and you choose to draw a new module instead of repairing.

Important: If you draw a module that you already own, put it on the bottom of its deck and draw another. You cannot have two copies of the same module!

You can draw a new module in two ways:

  • If your robot is destroyed and an opponent gains 1 VP. (Do not draw a module if you destroyed it yourself.)
  • If your robot is on a workshop in Phase 3: Resolution and you choose to draw a new module instead of repairing.

In either case, immediately draw 1 card from a module deck of your choice.

Place this card facedown next to your monitor. This is your inventory deck (you can look at it anytime). Your inventory can hold any number of module cards and related tokens. Modules in your inventory are not equipped and cannot be used.

Important: If you draw a module that you already own, put it on the bottom of its deck and draw another. You cannot have two copies of the same module!

EQUIPPING MODULES

In Phase 0 you can equip modules from your inventory.

You can equip modules only in Phase 0: Preparation. After damage tokens have been removed from destroyed robots, all operators can swap equipped modules with any modules in their inventory.

Don’t forget to inform the other operators about the effects of your newly equipped modules!

GENERAL ORDER OVERVIEW

VOLT is played in rounds. Each round consists of 4 phases. In each phase the player order is determined differently:

If a die or situation triggers multiple effects, always deal damage first .

When in question, determine the order by starting number.

CARD TERMS

adjacent = the 8 spaces surrounding a space
= blue die ( - = blue 1-6)
= red die ( - = red 1-6)
= damage
(X) = Detonation dealing x damage to its space and all adjacent spaces

BLUE MODULES (MOVEMENT)

BRAKE

1-6

When your robot moves, you can move it 1 or 2 spaces fewer than the number showing on this .

MOBILITY

1-6

If this on a blue key, you can activate it as a .

REPULSION BLAST

2-4

When your robot finishes moving, immediately push all adjacent robots and mines by 1 space away from your robot.

STEERING NOZZLE

1-3

You can place bis on a non-blue key to move your robot diagonally. Your robot can move diagonally across the end or corner of a wall. If your robot moves diagonally into another robot, it is pushed diagonally.

TELEPORT

2-5

Instead of firing, your robot can swap positions with the first robot or mine in your line of fire.

A TELEPORT is not a movement! Mines do not explode. Pits, lightning barriers, ANCHOR, etc. do not affect the TELEPORT.

TELESCOPIC ARM

In Phase 3: Resolution, instead of activating your robot’s current space, you can activate 1 (in all 8 directions) adjacent space of your choice. You cannot activate a space with a robot on it. You can activate a space with a mine token on it, but the mine also causes a detonation. Activating a space through a lightning barrier also activates the lightning barrier. Activating a space through an energy wall is not possible.

RED MODULES (DAMAGE)

CROSSFIRE

1-3

Instead of firing in only one direction, your robot fires in four directions. If this is on a blue key, your robot fires orthogonally. If this is on a non-blue key, your robot fires diagonally. Each hit deals 1 damage.

GRENADES

2-4

Instead of firing, your robot throws a grenade in its line of fire. The distance of the throw in spaces equals the die number. The grenade causes a detonation [1 ] on its landing space.

A grenade flies over any robots, mines, pits, lightning barriers, and energy walls. A grenade thrown against the arena wall detonates on the last space in front of it. A grenade thrown into a pit has no effect.

MINES

2-6

Place 3 mine tokens of your color on this module card.

When you start moving, you can place a mine token on the space you are leaving. If you have no more mine tokens, take a mine token from the board to place again.

Note: Do not place a mine when using TELEPORT.

Mines cannot be moved. If a mine would be pushed (by a robot or a module) or if it takes any damage, it causes a detonation [1 ]. Put the detonated mine back on its module card.

If your mine destroys an opposing robot, you gain 1 VP.

If your robot is destroyed or if you unequip this module card, return all your mines to your inventory.

POWER BEAM

3-6

A hit with a to also pushes the hit robot 1 space.

A hit with a to also pushes the hit robot 2 spaces.

REMOTE CONTROL

2-5

Instead of firing, you can REMOTE CONTROL the first robot in your robot’s line of fire. Move 1 die on its controller to another legal key without changing the number.

If the activation of the moved die causes that robot to destroy itself (e.g., by moving into a pit), you gain 1 VP.

Note: If you hit a KillBot), turn its miniature in an orthogonal direction of your choice.

ROTARY HEAD

3-6

Move this up to 2 keys clockwise or counterclockwise before you activate it.

SAW BLADE

2-6

If your robot pushes a robot when moving, it also deals damage: deal 1 damage for a to , or 2 damage for a to . Deal this damage before moving the pushed robot!

Note: You cannot use the SAW BLADE with other sources of pushes (e.g., from POWER BEAM or REPULSION BLAST).

SHOCK PULSE

4-6

When your robot finishes moving, immediately deal 1 damage to all robots and mines in adjacent spaces.

YELLOW MODULES (TACTIC)

ANCHOR

When your robot is pushed, you can choose for it to be pushed 1 or 2 fewer spaces.

BOMB

If your robot is destroyed, it causes a detonation [2 ]. If your robot falls into a pit, the BOMB has no effect.

RAM EXPANSION

In Phase 1: Programming, you can place all 4 dice on your controller. If you place 2 dice on the same key, place the die to be activated first on top.

You still can only activate 1 die on each control unit. When the first of two dice on a control unit would be activated, immediately remove one of the two dice on it.

If 2 dice are on the same key, the implementation at Yucata displays one of the dice in the center of the control unit. This way both dice are always visible.

SHIELD

When your robot takes damage, you can place damage tokens on this module card instead of on your monitor.

The SHIELD can hold up to 2 damage tokens. You cannot move damage tokens between your monitor and SHIELD.

When repairing or removing damage tokens after your robot was destroyed, remove those from your SHIELD as well. You cannot unequip your SHIELD if any damage tokens are on it.

CHAMPION MODULES

(only available in the RFL Championship)

JETPACK,
TWIN CITIES – A

2-5

When your robot moves, it can make a jump over all robots and mines. If its movement ends on a space with a robot or mine, it deals 2 damage and 1 push to its landing space. If a robot cannot be pushed (or stubbornly uses the ANCHOR), it is destroyed.

Additional Mandatory Effect: Your robot hovers over pits and never falls into them. Therefore, on a pit its BOMB works and enemy GRENADES cause detonations.

WATER CANNON,
ROME – B

2-5

Instead of firing, your robot can shoot a jet of water in its line of fire. This deals no damage, but pushes 3 spaces. If your robot is on any starting space, it pushes 6 spaces. Mines detonate without interrupting this push.

CONDUCTOR,
RUHRGEBIET – C

When your robot would suffer lightning damage, instead it deals 1 lightning damage to all adjacent spaces.

WALL CONTROL,
TOKYO – D

1-6

Your robot can move through energy walls. Its push and damage effects are still blocked by energy walls, but its TELESCOPIC ARM can reach through them.

Note: Your robot cannot be pushed through energy walls.

Playing with 2 or 3 players a KillBot controlled by AI can be added.

The robots have been driving around comfortably without getting in each other’s way for too long. The audience is not amused and its is time for some extra entertainment. It is time for KillBots!

Playing with 2 or 3 players, but crave for the excitement of an arena full of battle robots? Add a KillBot controlled by AI.

Besides that, Yucata offers a solo play mode where 1 to 3 of KillBots as described below join the game.

SETUP CHANGES

General setup stays the same, just add a KillBot and another starting number. Choose any unused robot and color for the KillBot, and place the following components on any free side of the arena.

  • KILLBOT-CARDS (AI Fire, AI Move, KillBot – cards with black back)
  • Any unused ROBOT
  • DICE (1x red, 1x blue)
  • MONITOR

Treat the KillBot as a normal robot; it can even win the game.

KillBot-AI: The KillBot rolls its dice!! If a decision must be made (in exceptional cases), the operator with the lowest starting number decides.

KillBot-Facing: the KillBot moves and fires in the direction its miniature is facing. The KillBot can only be faced in an orthogonal direction.

VP for Destroying the KillBot: If an operator destroys the KillBot, that operator takes 1 VP token from the KillBot. If the KillBot has no VP, the operator gains no VP.

Unless otherwise stated, treat the KillBot as a normal robot: it gets a starting number, suffers damage and can be destroyed, it reboots, and it collects VPs.

The KillBot can even win the game, putting the operators to shame!

KillBot-AI: The KillBot follows a fixed program. But since the KillBot does not have an operator, one operator will resolve its program. Instead of placing dice on chosen sides, the KillBot rolls its dice!

If a decision must be made (in exceptional cases), the operator with the lowest starting number decides.

KillBot Facing: Unlike the robots, the KillBot moves and fires in the direction its miniature is facing. The KillBot can only be faced in an orthogonal direction.

VP for Destroying the KillBot: If an operator destroys the KillBot, that operator takes 1 VP token from the KillBot’s monitor and places it on their own monitor. If the KillBot has no VP, the operator gains no VP.

PHASE 0: PREPARATION

The KillBot starts on the middle starting space facing the center of the arena.

The KillBot starts on the middle starting space of its arena side. If a robot or mine is on this space, place the KillBot on another of its starting spaces. Place the KillBot miniature so it faces the center of the arena.

PHASE 1: PROGRAMMING

The Programming phase is skipped for the KillBot, it is steered by its AI programming instead.

The KillBot has no controller. Its dice enter the game during Phase 2: Activation, according to its AI programming. After every operator has taken a starting number, give the remaining number to the KillBot.

PHASE 2: ACTIVATION

Immediately before operators start activating dice on each control unit, the KillBot rolls 1 die:

  1. If the KillBot is standing on a VP, it rolls a .
  2. If the KillBot is not standing on a VP, but it spots any robots, it rolls a .
  3. Otherwise, it rolls a .

The KillBot always has a 1–3 die. If necessary, flip it over before placing it.

Note: For each control unit activate the KillBot’s die in normal order.

SPOTTING

  • simultaneously to the left, forward, and right
  • not back or diagonally, nor through walls or robots

If the KillBot looks at a space with a robot or a VP, the KillBot spots it.

Immediately before operators start activating dice on each control unit (before I, before II, before III), the KillBot rolls 1 die as follows:

  1. If the KillBot is standing on a VP, it rolls a .
  2. If the KillBot is not standing on a VP, but it spots any robots, it rolls a .
  3. Otherwise, it rolls a .

Place the rolled die on the die key on the KillBot card. The KillBot always has a 1–3 die. If the die shows a 4, 5, or 6, flip it over (to show a 3, 2, or 1) before placing it.

Note: For each control unit the players resolve, activate the KillBot’s die in normal order.

SPOTTING

The KillBot simultaneously looks in 3 directions: left, forward, and right.

It cannot look back or diagonally, and cannot look through walls or robots.

If the KillBot looks at a space with a robot or a VP, the KillBot spots it.

EXAMPLE – SPOTTING AND ROLLING

The yellow KillBot looks left; it cannot look through the energy wall, so it spots nothing.

It looks forward and spots nothing.

It looks right and spots the red robot (across the mine).

It cannot look diagonally, so it doesn’t spot the VP.

Because the KillBot spotted a robot, it rolls the .

ACTIVATING A KILLBOT’S BLUE DIE: MOVE

1-3

Perform the following three steps for each of the KillBot’s 1–3 spaces of movement.

1. SPOT AND TURN

The KillBot spots robots and VPs.

If it spots a robot or VP token, it turns toward the nearest one.

If it spots nothing or several robots or VP tokens at the same distance, the KillBot keeps its current facing.

2. TURN AWAY FROM CAUTION LINE

If the KillBot is now directly facing a caution line, it turns in the direction of the small arrow on it.

3. MOVE

The KillBot moves 1 space forward. If this move destroys another robot, the KillBot gets 1 VP.

1-3

The KillBot moves a number of spaces matching the number showing on the die. Before each move into a new space, it spots and may turn.

Perform the following three steps for each of the KillBot’s 1–3 spaces of movement.

1. SPOT AND TURN

The KillBot spots robots and VPs.

If it spots a robot or VP token, it turns toward the nearest one. (In this case, treat multiple VP tokens on the same space as 1 VP.)

If it spots nothing or several robots or VP tokens at the same distance, the KillBot keeps its current facing.

2. TURN AWAY FROM CAUTION LINE

If the KillBot is now directly facing a caution line, it turns in the direction of the small arrow on it.

3. MOVE

The KillBot moves 1 space forward. If this move destroys another robot (e. g., by pushing it into a pit), place 1 VP token from the supply onto the KillBot’s monitor.

EXAMPLE – ACTIVATING A BLUE KILLBOT DIE

The yellow KillBot activates a :

1. The KillBot spots nothing, so it doesn’t turn, and then moves 1 space forward. 2. The KillBot spots the red robot, so it turns right. Because it now is facing a caution line, it turns again toward the lines’ arrow. Then, it moves 1 space forward. 3. The KillBot spots the green robot, so it does not turn. Then, it moves 1 space forward, pushing the green robot into the pit. The KillBot takes 1 VP token from the supply.

ACTIVATING A KILLBOT’S RED DIE: FIRE

1-3

The KillBot spots, may turn, and then fires.

1. SPOT AND TURN

The KillBot only spots robots.

If it spots a robot, it turns toward the nearest one.

If it spots nothing or several robots at the same distance, it keeps its current facing.

2. FIRE

The KillBot fires forward. 1 hit deals 1 damage. It gets 1 VP if that hit destroys a robot.

1-3

The KillBot spots, may turn, and then fires.

1. SPOT AND TURN

The KillBot only spots robots.

If it spots a robot, it turns toward the nearest one.

If it spots nothing or several robots at the same distance, it keeps its current facing.

2. FIRE

The KillBot fires forward. 1 hit deals 1 damage. If that hit destroys a robot, place 1 VP token from the supply onto the KillBot’s monitor.

EXAMPLE – ACTIVATING A RED KILLBOT DIE

The yellow KillBot activates a :

The KillBot spots the red robot and turns toward it. It fires and hits the mine, which explodes and deals 1 damage to both the KillBot and the red robot.

PHASE 3: RESOLUTION

On a space with any VP tokens, the KillBot collects all of them.

On a workshop, the KillBot repairs itself. It never draws new module cards.

If the KillBot is on a space with any VP tokens, it collects all of them and puts them on its monitor.

If the KillBot is on a workshop, it repairs itself. It never draws new module cards.

MODULES FOR THE KILLBOT

The KillBot gets equipped with two modules of different colors.

The KillBot always uses its modules when their conditions are met.

With the TELESCOPIC ARM, it always collects VPs first. With the ANCHOR, it is always pushed 2 spaces fewer. If a KillBot with GRENADES activates a red die, walls don't block its line of sight.

The standard KillBot doesn’t scare you anymore? Then it’s about time to equip it with modules.

To equip the KillBot with two modules of different colors, choose from the following modules or draw modules until you have two of these: ANCHOR, BOMB, GRENADES, POWER BEAM, CROSSFIRE, MINES, SAW BLADE, SHIELD, REPULSION BLAST and TELESCOPIC ARM.

The KillBot always uses its modules when their conditions are met.

With the TELESCOPIC ARM, it always collects VPs first. With the ANCHOR, it is always pushed 2 spaces fewer. If a KillBot with GRENADES activates a red die, walls don't block its line of sight.

KillBots use some of their modules in special ways:

TELESCOPIC ARM

In Phase 3: Resolution, the KillBot must take the first action that is possible from this list:

  1. Collect VP token(s) with the TELESCOPIC ARM on an adjacent space, but only if there are not more VP tokens than on the space the Robot is currently standing on. If there are several adjacent spaces with VP tokens then activate the space that contains the most.
  2. Collect VP token(s) on your current space.
  3. If CONDUCTOR is equipped: Trigger a lightning barrier.
  4. Activate a workshop to repair damage.
GRENADES

2-4

Activating a red die: Walls don’t block the KillBot’s line of sight.

JETPACK,
TWIN CITIES – A

2-5

After step 1. Spot And Turn, activate JETPACK only if the KillBot can jump on a robot (not a squad member).

Deal 2 damage and 1 push to its landing space as usual, then immediately end the KillBots activation.

WALL CONTROL,
TOKYO – D

1-6

Activating a blue die: Walls don’t block the KillBot’s line of sight.

When playing with only 2 operators, you may add 2 KillBots to the game. The KillBots win as a squad immediately if they have 7 VP in total.

SPOTTING FOR A SQUAD

  • Squad members block each other’s line of sight.
  • Squad members do not spot each other (so they won’t turn toward each other).

When playing with only 2 operators, you may add 2 KillBots to the game. Assign the two remaining starting numbers to them randomly. The KillBots win as a squad immediately if they have 7 VP in total.

At Yucata.de it's possible to add up to 3 KillBots in a solo game. In general at Yucata the KillBot squad needs the same amount of victory points as a human player (= "Base-VP-amount", set in the game invitation) plus 2 victory points for each KillBot after the first.

Example: In a solo game against a squad of 3 KillBots, the squad needs the Base-VP-amount, here e.g. 5, plus the penalty for the amount of KillBots, that is:
5 VP + (3 - 1) KillBots * 2 VP = 9 VP.

At the end of the game, all KillBots of the squad get the same rank, no matter the individual KillBot's contribution to the squad's total point sum.

SPOTTING FOR A SQUAD

  • Squad members block each other’s line of sight.
  • Squad members do not spot each other (so they won’t turn toward each other).
  • series of title bouts in different arenas
  • exactly 4 players needed
  • arena-specific champion module for the titleholder
  • winner of the bout gets all champion modules of the titleholder
  • if you gain all 4 champion modules, you become the new RFL Champion!

The RFL Championship attracts the masses to the arena. Will the titleholders remain undefeated, or will a new champion rise to glory?

Exactly 4 players are needed.

A championship is played over a series of title bouts in different arenas, with 4 competing operators each (4 players only). Each bout has a titleholder, equipped with the champion module of the current arena. If you win the bout, you gain that module. If you manage to gain all 4 champion modules, you become the new RFL Champion!

SETUP CHANGES

In order of starting number, each operator selects a robot below and takes its champion module (cards with RFL back).

START-CHAMPION-MODULE

A - Twin Cities: THE HOUND with JETPACK

B - Rome: MERCURY with WATER CANNON

C - Ruhrgebiet: REAPER with CONDUCTOR

D - Tokyo: VOLT with WALL CONTROL

In order of starting number, each operator selects a robot below and takes its champion module (cards with RFL back).

START-CHAMPION-MODULE

A - Twin Cities: THE HOUND with JETPACK
B - Rome: MERCURY with WATER CANNON
C - Ruhrgebiet: REAPER with CONDUCTOR
D - Tokyo: VOLT with WALL CONTROL

For the first title bout, use the arena board of the operator with the lowest drawn starting number.

The arena's titleholder must keep his champion module equipped through the whole fight. Other champion modules cannot be equipped.

If the titleholder of the played arena gives all his champion modules to the winner. The winner chooses the arena of the next bout.

The RFL Championship is won by the robot which has all 4 champion modules.

The arena's titleholder must keep his champion module equipped through the whole fight. Other champion modules cannot be equipped. Thus, inventories can start with modules.

If the titleholder of the played arena loses the bout, he gives all his champion modules to the winner. The winner chooses the arena of the next bout, but must choose an arena whose champion module she does not yet have.

If your robot has all 4 champion modules, you win the RFL Championship.

Note: If you cannot complete a championship during one session, keep the robots with their champion modules in separate compartments of the game box.

With less than 4 players you can fill the vacant spots for a championship with KillBots.

Occasionally the qualifiers leave too many robots as scrap unfit for combat. Therefore, in order to ensure that the championships can still be held, the RFL uses fully automatic KillBots.

You want to start a championship but you’re short an operator or two? With the following rules you can fill the vacant operator slots with KillBots.

Make sure you understand the rules for KillBots, before you continue reading!

SETUP CHANGES

KillBots start with a predefined set of modules, which are determined by the arena and whether or not it acts as the current arena’s titleholder.

STARTING MODULES FOR KILLBOTS

TWIN CITIES:
Titleholder: SHIELD + JETPACK
Others: SHIELD + MINES
ROM:
Titleholder: ANCHOR + WATER CANNON
Others: ANCHOR + REPULSION BLAST
RUHRGEBIET:
Titleholder: TELESCOPIC ARM + CONDUCTOR
Others: TELESCOPIC ARM + CROSSFIRE
TOKYO:
Titleholder: TELESCOPIC ARM + WALL CONTROL
Others: TELESCOPIC ARM + GRENADES

After each operator has selected a robot and its champion module, add 1 or 2 KillBots until all 4 operator slots are filled.

KillBots not only start with a specific starting championship module but also they have modules which are all predefined. The two modules which a KillBot equips are determined by the arena and whether or not it acts as the current arena’s titleholder.

STARTING MODULES FOR KILLBOTS

TWIN CITIES:
Titleholder: SHIELD + JETPACK
Others: SHIELD + MINES
ROM:
Titleholder: ANCHOR + WATER CANNON
Others: ANCHOR + REPULSION BLAST
RUHRGEBIET:
Titleholder: TELESCOPIC ARM + CONDUCTOR
Others: TELESCOPIC ARM + CROSSFIRE
TOKYO:
Titleholder: TELESCOPIC ARM + WALL CONTROL
Others: TELESCOPIC ARM + GRENADES

Once the starting modules for KillBots have been distributed, the operators shuffle each module deck and draw 2 modules as usual.

VP for destroying the KillBot: If an operator destroys the KillBot, that operator takes 1 VP token from the supply (if the KillBot has at least 1 VP).

2 OPERATORS + 2 KILLBOTS

The KillBot squad wins a title bout with 7 VPs in total and the championship when they have all 4 champion modules.

VP for destroying the KillBot: If an operator destroys the KillBot, that operator takes 1 VP token from the supply . You still only get a VP for destroying a KillBot, if the KillBot has at least 1 VP on its monitor.

2 OPERATORS + 2 KILLBOTS

The KillBots act as a KillBot squad. They win a title bout with 7 VPs in total. They win the championship when they have all 4 champion modules.

Note: Both members of a KillBot squad equip at least one of the same modules, leaving none of that module for the operators. KillBots are really mean that way!

The notorious arenas of the RFL offer a huge variety of challenges for operators and robots.

ARENA WALL: The arena wall surrounds the arena (box and arena pillars). It blocks everything (movement, fire, etc.).

CAUTION LINE: Caution lines only affect KillBots that are activating a blue die.

In the step Turn away from Caution Line, a KillBot directly facing a caution line turns in the direction of the small arrow on it.

ENERGY WALL: Robots cannot cross energy walls, and energy walls block effects that push or deal damage. A robot can fire past the end or corner of a wall diagonally.

HIGH-VOLTAGE SPACE: At the beginning of Phase 3: Resolution, the high-voltage space deals 1 lightning damage to anything on its space.

LIGHTNING BARRIER: If a robot crosses a lightning barrier, it takes 1 lightning damage before it enters the space behind the barrier.

PIT/WATER: If a robot enters a pit (or water), it falls in and is immediately destroyed.

Pits and Water can also exist in the corners of an arena.

STARTING SPACE: Robots start the game and reboot in one of the starting spaces on their side of the arena.

VP SPACE: In Phase 0: Preparation, a random VP token is placed, number side up, on the VP space showing the same number.

In Phase 3: Resolution, a robot on a VP space can activate it to collect all VP tokens from it.

WORKSHOP: In Phase 3: Resolution, a robot on a workshop can activate it. Its operator chooses 1 of the following options:


  • Repair: Remove all damage tokens from your robot.
  • Draw: Draw 1 card from a module deck of your choice and place it in your inventory.
Note: The corners of all arenas represent ARENA WALL which blocks everything (movement, fire, etc.).

A - TWIN CITIES

One of the two base arenas with, beside the obligatory VP spaces and workshops, just a few scattered pits.

B - ROM

The second of the two base arenas.

Instead of the scattered pits this arena is surrounded by a water moat which is not less deadly though.

C - RUHRGEBIET

The Ruhrgebiet arena is bursting with energy. High voltage spaces and lightning barriers turn this arena into a circuit-frazzling task.

Especially treacherous are the big pits in the corners of the arena which have devoured many a robot already. Especially treacherous are the big pits around the corners of the arena which have devoured many a robot already. The corners themselves are walls, though.

D - TOKYO

Tokyo is the arena for experienced navigators.

Victory points and workshops are partially unreachable behind energy walls, but just when you think you're save behind such a wall, a slanted laser beam hits you..

Zoom

The area of the arena can be made bigger or smaller horizontally as well as vertically. For that, hover your mouse over the border of the arena area and drag it into the desired direction. If you do this with the right bottom corner of the arena then you can change the size of the arena horizontally and vertically at the same time.

If you change the size of the arena horizontally then this also always affects the size of your playerinfo area: you are changing the horizontal distribution of the space of arena and playerinfo.

If you change the size of the arena vertically you affect the available space for the arena in bottom direction (the aspect ratio of arena width and height always stays the same - no skewing of the arena). In games with more that 2 players and vertical alignment of module cards and controller, you, at the same time, also move the playerinfo areas of the other players up or down respectively.

Sounds complicated? My tip: just try and play around with it! It's worth the investment of some time because your adjusted layout is saved and will be exactly how you have set it in your next turn (given you have activated your browser cookies). Because the respective layout differs, your settings will be saved separately for games with two and for games with more than two players.

Game log coordinates

The game log displays coordinates for example like this: 4 | 2
If you hover with your mouse over such a coordinate, the corresponding field in the arena will be highlighted.

Alignment of module cards and Controller

By default the module cards are displayed above the Controller (alignment "vertically") which leads to a compact layout where everything should visible even on small screens.

However on a large enough screen it's recommended to display the modules to the left of the Controller (alignment "horizontally") because then the Controllers of all players are displayed one below the other. This way the activation of the dice can better be tracked.

Whether vertically or horizontally you can set via the game options in the sidepanel.

Navigation to the predecessor game of a RFL Championship or an All-Arenas-Match

These play modes consist of a series of individual games. In the game window of such an individual game you will find a navigation link to the respective predecessor game in the sidepanel under the tab "game information". This way you can navigate from the last individual game of the series to the start game of the series. You will find the link to the last game of the series in your game history.

General

1a. Q: A robot can fire and move diagonally across the end or corner of an energy wall. Does this include the bend in the wall?
A: No. A robot can't move, fire, TELEPORT, or REMOTE CONTROL through the bend of an energy wall.
(Of course you can move through the bend of an energy wall with the champion module WALL CONTROL.)

1b. Q: Can I reboot on a starting space with a robot or mine?
A: Yes, you simply push the robot or mine one space in the direction of the starting space arrow. You cannot damage a robot or mine this way or push them into pits. Modules (e. g. ANCHOR, MINES) are inactive in Phase 0, thereby mines can be pushed without causing a detonation.

1c. Q: What if two players reach the 5 VP in the same round? Is there a tiebreaker?
A: This is impossible for the following reasons:
  • The dice activation is strictly ordered.
  • In order from lowest starting number (1) to highest (4), the robots activate the spaces they are on, and the game ends immediately when an operator takes their 5th VP token.
  • You resolve the detonations of MINEs in order of starting numbers of the owners of the MINEs.

1d. Q: If my Robot pushes another Robot through a lightning barrier so that it takes the 3rd damage and gets destroyed, do I get a VP for that?
A: Yes, you get the VP. It is similar to pushing into a pit. (See official answer of publisher at BGG)

1e. Q: If a Robot is standing on the location of a newly drawn victory point token, will it be placed beneath that Robot? Or will another victory point token be drawn instead?
A: Yes, it will be placed under the robot. (See post at BGG)

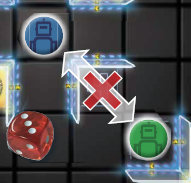
1f. Q: Will Robot_B behind a Lightning Barrier be pushed if Robot_A is destroyed while moving through the barrier?
A:
No, it won't be pushed. (See official answer of publisher at BGG)
Similarly the yellow and blue Robot in the following image are not pushed by the movement of the red Robot if the yellow Robot uses its CONDUCTOR (because then the red Robot is destroyed before it can further push the yellow Robot).
If in contrast the red Robot would push the yellow Robot using its REPULSION BLAST or POWER BEAM then the yellow (and blue) Robot would be pushed in spite of the red Robot getting destroyed by the CONDUCTOR (Reason: REPULSION BLAST and POWER_BEAM have been triggered and their push effect will then be carried out, no matter whether the red Robot gets destroyed afterwards).

1g. Q: If a Robot with an ANCHOR is directly behind a lighning barrier and another Robot moves 1 towards that Robot, but can't due to its ANCHOR, does it get the 1 damage from the lightning barrier?

Modules

2a. Q: Can modules be equipped freely as long as the connections are correct?
A: No. You cannot place another module next to a yellow module (even though the connections fit). You cannot equip modules upside down to create fitting connections.

Blue Modules

3a. Q: Does MOBILITY influence the activation order?
A: No. Aon a blue key is still a, it is only used as a.

3b. Q: Is the push of REPULSION BLAST executed if the Robot with REPULSION BLAST actually did not move (because it stood in front of a wall or pushed another Robot that used its ANCHOR)?
A: Yes. An upgrade can always be triggered if the dice shows the correct number and color. (See official answer of publisher at BGG)

3c. Q: Can a robot move diagonally across the corner of a pit, without falling into it?
A: Yes.

3d. Q: When exactly do I place a die on a non-blue key?
A: You place a to in Phase 1: Programming on a non-blue key. (You activate it as usual in Phase 2: Activation.)

3e. Q: Can I decide not to use the STEERING NOZZLE when activating a to on a non-blue key?
A: No. In this case you already started using the module by placing the to on a non-blue key, so you have to follow through with it.

3f. Q: Is it possible to use TELEPORT through an ENERGY WALL?
A: No. The TELEPORT was made as an alternative to dealing damage with your laser. Thus it should only work in situation when you can deal damage with your laser. As you can't shoot through an energy wall you can't teleport either. (See official answer of publisher at BGG)

3g. Q: If a robot somehow gets destroyed in Phase 3: Resolution, can it collect VP tokens before that?
A: It depends. ;-)

If your robot is destroyed by an "At the beginning of Phase 3: Resolution" effect, it is destroyed before you can activate a VP space.

If the activation of a VP space with a VP token also triggers a damage effect (e.g. activation through a lightning barrier, activation of a space with a mine on it, etc.) you receive damage and are destroyed before collecting VP tokens.

Keep in mind that in Phase 3: Resolution, robots activate their spaces in order of starting numbers.


3h. Q: With TELESCOPIC ARM may the Robot activate an adjacent space that is neither a VP- nor a workshop space ?
A: Yes. The Robot may want to do that in order to reach through a lightning barrier or trigger a mine and get damage that will let it trigger its BOMB to destroy adjacent other Robots and earn victory points. (See official answer of publisher at BGG)

Red Modules

4a. Q: What happens if CROSSFIRE hits a mine?
A: In this case two damage sources are present. The mine immediately causes a detonation [1 ]. However, all damage by the first damage source CROSSFIRE is dealt before the second damage source mine deals any damage.

4b. Q: Do I get a VP, if my GRENADES destroy a robot?
A: Yes. You or rather one of your modules destroys a robot, therefore you gain a VP. The only exception to this general rule is if you destroy your robot yourself. You don't get a VP in this case.

4c. Q: What happens if a mine is pushed by 1 space?
A: As soon as a mine is pushed, it causes a detonation [1 ]. It doesn't matter if you push a mine by 1 or more fields, it immediately detonates on its current space before it can be moved to another space.

For example, if a robot with REPULSION BLAST ends its movement adjacent to a mine, this pushes the mine by 1 space. The mine immediately causes a detonation [1 ]. In this case the following basic rule applies: "If a die or situation triggers multiple effects, always deal damage first."
The mine still detonates adjacent to the robot, so the robot thereby suffers 1 damage (as well as all other adjacent robots or mines). Then the push by REPULSION BLAST is resolved. Since the push is already in motion, it is resolved even if the responsible robot is destroyed by the detonation of the mine.


4d. Q: If two mines are pushed or hit by the same effect, which mine detonates first?
A: You resolve the detonations in order of starting numbers of the owners of the mines.

4e. Q: Do MINES on HIGH-VOLTAGE SPACES explode at the beginning of Phase 3: Resolution ?
A: Yes, because at the beginning of Phase 3: Resolution, the high-voltage space deals 1 lightning damage to anything on its space.

4f. Q: What happens if a mine is in your robot's line of fire?
A: A mine blocks your line of fire and therefore REMOTE CONTROL can't reach a robot behind a mine. In this case you just fire at the mine as usual.

4g. Q: Can you move a die of a remote controlled robot to another control unit?
A: The die has to be moved to another legal key. So unless the controlled robot has RAM EXPANSION, the only legal keys would be on the same control unit.

4h. Q: Can you move a die of a remote controlled robot to a control unit, that has already been activated?
A: No.

4i. Q: Can you use a robot's STEERING NOZZLE when you control it remotely?
A: If you REMOTE CONTROL a robot with an equipped STEERING NOZZLE, you can move a to to any key.

4j. Q: What happens if the activation of the moved die causes that robot to gain a VP?
A: That robot still gets the VP token. You only gain 1 VP if it destroys itself.

4k. Q: Who gets VPs if a remote controlled robot is destroyed by a mine?
A: Only one operator can receive a VP token for destroying a robot. If a remote controlled robot moves into a mine and is destroyed by its detonation, the owner of the mine receives 1 VP token. The only case in which the robot with REMOTE CONTROL receives the VP token is when the mine belongs to the destroyed robot itself (because the activation of the moved die causes that robot to destroy itself).

4l. Q: Does the SAW BLADE deal its damage to a pushed Robot that doesn't actually move (because of a wall)?
A: Yes, a Robot with a SAW BLADE always always deals its damage when it activates its move module, independent of whether it's really moving. (See official answer of publisher at BGG)

Yellow Modules

5a. Q: Can the ANCHOR be used for several pushes caused by the same activation of a die?
A: Yes. If, for example, a robot with REPULSION BLAST moves to your field, you can first use the ANCHOR to be pushed fewer spaces by the movement and then you can use it to be pushed fewer spaces by REPULSION BLAST.

5b. Q: Can I move a SHIELD with damage tokens to the other side of my robot card when equipping modules?
A: Yes.

5c. Q: Does the BOMB still detonate if the destruction of its carrier ends the game?
A: No, the game ends immediately after the destruction of the Robot carrying the BOMB if the destroying Robot then has the necessary number of victory points to win the game. The BOMB doesn't explode anymore. (See official answer of publisher at BGG)

5d. Q: If a Robot with a BOMB and MINES is destroyed, what happens first: the BOMB explodes or the MINES are removed from the arena ?
A: The MINES are removed before the BOMB explodes.

Champion Modules

6a. Q: With a JETPACK and a STEERING NOZZLE equipped, where do you land if you jump diagonally against a corner of a wall or the arena wall?
A: You land on the last space in front of the wall. If a robot is in this space, it is destroyed (because it can't be pushed in the direction of the jump).

6b. Q: With JETPACK and REPULSION BLAST equipped, which push is dealt first?
A: The push by the JETPACK is dealt first. The second push by REPULSION BLAST doesn't affect robots who are no longer adjacent.

6c. Q: Can a robot with JETPACK jump over one robot and then push the next robot in one movement?
A: No, you make one single jump. You jump over all robots and mines in your way. You can't decide to start your jump after you moved a step or two and you can't end your jump short. (See official answer of publisher at BGG)

6d. Q: What happens if there are a mine and a robot in line of fire of the robot with WATER CANNON?
A: The mine explodes, damage by the mine is dealt, but afterwards the push affects the robot in line of fire.

6e. Q: What happens if there are several robots in line of fire of the robot with WATER CANNON, and the first of them is destroyed by the detonation of a mine?
A: There are several options depending on the order of the robots and the mine in line of fire:
  1. mine, robot, robot: The mine explodes, its explosion destroys the robot right behind it; the next robot in line of fire is affected by the push.
  2. robot, mine, robot: The robot is pushed into the mine, its explosion destroys the robot right in front of it; no further robot is affected by the push.
In short: Only 1 robot can be pushed, but several mines can detonate along the way.

6f. Q: Can a robot with WALL CONTROL push other robots through walls?
A: No. A robot with WALL CONTROL can move through an energy wall and then push robots, but the latter will always stop in front of walls.

KillBots

7a. Q: Do I get a victory point if the KillBot, who's facing direction I've changed with my REMOTE CONTROL, runs into its own mine and destroys itself?
A: Yes, but only if it's the killbot's mine. (See official answer of publisher at BGG)

7b. Q: Does a KillBot get a victory point for destroying another KillBot?
A: No. At Yucata the KillBots always fight in a squad and don't earn 1 VP for destroying other members of their squad. (See official answer of publisher at BGG)

7c. Q: Regarding the movement of a KillBot: Does a KillBot spot the victory point token on which another KillBot is standing on?
A: No. A friendly KillBot blocks the line of sight of a KillBot. This means, that he can't see the space the KillBot is standing on and nothing behind him. (See official answer of publisher at BGG)

7d. Q: RFL Championship:

1.) If a KillBot of a KillBot Squad loses as the champion of the arena, does the winner only get the championship modules of the losing KillBot champion of the arena or all championship modules of all KillBots in its squad?

2.) If the KillBot squad wins a bout of the RFL Championship (because they got 7 VP in total), which KillBot of the squad gets the championship modules of the losing champion of the arena?

A:

1.) Only the losing KillBot gives away its championship modules.

2.) The KillBot of the squad with the most VPs gets the championship modules. In case of a tie the KillBot with the lower Starting number gets them.

(See official answer of publisher at BGG)

7e. Q:

Does a KillBot with JETPACK move over a pit or turn according to the caution line arrows?

Does a KillBot with WALL CONTROL ignore the caution lines at the doors?

A:

A KillBot with JETPACK ignores the caution lines around pits. (See official answer of publisher at BGG)

Likewise, a KillBot with WALL CONTROL ignores the caution lines at the doors. A door is connected to the caution line at its bottom, thus if you deactivate a door using WALL CONTROL its caution line is deactivated, too. (See official answer of publisher at BGG)


7f. Q:

Can a KillBot spot across MINES?

 
Privacy statement | Editorial | FAQ To Top YST: 00:00:00 |