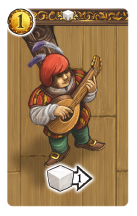
The small village of Tiefenthal is famous for its dimly lit taverns. In
THE TAVERNS OF TIEFENTHAL, players assume the role of tavern owners
who are vying to have the most successful tavern in town. You need
to attract wealthy customers and use their money to expand and improve
your tavern. Do you expand your seating capacity, or the size of your
beer cellar? Hire new staff perhaps? With the right improvements, you
will attract nobles, ensuring your tavern is the talk of the town.
THE TAVERNS OF TIEFENTHAL combines dice placement with deck building to
create a challenging and accessible game for all skill levels – a hallmark
of all Wolfgang Warsch’s games. With multiple ways to expand the
game, the game has hours and hours or replayability.
Now go make sure the beer flows freely and your customers are happy!
GAMEPLAY
The game is played over 8 turns. The Moon tracks the current Turn on
the Turn Track, found along the top of the Monastery Board. Each
Turn is divided into 7 Phases, which are played in this order:
A
B
C
D
E
F
G
A
A New Evening in the Tavern
The Moon is moved to the next space on the Turn Track.
Whenever the Moon moves onto or past (in Module 2) a symbol,
all players receive the corresponding bonus.
List of Round bonuses
B
The Guests Arrive (automatically)
In this Arrival Phase, guests, workers, and some extra equipment will
enter your tavern. Players start by revealing the top card of their deck
and depending on the card drawn, place it face up in the appropriate
spot in their tavern.
Keep drawing Guest Cards from your deck and placing them in their
appropriate spots. Repeat this until all of your Tables (existing Tables
and those that were possibly drawn in this Phase) are occupied, at
which point stop drawing cards. Your Arrival Phase is now over.
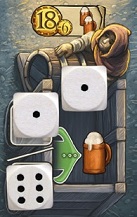
Nobles are very sociable and like to sit together at
the same Table. The first Noble you draw in a turn is placed at a free
Table, as usual. Every Noble you draw after that you place on top
of any previously drawn Nobles, so there will only be 1 Table
of Nobles.
If at any time you need to draw a card from your deck and it is empty,
shuffle your discard pile to create a new face down draw deck. In
Closing Time! (Phase G), all cards you have drawn and placed in your
tavern this Phase will be placed in your discard pile.
C
Here Comes the Server (automatically)
For each Server you drew in Arrival Phase
B take 1 die of your
player color from the general supply, roll it, and place it below your
Tavern Board. These dice are used in the Serving Phase
F.
If you hired a permanent Server on an earlier Turn, you will also receive 1 die of your
player color from that Server.
You can have a maximum of 3 dice of your player color. Any additional
Servers you may have in excess of 3 do not give you any more dice.
First, all players roll the 4 white dice on their Dice Coasters at the
same time, and return them to the Coaster, with the rolled numbers
facing up.
Then, beginning with the Starting Player and continuing
in turn order, each player selects 1 of the white dice on their Coaster
and places it below their Tavern Board.
After all players have chosen 1 white die, everyone passes their Dice Coaster (which now has
3 white dice) to the player on their left. Players repeat the action of
selecting a white die and passing their Coaster to the left 3 more times
until all Coasters are empty and each player has 4 white dice below
their Tavern Board. These dice will be used to perform actions in
Serving Phase F.
Before performing actions in Serving Phase
F,
you must first plan them. To do this place all of the dice below
your Tavern Board (both white dice and dice
in your color earned via Servers)
onto action spaces according to the following rules.

|
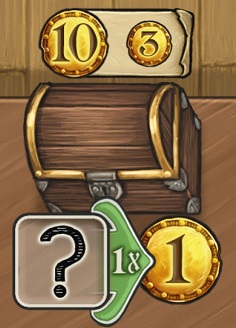
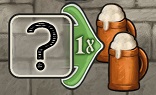
You may place any die on an action space depicting a “?”.
|

|
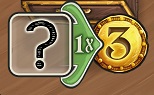
Only 1 die may be placed on a space depicting a green “1x” arrow.
|

|
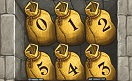
Some action spaces depict a specific number of pips. Only dice of
that exact value may be placed there (exception: using a
Dishwasher).
|

|
Any number of dice may be placed on a space depicting a green “…” arrow
(Monk
and Brewer).
|
Important: Even if you have placed several Nobles at the same Table,
you may still only place 1 die on the topmost Noble Card.
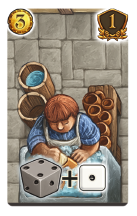
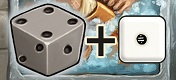
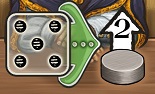
For each Dishwasher in your Tavern, you may place
1 die on any action space and treat it as if it were 1
number higher. Die values do not wrap around; thus a die of
value “6” can never be made into a “1” by using a Dishwasher! You
may use several Dishwashers on the same die to increase its value by
more than 1.
At Yucata, Dishwashers are used automatically whenever you place a die on a space
with a value higher than the die. Their use is symbolized by a little

next to the placed die.
As soon as a player has placed all their dice, they can start their Serving Phase
F.
In the original game, Serving Phase
F
starts only after all players have finished placing their dice.
At Yucata, however, a player carries out Phases
E
and
F
directly in the same turn. They place all their dice, then click "Finish Moving"
and subsequently start Serving Phase
F.
Even in the original game, all players are allowed to rearrange their dice still in Phase
F.
Hence, the online adaption does not lead to any restrictions on players' options or
available information.
On your turn, remove your placed dice one at a time to keep track of the actions you
perform. When you remove a die from a Monk, move your marker
forward on the Monastery Track. You receive Thalers to spend (or
save) by serving Guests, and Beer to spend (or store) when you
use Barbacks and Brewers.
Thalers and Beer can be used to perform the actions described on the following pages (see
“Thaler Actions” and
“Beer Actions”).
At the end of this phase, Thalers and Beer that were not used can be stored in
the Safe or the Beer Storage.

Clicking this symbol (bottom right of your Tavern) automatically activates all dice in the Tavern.
Alternatively each die can be clicked and activated individually. (That way effects that one receives
in one round might be directly used.)
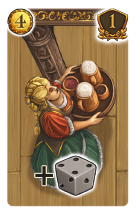
1.The Barback (automatically)
For each Barback you placed in Arrival Phase
B,
you receive exactly 1 Beer.
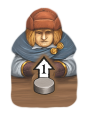
3. Withdrawal from the Cashbox
When removing a die from the Cashbox, receive 1 Thaler,
regardless of the value of the die placed there. If you
have upgraded your Cashbox, receive 3 Thalers instead.
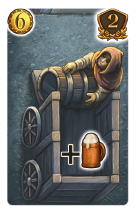
4. The Brewer
Dice of value “1” and “6” may be placed on the Brewer space.
For each die you remove from this space, you receive 1 Beer, plus
1 additional Beer for each Brewer Card next to the printed Brewer
space.
If you have upgraded your Brewer space, you will receive
1 additional Beer for each die you remove from the space.
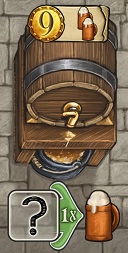
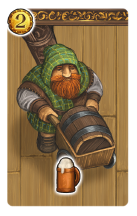
5. The “House Brew” Barrel
The Barrel represents the House Brew of your Tavern.
When removing a die from it, you receive exactly 1 Beer,
regardless of the value of the die.
If you have upgraded your Barrel, you will receive 2 Beers instead.
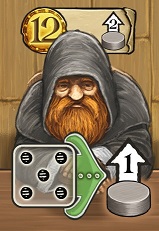
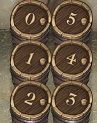
6. The Monk
For each “5” die you remove from the Monk space, you
may move your Monastery Marker 1 space forward on
the Monastery Track. If your Marker passes or ends its
movement on a space showing a bonus, you receive that
bonus immediately.
If you have upgraded your Monk, you may move your
Marker ahead by 2 spaces.
If your Marker moves beyond the “22” space on the Monastery
Track, place your Marker back on the starting space of the Track and
continue its movement from there.
List of bonuses
Which Actions Can be Performed with Thalers and Beer?
Note: There is no fixed order in which actions must be performed
in a Phase, or how and when Thalers and Beer must be earned.
You do not have to perform all Thaler Actions before performing
Beer Actions, and vice versa. Often, mixing the actions is more
advantageous, i.e, first use some of your earned Thalers to pay for an
upgrade, which will in turn earn you more Beer, etc.
Wichtig: Whenever you purchase or earn new cards, place
them face down on the top of your draw deck. This way, they are
immediately available next turn!
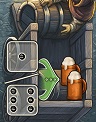
Purchase Tavern Cards
Take 1 or more Tavern Cards (Barback,
Dishwasher,
Server,
Table
or Brewer)
from the general display and place them face down on top of
your draw deck. The cost of each Tavern Card in Thalers is depicted in
the top left corner of the card.
Important: In a given Turn you may buy a maximum of 1 Tavern
Card of each type listed above.
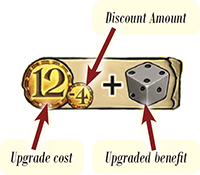
Upgrade Your Tavern or Hire Staff
Each area (Equipment/Furnishing/Staff) of your
Tavern can be permanently upgraded by paying Thalers.
The base cost of an upgrade is the number in the large Thaler symbol,
shown in the banner in the upper left corner of the tile. The benefit of the
upgraded area is depicted on the right side of the banner.
To upgrade an area, flip the tile to its reverse side. From now on,
the tile’s upgraded benefit is in effect. Unless otherwise stated, the
upgraded benefit may be used immediately. If there were any dice on
the upgraded tile, return them to the tile after flipping it over.

Important: Whenever you upgrade a tile, you immediately receive 1 Noble;
place it face down on the top of your draw deck.
Liste of Upgrades
SPECIAL OFFER! The cost of an upgrade can be reduced by
returning 1 or more Tavern Cards from the area being upgraded
to the general supply. Use of the Special Offer is only possible if a
Tavern Card was drawn in Arrival Phase
B
and placed in the area being upgraded (for example, a
Dishwasher
being drawn and placed next to the
Dishwashing Area).
For each Tavern Card returned in this
way, the price of the upgrade will be reduced by the amount shown
in the small Thaler symbol to the immediate right of the base cost.
The price of an upgrade can never be reduced to less than 0.
Beer Actions:

Recruit a Guest
By offering Beer to the local villagers, you can win them
over as new Guests for your tavern.
Take 1 of the Guest Cards from the general display and place it face down on
top of your draw deck. The amount of Beer it costs to
recruit a Guest is depicted in the top left corner of that card.
Important: In a given Turn, you may recruit a maximum
of 1 Guest Card.
When a Guest Card is taken from the general display, you
immediately draw the top card from the face down Guest Card deck
to refill the empty spot in the open display. In the rare event that
the final “3 Beer” Guest Card is taken from its stack, a fifth card
from the face down deck is drawn and placed in the empty spot.
In contrast to the original game, the new guest is placed face down into the display
and only turned over at the end of a player's turn.
If you want to see the guest before the end of your turn, you can click the new card.
However, if you do so, you forfeit the option to undo your turn to before you recruited
the guest.
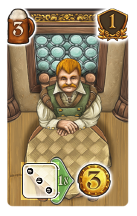
Some Guest Cards show an immediate bonus,
displayed on the table in the center of the card. This
bonus is only awarded once, at the moment the Guest
is recruited. It is not awarded again when the Guest
Card is placed at a Table on a later Turn.
Overview of guest bonuses
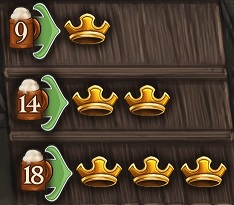
Recruit Nobles
You may recruit Nobles at any time during
Serving Phase. By paying 9, 14 or 18 Beers,
you may take 1, 2 or 3 Nobles and place them
face down on the top of your draw deck. This
does not count against your limit of recruiting
only 1 Guest per Turn.
You may even recruit Nobles more than once in your turn.
Unlike in the original game, Noble cards are not limited at Yucata.
End of Your Serving Phase
As soon as you cannot or do not want to perform any more actions,
your Serving Phase ends. If you have any Thalers or Beer left
over, you can keep up to 2 of them in your Safe or Beer Storage,
respectively. Any remaining Thalers or Beer are lost. An upgraded
Safe or Beer Storage will allow you to keep up to 5 Thalers or Beer, respectively.
At Yucata, all your leftover Thalers and Beers are automatically stored as long as there
is enough room in the respective storage. However, for this to take place, a player must
previously have collected them by activating their dice.
The next player in clockwise order now performs Phases
E and
F
and so on.
Once all players have completed their Serving Phase actions, the
Phase ends.
G
Closing Time! (automatically)
Players now pick up all the cards placed this Turn and place them face
up in a discard pile to the left of their draw deck.
If the Moon is in the last field of the Turn Track, the game ends.
Otherwise, the Beer Mug is passed to the next player in clockwise
order and a new Turn begins with New Evening Phase
A.
Explanation of Symbols
Upgrades effective in the next Turn

Server
You now have a permanent Server, which allows you
to roll a die of your color in Server Phase
C and
later place it on an action space. When you hire the
permanent Server, you do not gain the extra die immediately, but in
the following Turn.
Dishwasher
You now have a permanent Dishwasher in your
tavern. Once per Turn during Planning Phase
E,
you may place 1 die (either a white die or a die of your color) on any
action space and treat it as if it were 1 value higher. The die is not
rotated, but placed showing its actual rolled value. However, a die
of value “6” can never be made into a “1” by using a Dishwasher.
Upgrades effective immediately
Brewer
From now on, more Beer can be delivered to your
tavern. For each die removed from the upgraded
Brewer tile, you will receive 2 Beers (plus 1 Beer for
every Brewer Card present).
Cashbox
From now on, whenever you remove a die from the
Cashbox, you will receive 3 Thalers.
"House Brew"
From now on, whenever you remove a die from the
Barrel, you will receive 2 Beers.
Safe
From now on, you may save up to 5 Thalers in your
Safe. Thalers in excess of 5 are lost.
Beer Storage
From now on, you may store up to 5 Beers in your
Beer Storage. Beers in excess of 5 are lost.
The Monk
From now on, whenever you remove a die from the
Monk, you may move
your Monastery Marker forward 2 spaces.
Bonuses on the Turn Track
As soon as the Moon is moved to the next Turn Track space, all
players immediately receive the bonus shown there:
Turns 1, 4 and 6
Each player takes a Counter Guest and places it at a bar stool at
the Counter. You can only use a Counter Guest once. When you decide to use a Counter Guest,
you must choose between the following two actions it offers (shown
on either side of the Counter Guest):
After filling all of your Tables in Arrival Phase
B, you
may discard the Counter Guest and discard all the cards
you have drawn during this Phase to your discard stack.
You then restart this Phase from the beginning.
ODER
During Serving Phase F,
you may discard a Counter Guest to advance 1 space on the Monastery Track.
You may use more than one Counter Guest in the same Phase
B
or
F.

Turn 2
Each player may choose between taking either a
“3 Beer” Guest Card or a Barback Card. The player
then places the card face down on the top of their draw deck.

Turn 3
Each player may choose between either taking a
die of their color, rolling it, and placing it below
their Tavern Board for use in Phase
E,
or taking a
Dishwasher
Card and placing it face down on the top of their draw deck.

Turn 5
Each player may choose between taking a
Table Card
or a Brewer Card.
The player then places the card
face down on the top of their draw deck.

Turn 7
Each player may choose between either taking a
die of their color, rolling it, and placing it below
their Tavern Board for use in Phase
E,
or taking a Barback Card and
placing it face down on the top of their draw deck.

Turn 8
Each player may immediately upgrade any area of
their Tavern for free by flipping over the tile of their
choice. However, they do not gain a Noble Card for
this! The upgraded benefit is immediately available
in the current Turn.
Bonuses on the Monastery Track and on Guest Cards
Any bonuses earned on the Monastery Track or from purchased
Guest Cards must be taken immediately or they are lost.


Monastery Track Movements
Move your Monastery Marker 1 or 2 spaces on
the Monastery Track. If you move past or finish
your movement on a space showing a bonus, you
receive that bonus immediately.

Service Denied!
You may immediately remove 1 Regular or other Guest
Card seated at 1 of your Tables from the game. You may
not remove a Guest from your draw deck or discard stack.
You may only remove a Guest if there is no die currently
on it. The Table from where the Guest was removed is
not refilled.

Noble
Take 1 Noble Card and place it face down on
top of your draw deck.
MODULE 3
“Your Reputation Precedes You...”
A good reputation is the nuts and bolts of any flourishing tavern. If a tavern
is managed wisely and with balance, the path to success is almost guaranteed!
Setup
The 10 Guest Cards with a white die symbol at the
top are shuffled into the stack of Guest Cards. The Monastery Board
is laid out with the winter side up (with snow). The
Schnapps Tiles are place in the 3 recesses in the Monastery Board so that
the Schnapps are not visible. The 16
Bard Cards are placed in a face up pile
next to the other Tavern Cards.
The players' Tavern Boards are prepared so that the
Reputation Track is visible, but the
little signature on it is not visible. Each player receives a Reputation Marker (white
cube), which is placed on the Bartender.
The rest of the game is set up as described for Module 1
and Module 2.
The Reputation Track

The Reputation Track consists of 11 spaces (12 spaces when using
Module 5).
Whenever your Reputation increases, move your Reputation
Marker clockwise on the Track. When you would move past the Crown,
return to the beginning of the Reputation Track. It wraps around so that
you can earn additional bonuses.
You may not forfeit steps an the Reputation Track (exception:
Bard Cards).
If your Reputation Marker reaches or passes one of the following spaces,
you immediately receive the specified bonus:

Take 1 Noble card and place it face down on top of your draw deck.
The Reputation Phase (automatically)
After you have placed all of your dice in Planning Phase
E,
and before you perform your first action in Serving Phase
F,
you now complete an additional sub-phase: The Reputation Phase.
First, count how many Thalers you will earn from your dice placement.
This is the sum of:
- Thalers that you receive via Guest Cards.
- 1 or 3 Thalers that you receive via the Cashbox.
Then, count how many Beers you will earn.
This is the sum of:
-
Beers you receive via the Brewer.
- 1 or 2 Beer/s you receive via the Barrel.
-
1 Beer for each Barback placed next to your Beer Storage.
You now move your Reputation Marker a number of spaces equal to the
lesser of these 2 totals.
Important: For the calculation of your Thalers and Beer, count only the
action spaces containing dice, as well as the
Barback. All Thalers and
Beer that are earned by other methods are not counted here. Therefore,
do not count Thalers in the Safe or Beer in the Beer Storage, or those that
you receive via Entertainers,
the Monastery Track bonuses or instant
Guest bonuses.
Even if you upgrade an area during Serving Phase
F,
which would result in a higher production of Thalers or Beer, that additional
production does not count since the Reputation Phase is performed
before Serving Phase F.
The Bards
The Bards are performers you can hire for your Tavern.
During Serving Phase
F,
you can hire a Bard for 1 Thaler.
Like all other Tavern Cards, the Bards are placed face down
on the top of your draw deck when hired.
If you draw a Bard while filling your Tavern in Arrival Phase
B,
place it to the right of your Beer Storage (in the same row where
Barbacks are placed).
The Serenade of the Bard
For each Bard drawn during Arrival Phase
B,
you may move your Reputation Marker
1 space ahead on the Reputation Track in Serving Phase
F.
New Guests
If you recruit a Guest Card that has a Reputation
Marker symbol, immediately move your Reputation Marker forward
a number of spaces equal to the number depicted on the card.
If you recruit a Guest Card that has a Schnapps symbol,
you immediately receive 1 Schnapps Token.
These bonuses are only rewarded when the corresponding Guest is recruited.
They are not activated when placing these Guests at Tables during later turns.
Game End
In addition to the ways of scoring Victory Points from the previous
Modules, in Module 3 you also earn Victory Points for your
Reputation
at the end of the game. These Victory Points depend on the position of
your Reputation Marker. If your Marker is on a number, you score that
many points. If your Marker is on a
Schnapps space, you score
points equal to the number on the previous space. If your Marker is on
the Crown, you score no additional points (you already received a Noble card as
a reward for arriving there).
MODULE 5
“The later the hour, the nicer the guests...”
Your reputation might precede you, but can you produce a guest book full of
signatures of satisfied customers as proof? You better hope so if you want to
impress those indecisive Nobles!
Setup
The game is set up as described for Modules
1,
2,
3 and
4.
With this Module, however, the small
cutout at the bottom of the Reputation Track
is flipped over so the signature side is face up. Each player
receives a Guestbook.
The Signature Tiles are placed in the general supply.
In contrast to the original game, the Signature Tiles are not placed onto the Guests in the
display. Instead, players automatically receive a Signature Tile when they take one of the Guests.
The Guest Book
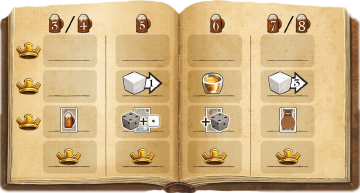
Your Guest Book consists of 4 columns that you fill from top to bottom
with Signature Tiles. There are 2 ways to fill your Guest Book:
-
Whenever you recruit a Guest with Beer, take a Signature Tile
and put it in your Guest Book (the Guest has written
their name in the Guest Book). Place the Tile in the column that
corresponds to the value of the Guest you just recruited (3/4 Beer, 5
Beer, 6 Beer or 7/8 Beer).
-
If your Reputation
Marker reaches or passes the Signature
symbol on the Reputation Track, take a Signature Tile
from the general supply and place it in any column of your
Guest Book (remembering to fill from top to bottom!).
Certain spaces of the Guest Book depict bonuses. If you cover
one with a Signature Tile, you receive that bonus immediately. If
you are awarded a Signature for a column that is already full, the
Signature cannot be placed and is simply forfeited.
You receive the following bonuses immediately upon placing a
Signature Tile on the corresponding space:

Take 1 Barback and place it
face down on top of your draw deck.

Take 1 Dishwasher
and place it face down on top of your draw deck.

Take 1 Server
and place it face down on top of your draw deck.

Take 1 Table
and place it face down on top of your draw deck.


Move your Reputation Marker forward 1 or
3 spaces, respectively.

Take 1 Noble and place it face down on top of your
draw deck.

Take 1 Schnapps Token from the
general supply.
If you place a Signature Tile in the last empty space in a horizontal row
of your Guest Book, you immediately receive 1 Noble and place it face
down on top of your draw deck.
As opposed to the original game, Signature Tiles are not limited at Yucata.
Note that even when playing with Module 5, you may only recruit 1 new
Guest per Turn.
All other rules from Modules 1,
2,
3 and
4 remain the same.