If you are reading these rules for the first time, ignore the text along the right hand side. These rules serve as a summary to help you quickly familiarize yourself with the game.
The players embody railroad moguls who have been commissioned to build the Trans-Siberian Railway, as well as
two additional railroads. In addition to track construction, the players will purchase new locomotives, promote
industrialization, and hire workers and engineers. All this is done in the lofty pursuit of acquiring the most victory
points – the truest measurement of a player’s rail building skills.
The areas of the board - possible actions
- Track extension
- Locomotives and factories
- Industrialization
- Auxiliary actions
- Engineers
- Turn order track
Track extension
Each player board depicts 3 railroads, which can be independently extended over the course of the game. The better each of their railroads is developed, the more points each player will score at the end of each round.
To advance their tracks players place the required number of workers on one of the track extension action spaces. You may choose to distribute track advancements between multiple railroads.
In order to advance the tracks in the other colors, you must first earn them. Your earn these tracks by advancing
the black track to spaces 2, 6, 10 and 15 on the Trans-Siberian.
The action at the bottom of the area of rail extension (move a black or gray track) is the only one which may be occupied by several
players as well as more than once by each player.
The track extension actions are among the most important in the game
Each player’s personal player board depicts 3 railroads, which can be independently extended over the course of the game.
These railroads will be called Trans-Siberian railroad, Petersburg railroad and Kiev railroad for the remainder of this rulebook.
The better each of their railroads is developed, the more points each player will score at the end of each round.
First, place the required number of workers on one of the track extension action spaces. Then, advance the
appropriate track(s) on your player board the number of spaces indicated on the action space.
You may choose to distribute track advancements between multiple railroads.
And so ends the action.
In order to earn more points, the players should strive to extend their railroads
through the advancement of these tracks. To maximize their progress, players will
also need to advance tracks of other colors, indicating tracks of higher value.
In order to advance the tracks in the other colors, you must first earn them. Your earn these tracks by advancing
the black track to spaces 2, 6, 10 and 15 on the Trans-Siberian.
Once a player has advanced the black track to or beyond space 2 of the Trans-Siberian, she immediately takes 3 gray tracks from the general
supply. She places these new tracks to the left of each railroad depicted on
her player board. She may now begin advancing her gray tracks.
When a player’s black track reaches or passes space 6 of the Trans-Siberian, the player
receives 3 brown tracks, space 10 grants access to 2 natural tracks and space 15 to 1 white track.
The two actions at the bottom of the area of rail extension
 To use this action, you must place a worker and 1 rouble. This action gives you two advancements of
your choice (split between 1 or 2 tracks).
To use this action, you must place a worker and 1 rouble. This action gives you two advancements of
your choice (split between 1 or 2 tracks).
 This is the only action in the game that may be used more than once during a round. When a player places a worker there, she must then
move either a black or a gray track. The action space is not considered occupied and may be used again during the same round by any player (including players
who have already used it).
This is the only action in the game that may be used more than once during a round. When a player places a worker there, she must then
move either a black or a gray track. The action space is not considered occupied and may be used again during the same round by any player (including players
who have already used it).
The following must be observed when advancing tracks:
-
Tracks advance in a specific unchangeable order:
first black, then gray, brown, natural and finally white.
-
A track can only be moved onto an empty space. A track
may never catch up to or go beyond the track that is in
front of it. As such, the order is always respected.
- Advancements may be split between different railroads.
-
Not all railroads use every track color. Your player board
shows which colors go with which railroads.
Locomotives and factories
Building locomotives:
The player takes 1 locomotive from the lowest numbered pile in the supply and places this locomotive in front of one of the 3 railroads of his
player board.
There can be up to 2 locomotives on the Trans-Siberian (their range will be added).
During each end of round scoring, you will only score points for the spaces that your locomotives can reach.
Upgrading locomotives:
To upgrade a locomotive, simply replace it with one whose number is higher.
The “old” locomotive is not lost: you can move it to one of the other two railroads.
When a player is unable to place a locomotive, she flips it purple side up and places it next to the locomotive
supply. That locomotive will now be used as a factory.
Factories:
A factory is depicted on the back of each locomotive. A factory can be used to benefit from a unique ability. The ability
of a factory is also depicted in the top left corner of a locomotive.
Building Factories:
The player takes a locomotive from the lowest numbered pile in the supply, flip it and place it on the next free space
at the bottom of his player board.
If there are some factories next to the locomotive piles, the player may choose to take one of these factories.
If you manage to fill your 5 factory spaces, you can replace any of your factories with the new one.
Building locomotives
First, place the required number of workers on one of the locomotive action spaces. Then, take 1
locomotive from the lowest numbered pile in the supply. Finally, place this locomotive in front of one of the 3 railroads of your
player board.
There can be only 1 locomotive on these railroads: St.Petersburg and Kiev. There can be up to 2 locomotives
on the Trans-Siberian. The number of a locomotive indicates the number of spaces it can reach on a railroad.
The Trans-Siberian is the only railroad where there can be 2 locomotives. One of these is placed next to the board
to the left of the track, while the other is placed directly on the board. You must add up the value of both locomotives
on the Trans-Siberian to determine the total number of spaces that can be reached on this railroad.
Upgrading locomotives
To upgrade a locomotive, simply replace it with one whose number is higher.
The “old” locomotive is not lost: you can move it to one of the other two railroads.
When you move an “old” locomotive to a railroad where there is a locomotive, this can create a chain reaction.
When a player is unable to place a locomotive, she flips it purple side up and places it next to the locomotive
supply. That locomotive will now be used as a factory. What are factories? They will be
explained in the next section.
During each end of round scoring, you will only score points for the spaces that your locomotives can reach.
Furthermore, special spaces are spread amongst your railroads, and in order to benefit from
their advantage, you must first reach them with a locomotive.
Factories
Factories are essential to the industrial development of your railroad network. Not only that, but each factory can
be used to benefit from a unique ability.
A factory is depicted on the back of each locomotive. Locomotives with the same number all have the same factory
on their back. Each factory grants its owner a special ability that she can benefit from. The ability a factory
possesses is also depicted in the top left corner of a locomotive.
Building Factories
To build a factory, you must use the same actions that were required to build locomotives.
First, place the required number of workers on the action space. Then, just like you did for the locomotives, take a
locomotive from the lowest numbered pile in the supply.
Flip this locomotive purple side up (with the factory) and place it under your board, in one of the 5 spaces reserved
for factories. You must place your factories from left to right. If a player wishes to build a factory and there
are some factories next to the locomotive piles, the player will be able to choose between one of the face up factories
or one from the lowest numbered pile.
If you manage to fill your 5 factory spaces, you can replace them with other factories. When you wish to replace
a factory, you must first place one of your “old” factories in the general supply, to the left of the locomotive piles,
factory side up (purple side). Then, you place the new factory in the recently freed space. You do not have to
replace your factories from left to right.
Note: How factories are used will be covered in the next section “Industrialization”.
Industrialization
Advance your
Industry marker the number of spaces indicated by the chosen action space.
You cannot move your Industry marker into or beyond a gap. You have to build a factory first.
Moving your Industry marker on a industry space of a factory triggers the ability of that factory.
Another type of action is possible: industrialization. Industrialization lets you score points during the scoring phase
at the end of a round, and also gives you access to the abilities of your factories.
First, place the required number of workers on one of the industrialization action spaces. Then, advance your
Industry marker the number of spaces indicated by the chosen action space. You will notice that there is a gap after the first 4 spaces of your
industry track. You cannot move your Industry marker into or beyond this gap.
For your Industry marker to progress on your industry track, you must first fill these gaps with factories. This
represents another way in which your industries are improving.
Each factory features an industry space  onto which your Industry marker can move.
After each factory there is another industry space that becomes available.
onto which your Industry marker can move.
After each factory there is another industry space that becomes available.
When a marker moves onto a factory, you must then immediately use that factory’s ability. If you are unable to
use it at that time, the effect is cancelled.
The various abilities are explained here.
Auxiliary actions
1 Doubler:
Place a doubler above the Trans-Siberian. A doubler multiplies by 2 (doubles) the value of the space below it during scoring.
2 Roubles
Take 2 roubles from the supply
2 temporary workers
Take the 2 turquoise temporary workers. These workers act as if they were your own color. You may not keep the temporary workers for the next round.
-
1 Doubler
Place 1 worker on this action space to take 1 doubler from the supply. Then, you must place
this doubler on an empty dashed space above the Trans-Siberian (and only there). You
must fill these 8 spaces from left to right and there may only be 1 doubler per space. A track does not have to be present for you to be
able to place a doubler. A doubler multiplies by 2 (doubles) the value of the space below it during scoring.
-
2 Roubles
Place 1 worker on this action space to take 2 roubles from the supply and then place them in front of you.
Roubles may replace workers when playing on action spaces.
Although roubles can replace workers, workers cannot replace roubles. Like action spaces occupied by one or more
workers, an action space that is occupied by a rouble cannot be used again during this round.
-
2 temporary workers
Place 1 worker on this action space to take the 2 turquoise temporary workers. You must
use these workers during this round, and they act as if they were your own color.
Just like roubles, you can use temporary workers by themselves (individually or together), or combine them with
workers of your own color or roubles.
You may not keep the temporary workers for the next round.
Engineers
Hiring engineers:
Each round, only one engineer can be hired. To hire an engineer, you must place a rouble on the hiring action space. Place the engineer
close to your player board. Hired engineer may only be used by the player himself once per round.
The 2 light side up engineers on the game board:
Both engineers that are placed light side up on the board allow players to use their respective action. Players are
unable to hire these engineers.
Preview:
The 4 left-most engineers may neither be hired not used. Seeing them lets players plan ahead for the rounds to come.
Hiring engineers
Engineers can help players during the game with their special skills. They can also give players a certain number of
points at the end of the game. Each round, only one engineer can be hired. The engineer that can be hired is located in the right-most space
(the hiring space) of the engineer area of the game board. To hire an engineer, you must place a rouble on the hiring action space. You then take the engineer from this
space and place it, light side up, close to your player board.
The light side of each engineer shows an action. If a player has one or more engineers next to his game board, he
may use these actions just like those from the game board. A player may use his engineer actions,
even if he is unable to use the action completely.
Another advantage to having “your own engineers” is that they are not “time sensitive”, meaning that since the
other players do not have access to them, you are able to use them exactly when you need to.
The 2 light side up engineers on the game board
Both engineers that are placed light side up on the board allow players to use their respective action. Players are
unable to hire these engineers. They represent extra action spaces available to all players, just like all other action
spaces on the game board (track extension, locomotive, etc.). And just like all other action spaces on the board,
these actions can only be used once per round.
The 4 left-most engineers
These engineers can neither be used nor hired. However, at the end of a round, every engineer is moved one space to the right.
In other words, these engineers will become available during future rounds. Seeing them lets players plan ahead for the rounds to come.
Turn order
The turn order track is used to determine player order.
When a player does not wish to or cannot continue playing, she passes. The other players keep playing, one after the other, until every player has passed.
You can place one of your workers under the first or second position of the turn order track indicating that you want to play
at that position in the next round.
You may not place a worker on the action space under your current position.
Once the turn order has been reorganized, players
who placed a worker on the turn order action spaces can each move their worker to a free action space.
In this game, players do not play in clockwise order. The turn order track is used to determine player order. The
player occupying the first position plays first, followed by the player occupying the second position, and so forth.
Once the last player has taken her turn, it is once again the first player’s turn to play.
When a player does not wish to or cannot continue playing, she passes; this means that for the remainder of this
round, she will not be able to play. Finally, to show that she is out of this round, she flips her Turn Order card and
immediately scores the points shown on the back of her card.
The other players keep playing, one after the other, until every player has passed.
Note: Even if a player runs out of workers, this does not mean that she must pass right away. She can continue
performing actions with roubles.
You can place one of your workers under the first or second position of the turn order track.
This will be your position in the turn order sequence of the following round.
You may not place a worker on the action space under your current position
in the turn order, nor may you occupy both turn order action spaces.
Special case: If the first player places a worker on the 2nd position (probably because she does not wish to move further back) and that no other
player places a worker on the 1st position, the turn order will not change. The player still replaces her worker.
A worker on a turn order action space provides another benefit. Once the turn order has been reorganized, players
who placed a worker on the turn order action spaces can each move their worker to a free action space.
The player whose worker occupies the 2nd position is first to move her worker. She takes her worker from the turn
order action space and moves it to a free action space of her choice (this can be one of her engineers). She then
performs the corresponding action.
Then, the player who placed his worker on the 1st space does the same, following the same rules.
When moving your worker, you must observe the following:
-
You may only move your worker to an action that
requires exactly 1 worker (i.e. you may not combine it with other workers, temporary workers, or roubles).
- If there are no better options, you can always use the bottom track extension action
Player board
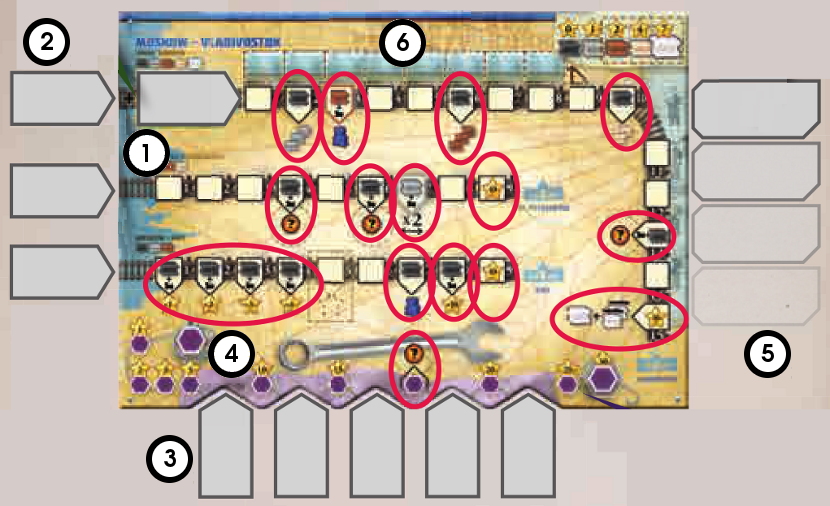
- The 3 railroads Trans-Siberian, Petersburg and Kiev
- room for locomotives
- room for factories
- Industrialization
- room for the engineers
- 8 spaces for doublers
The spaces circled in red give you various advantages.
To get these advantages (shown below the space or next to it), you must first fulfill certain conditions.
Before acquiring the advantage that a space gives, you must always at least reach the space
with a track. Sometimes, a locomotive must also reach that space. The following pages present these special
spaces in two groups: those that do not require a locomotive and those that do.
Without a locomotive
On spaces, 2, 6, 10 and 15 of the Trans-Siberian, you get the tracks depicted below each space.
At space 15 you can immediately advance the white track up to 2 spaces.
When you reach the last space of a railroad with the
black track,you immediately score 10 points.
If you reach space 7 of the Kiev railroad with your black track, you get an extra worker. You may use this worker immediately and for the rest of the game.
-
On spaces, 2, 6 and 10 of the Trans-Siberian, you get the tracks depicted below each space, as
explained in section building tracks.
Space 15 allows you to get the white track. On top of that, you can immediately advance
it up to 2 spaces. You must follow the usual rules (only on empty spaces, no passing), otherwise you
lose the advancement(s) you cannot use.
-
When you reach the last space of a railroad with the
black track,you immediately score 10 points. A railroad may not be extended beyond the last illustrated space.
-
If you reach space 7 of the Kiev railroad with your black track, you immediately receive one
worker of your color from the general supply. You may use this worker immediately and for the rest of the game.
With a locomotive
If you reach space 3 of the Trans-Siberian with your brown track and a locomotive, you get an extra worker.
If you reach space 7 of the St.Petersburg railroad with your gray track and a locomotive, the value of every scored space of this railroad is doubled during the scoring phase.
If you reach spaces 1 through 4 or space 8 of the Kiev railroad with your black track and a locomotive, you score the points
depicted in the stars during future scoring phases.
If you reach space 13 of the Trans-Siberian, or spaces 4 or 6 of the St.Petersburg railroad with your
black track and a locomotive, you choose one of your 7  tokens.
-
If you reach space 3 of the Trans-Siberian with your brown track and a locomotive, you
immediately receive one worker of your color from the general supply. You may use this worker immediately and for the rest of the game
- If you reach space 7 of the St.Petersburg railroad with your gray track and a locomotive, the value of every scored space of this railroad is doubled during the scoring phase.
-
If you reach spaces 1 through 4 or space 8 of the Kiev railroad with your black track and a locomotive, you score the points
depicted in the stars during future scoring phases. These points are cumulative. For example, if your track is on space 3 and you have a #3 locomotive (at least),
in each future scoring you will score 6 bonus points (1+2+3 points).
-
If you reach space 13 of the Trans-Siberian, or spaces 4 or 6 of the St.Petersburg railroad with your
black track and a locomotive, you choose one of your 7
tokens, apply its effect and then place that token in the dashed space with a .
This space may not be used again to receive another token.
Industry track
If you reach the space with your Industry marker, choose one of your
tokens.
To receive this advantage, your Industry marker must reach this space on the industry track.
(There is no track or locomotive requirement for this space.) You then proceed as described
above for the spaces.
This space may not be used again to receive another token.
Scoring phase
At the end of each round the scoring phase take place.
Scoring the 3 railroads
Only spaces reached by a locomotive are scored.
Each track on a railroad can score points as shown in the upper right corner of the board.
Empty spaces behind a track count as being occupied by tracks of the same color.
Scoring the industrialization
The players score the points noted on the space on the industry track currently occupied
by your Industry marker. Spaces that do not show any points score the points of the first previous space showing points.
At the end of each round, once every player has passed and the turn order has been reorganized, the scoring phase happens.
These two elements on each player’s individual boards are scored:
- their 3 railroads
- their industrialization progress
Scoring the 3 railroads
- In principle, only spaces reached by a locomotive are scored.
- Each track on a railroad can score points. The value of each track is determined by its color, as shown in the upper right corner of the board.
- A track scores points for the space it occupies and all empty spaces behind it. These empty spaces count as being occupied by tracks of the same color (=virtual tracks).
Scoring the industrialization
In addition to your tracks, you also score the points noted on the space on the industry track currently occupied
by your Industry marker. Spaces that do not show any points (for example, the factories) are worth the same
amount of points as the first previous space worth points.
Setup and Game Play
Each player takes the Germany board in her color.
The main railroad München has a switch. You will have to decide in which direction you would like to build.
The other two other railroads have several areas
with dashed outline sin which you may place railroad extensions to design these
railroads as you see fit.
Instead of using the player boards included in the base game, the player takes the Germany board in their color.
Basic gameplay remains the same.
The main railroad (München) has a switch, beyond which lie two separate destinations. You will have to decide in which direction
(Hamburg or Berlin) you would like to build.
The other two other railroads (Dresden and Nürnberg-Fürth) have several areas
with dashed outlines, in which you may place railroad extensions to design these
railroads as you see fit.
Unlike the railroads in the base game, these
railroads are not yet fully "planned."
There are 3 ways you can influence the
development of your railroads.
The switch on the München railroad
To proceed past space 8 of the München railroad, you must decide whether you will build towards
Hamburg or Berlin.
The longer route towards Hamburg will earn you more points and
eventually grant you access to white tracks.
The shorter route to Berlin will allow you to reach
specific upgrades earlier.
To proceed past space 8 of the München railroad, you must decide whether you will build towards
Hamburg or Berlin.
On one hand, the longer route towards Hamburg will earn you more points and
eventually grant you access to white tracks.
On the other hand, taking the shorter route to Berlin will allow you to reach
specific upgrades earlier.
When advancing the black track to the space 9 of the München railroad, you
must decide to which space 9 you will advance, as it determines where further
advancements must be made. You may not change the destination of this
railroad for the rest of the game. You may not "reverse course" and the tracks of
other colors must also be advanced towards the same destination.
The railroad extensions
Whenever you advance the black track to a dashed
outlined area you must place a railroad extension with corresponding length inside this area.
Some areas of the Dresden and Nürnberg-Fürth railroads have dashed
outlines. There is an intermediate station located on the first space of each
of these areas. These intermediate stations are Hannover (on the Dresden railroad),
Würzburg and Frankfurt (on the Nürnberg-Fürth railroad).
Whenever you advance the black track on these railroads to one of these
intermediate stations, you must place a railroad extension at the corresponding
outlined area.
When doing so, you must observe the following rules:
-
You must choose and place one of the available railroad extensions that fits the corresponding outlined area
(2-space, 3-space, or 4-space) and immediately place a black track on the first space of this new extension.
- If you satisfy the conditions for a particular special space, you receive the depicted advantage.
Note: The sooner you advance to a particular intermediate station, the greater your selection will be when choosing the
corresponding railroad extension
Special spaces on the Germany board and railroad extensions
The Kiev medal, if acquired, is placed on space 5 of the Dresden railroad.
Immediate effects:
As soon as you satisfy the conditions for one of these
spaces, you immediately and only once receive the depicted advantage.
Income:
As soon as you satisfy the conditions for one of these spaces, immediately
take one of the income markers.
The Kiev medal, if acquired, is placed on space 5 of the Dresden railroad. Apart from this tiny
geographical variation, the rules regarding the Kiev medal remain the same.
Immediate effects: As soon as you satisfy the conditions for one of these
spaces, you immediately and only once receive the depicted advantage. These
advantages include: 2 industry advancements, 2 coins, or 1 locomotive/factory.
An additional industry marker: Once you advance a black track to this space,
you may take an additional industry marker and place it on space 0 of your
industry track. You may still
get your second industry marker with the
token, making it possible to have 3
industry markers on your industry track.
Income: As soon as you satisfy the conditions for one of these spaces, immediately
take one of the income markers and place it faceup next to your board.
If you satisfy the conditions for another one of these spaces, you simply take
another income marker.
You may use each of your income markers once per round (including the round
you acquire it) in order to receive the depicted advantage.
When using an income marker, you must observe the following rules:
- You may only use an income marker during your own turn, at which time you immediately receive the depicted advantage.
- You may use multiple income markers in the same turn.
- You may use an income marker before or after you have placed workers (or coins).
- You may even choose to use an income marker when you are unable to fully use its advantage.
-
You may not use income markers once you have passed, when you are relocating a worker on the turn order
track, or during scoring.
- Once you have used an income marker, flip it facedown.
- After the scoring phase, flip all income markers faceup.
The natural colored tracks
The natural tracks basically may be used on all three railroads of the Germany board. But you may only build the natural tracks on two railroads of your choice.
The natural tracks may be used on all three railroads of the Germany board. However, as in the base game, you
only have 2 of these tracks to use. Therefore, you must decide on which railroads you wish to advance these natural
tracks.
Setup
What follows is a description of the setup for a
4-player game. Changes for playing with
2 or
3 players are described later.
The coal board is placed on the game board.
Shuffle the 12 foundries and place 2 of them faceup next to the game board.
You will play 1 fewer round when using the Coal module (place 1 blockade on an engineer space).
Each player gets 1 coal and 1 extra coin.
We recommend using the Mining engineer, the tokens with 4 coal and the
card with the coal factory.
The online implementation will add those components automatically if the coal module is chosen.
Add the new starting bonus card to the others.
Place the Coal board on the game board, with the side featuring 3 action spaces faceup.
Shuffle the 12 foundries and place them as a facedown supply near the board. The back of these tiles depict a
boilerman. Then draw two foundries and place them faceup next to the facedown supply.
You will play 1 fewer round when using the Coal module (place 1 blockade on an engineer space).
Because of this, you will place 1 fewer A engineer than in the base game.
Each player starts with the same components as they do in the base game, as well as 1 coal
and 1 additional coin.
If you wish to use the new components, set them up now. We recommend using the Mining engineer, the
tokens with 4 coal and the
card with the coal factory. The online implementation will add those components automatically if the coal module is chosen.
Shuffle the new Starting Bonus card with the others. You now have another Starting Bonus card to choose
from. A player choosing this new card receives 1 additional coal.
The action spaces in detail
The boilerman
If you use the lower action on the coal board take a boilerman
 and place it next to
one of your locomotives or factories.
and place it next to
one of your locomotives or factories.
Adding a boilerman to a locomotive
The boilerman increases the power of the locomotive by 1, meaning that you can reach 1
space further on the corresponding railroad. If doing so satisfies the condition of a special
space on your board, you gain the advantage immediately.
Each locomotive may only have 1 boilerman.
Adding a boilerman to a locomotive is permanent. If you return
a locomotive with a boilerman to the supply, the boilerman is removed from the game.
Adding a boilerman to a factory
When you move an industry marker to a factory manned by a boilerman, you perform
an improved version of that action:
Factories with 1 ability: Immediately use the factory a second time.
Factories with 2 or more abilities: Use one of the abilities a second time.
Point scoring factories: Score (only) 1 additional point.
Each factory may only have 1 boilerman
Adding a boilerman to a factory is permanent. If you return
a factory with a boilerman to the supply, the boilerman is removed from the game.
To use the lower action on the coal board, you must use 2 coal from your personal supply. Take
the top tile of the facedown foundry supply and place it as a boilerman
( side up) next to
one of your locomotives or factories.
What happens when I add a boilerman to my locomotive?
The boilerman increases the power of the locomotive by 1, meaning that you can reach 1
space further on the corresponding railroad. If doing so satisfies the condition of a special
space on your board, you gain the advantage immediately. For all intents and purposes,
this locomotive's actual number is now 1 higher than its printed value.
Each locomotive may only have 1 boilerman.
Adding a boilerman to a locomotive is permanent. You may not move a boilerman to a different locomotive or
factory. If you move such a locomotive to a different railroad, the boilerman moves along with it. If you return
a locomotive with a boilerman to the supply, the boilerman is removed from the game.
What happens when I add a boilerman to a factory?
When you move an industry marker to a factory manned by a boilerman, you perform
an improved version of that action.
Depending on the ability of the factory, this can have different effects:
Factories with 1 ability: Immediately use the factory a second time.
Factories with 2 or more abilities: Use one of the abilities a second time.
Point scoring factories: Score (only) 1 additional point.
You are not required to use the effect of a factory manned by a boilerman in full.
Each factory may only have 1 boilerman.
As with the locomotive, the boilerman becomes a permanent part of the factory. You may not move a boilerman
to a different locomotive or factory. If you return a factory with a boilerman to the supply, the boilerman is
removed from the game.
The foundries
You may use your foundries once per round, even if cannot perform its effect in full.
You may choose to close a foundry immediately after using it. To do so flip the foundry and place
it as a boilerman next to a locomotive or factory.
The appendix contains an overview of available foundries.
You may use each of the foundries you have collected once per round. To use a foundry, you
must place 2 coal from your personal supply. You may use a foundry
even when you cannot perform its effect in full.
Important: You may not use the faceup foundries in the general supply.
Closing a foundry:
You may choose to close a foundry immediately after using it. Doing so allows you to flip the foundry and place
it as a boilerman next to a locomotive or factory. Return the coal on the used foundry to the
general supply. You may never choose to reopen this foundry. Its action is now lost.
Important: You can only choose to close a foundry immediately after using it.
The appendix contains an overview of available foundries.
The coal factory
The third way to use coal is at the coal factory, which can be acquired by taking the new
card. This factory depicts an action that may be used whenever you activate it.
For a detailed description of the coal factory see appendix.
Solo Variant
You want to play, but all of your friends are at work? The Yucata server is down? Are you just looking for a
challenge? Let us introduce you to your new friend, Emil (who is also bored)
Setup
Set the game up as you would for 2 players.
Cover the action space 2 coins.
Take 5 coins instead of just one.
You will not need the Last Round marker, the Turn Order cards, or the Starting Bonus cards.
Emil begins with a supply of 6 workers.
Set the game up as you
would for 2 players.
Cover the Take 2 coins action with a blockade. This space is not available in the solo game.
You will not need the Last Round marker, the Turn Order cards, or the Starting Bonus cards.
They can be put back in the box.
Take 5 coins instead of just one. You also will not need the pawn
for the turn order track, as the turn order track serves no purpose in the solo game.
Emil, your opponent, is represented by a deck of cards.
Emil begins with a supply of 6 workers. Place his 2 remaining workers next to the 50 space of the score track.
Emil does not require any other components.
Game sequence
The number of rounds corresponds to a 2-player game.
Emil begins the game. At the beginning of each of his turn, draw a card from Emil's deck.
Place the appropriate number of Emil's workers on the depicted action space.
Special cases when executing Emil's cards:
If an action requires coins Emil just takes the coin from the supply.
If Emil has not enough workers left for an action or the action space is already occupied, just draw the next card from Emil's deck
Emil also skips track actions concerning track colors you have not yet unlocked.
Emil takes locomotives and factories. He always takes them from the locomotive supply.
Emil hires engineers. They will count when calculating the majority of engineers during the end scoring phase.
If Emil's card shows the coal action space, Emil places one of his workers. This card is used only when playing with the coal module.
If there are no cards left in Emil's deck or if he ran out of workers at the beginning of his turn, he must pass.
As soon as you reach a score of 50+ points, Emil gets an extra worker and another one as soon as you reach 150+ points.
Emil may use this worker immediately.
Just as you would in the 2 player game, you will play 6 rounds (5 rounds if you're using the Coal module).
However, you will actually be playing this game on your own. Emil doesn't care about scoring points.
He's only here to get in your way.
Emil begins the game. At the beginning of each of his turn, draw a card from Emil's deck. Each of his cards
depicts one of the action spaces on the game board, which Emil will occupy and prevent you from using. Place the appropriate number of Emil's workers on the
depicted action space. Emil doesn't actually perform the action. He thinks performing actions is boring. (Exception: taking locomotives and engineers; see below.)
You may now discard the drawn card and take your turn.
There are some special cases when executing Emil's cards:
-
Emil's card depicts an action requiring coins: This doesn't bother Emil at all. Emil is anti-capitalist. When you draw either the
"Get 2 track advancements of your choice" or the "Hire an engineer" card, Emil
takes the necessary coins from the supply to place on the corresponding space.
The worker required for the "Advance 2 tracks of your choice" space is taken
from Emil's worker supply, as normal.
-
Emil doesn't have enough workers: When you draw a card that Emil does not have enough workers to use, you
simply discard it and draw another. Emil will not be able to block this space. You
must continue drawing cards until Emil is able to block the space depicted on a
drawn card, or until Emil's deck is exhausted.
-
The action space on Emil's card is occupied: If there is already a worker on the the action space depicted on Emil's card,
simply discard the card and draw another (and so on, as required).
-
Emil only blocks spaces that you can use:
When you draw a card that depicts an
action space that you cannot use
(i.e. a track action that you have not yet unlocked the track color), simply
discard the card and draw another (and so on, as required).
Emil will only bother
himself with blocking spaces that you can use.
-
Emil collects locomotives and engineers:
When Emil uses an action space that gives him a locomotive or an engineer,
place the corresponding component in front of him. If there are no locomotives
remaining in the supply, Emil takes the factory with the lowest number.
Locomotives and factories taken by Emil are simply gone, they have no further
effect in the game. The engineers collected by Emil are only used when determined engineer majority at game end.
-
The light side up engineer:
When you draw this card, Emil must place a worker on the light side up
engineer's action space.
-
The coal action space:
This card should only be used when using the
Coal
module.
Otherwise, remove
it from Emil's deck. Emil always places a worker on this action space; never a
coin. Emil does not collect coal.
-
Emil must eventually pass
If there are no cards left in Emil's deck
at the beginning of his turn, or if he
has no remaining workers left in his supply, he must pass. You may now take as
many consecutive turns as you would like and are able to perform.
-
Emil gets a new toy
As soon as you reach a score of 50+ points, take 1 of the workers next to the
50 space of the score track and add it to Emil’s worker supply. Emil now has
7
workers. As soon as you reach a score of 150+ points, add the other worker to
Emil’s supply. This will usually happen during the scoring phase. If this happens
during a round, and Emil has not yet passed, he may use the new worker in the
current round.
Your turn
Once Emil has blocked an action space, it is your turn.
Once you have completed your turn, draw a card from Emil's deck.
You and Emil will alternate turns in this way
until you choose to pass.
After that the round ends and the scoring phase is performed as usual.
Shuffle all of Emil's cards to prepare his deck for the following round.
Once Emil has blocked an action space, it is your turn. Unlike Emil, you're playing to win! As usual, you choose an
action space, place the required workers (or coins), and perform the action.
Once you have completed your turn, draw a card from Emil's deck.
You and Emil will alternate turns in this way
until you choose to pass.
Once you have passed, the round ends and the scoring phase is performed as usual.
(Emil will take this opportunity to take a walk. He doesn't score any points; not that he cares.)
After the scoring phase is complete, return all the placed workers to your and Emil's personal supplies. Shuffle all
of Emil's cards to prepare his deck for the following round.
Game end
After the last scoring phase the game end scoring takes place.
When determining engineer majority, you must consider Emil's collection.
Your goal is to score as many points as you can
After the 6th round, the game ends (after the 5th round if using the Coal module). Proceed with the last scoring
phase and finally game end scoring. You will only need to count your own points (again, Emil doesn't care).
However, when determining engineer majority, you must consider Emil's collection. If Emil collected more
engineers than you, you only score points for 2nd place.
Your goal is to score as many points as you can – and then to score even more next time.
Player board - The Rocky Mountaineer
The main track is treated the
same as in the base game
except for a few new
advantages which we will
explain below.
Detonations
When you fulfill the prerequisites for one of these two
spaces, you remove one of
the two boulder tokens immediately and place it back
in the box. You score 10 points immediately.
You will be able to advance a track or an industry
marker onto the “freed” space as usual later.
Special spaces depicting coins
As soon as you meet the requirements of one of that space you
may pay a coin and receive the depicted
advantage. You may do this in a later turn.
After you have paid the coin you place one of your 3 “Done”
markers onto the symbol of the advantage. You may only receive each advantage
once.
3 spaces on the player board show – next
to a track in a certain color – a coin as
additional prerequisite.
As soon as you reach one of these spaces
with the track in the color shown, you
may pay a coin and receive the depicted
advantage. You may do this in a later turn.
After you have paid the coin and have received
the advantage, you place one of your 3 “Done”-
markers onto the symbol of the advantage
to show that you have already received it. As
usual, you may only receive each advantage
once.
Transcontinental East and West
Each of the two shorter tracks
represents one part of this railroad.
This does not mean that
the two tracks are connected. The
Transcontinental East ends on space
7, the Transcontinental West on space
9.
When you fulfill the conditions of the last space
for one of the two tracks you receive 10 additional
points during each railroad scoring phase.
When you fulfill the conditions of the last space
for both tracks you also receive the advantage
twice.
Building of the Transcontinental Railroad was
started at the same time in the east and the west
to meet in Utah. Where the two tracks joined, the
“Golden Spike” was driven in.
Each of the two shorter tracks
represents one part of this railroad.
Attention: this does not mean that
the two tracks are connected. The
Transcontinental East ends on space
7, the Transcontinental West on space
9. The black track cannot be moved
beyond these spaces.
The space where the two tracks meet has a dashed
outline and a +10 points advantage.
When you fulfill the conditions of the last space
for one of the two tracks you receive 10 additional
points during each railroad scoring phase.
When you fulfill the conditions of the last space
for both tracks you also receive the advantage
twice.
Golden Spike
When you choose the token “Golden Spike“  , you place the token within the dashed
outline. You will then gain the additional
advantage of +25 points during the railroad
scoring phase for each of the two spaces for
which you fulfill the conditions.
, you place the token within the dashed
outline. You will then gain the additional
advantage of +25 points during the railroad
scoring phase for each of the two spaces for
which you fulfill the conditions.
Track colors
You may build tracks of all colors on
all the railroads on the USA board.
You only have – like in the base game
– 2 natural colored tracks and 1 white colored
track available though. Thus you will have to
choose on which railroads you want to build the
natural colored tracks.
Doublers
The Transcontinental East and West
railroads show 3 dashed spaces for
doublers where you may place doublers,
just like on the main railroad.
Industry tracks
The USA board has two industry tracks.
Advancements on the industry track can be made
with an industry marker of choice and also split
freely between both tracks. The industry track on
the bottom has the same rules as the base game.
On the top industry track you may advance onto
gaps and even skip them. Instead of
advancing onto the factory as usual
you move the industry marker onto
the space above the gap. If the gap
is occupied by a factory, you have to
use the function of the factory
immediately. Is the gap not
occupied yet, nothing happens.
Attention: should you place a
factory in a gap with a factory
marker above it, you may not use
the factory because the industry marker has
reached it before the factory was placed.
Each industry marker belongs to its own track.
You may not “change tracks”.
Stock market
Stocks advancement
Each time you fulfill the prerequisite for a
space with  , you advance your
stock price marker one level up.
, you advance your
stock price marker one level up.
When you are the first player to
reach a new level, you move your stock
price marker to the very left. Then you
choose one of the displayed dividend tokens and place it on this level onto the
space showing the white star. Then you
may receive the advantage this token
shows immediately.
Should you reach a level where stock price
markers from one or more players have been
placed already, you place your stock price marker to the right of those. Then you may receive the
advantage of the dividend token of this level.
If you are on the top level
already and receive a further advancement
on the stock market, you leave your stock
price marker in place. Instead you receive a
personal payout immediately.
Personal Payout
You receive the advantages of the level
where your stock price marker is and of
all the levels below it. You may use them
in any order and also decline to receive an advantage in parts or entirely.
The  Token
Token
Should you choose this token you first
advance your stock price marker one level up and
receive the advantage of the new level.
Additionally you receive a personal payout.
Steelworks
When you take the last locomotive from a
pile next to a steelworks, you also take the
steelworks. You may flip the steelworks and place
it like a regular factory in a gap in your
industry track. Also, you may place it back
in the box. In that case proceed with your
turn as usual.
The steelworks is a slightly weaker factory.
When you advance an industry marker onto the
steelworks you then receive one black track
advancement.
When you build a new factory, you may
replace the steelworks with the new factory, even if
not all 5 gaps of your industry track are filled yet.
The steelworks is placed back in the box.
After you finish your turn, perform a general payout.
General Payout
The player who took the steelworks goes first.
They receive the same advantages they have
already reached, just like for the personal
payout.
After, all other players follow in turn order and
receive all advantages they have reached with their
stock price marker so far.
Game end Bonus
The player whose stock price marker is at
the top of the board scores 20 points. The
player in second place scores 10 points.
In case of a tie, the player whose stock
price marker is farther to the left scores
the points.
Obligatory actions listed in the list of open actions are marked with an exclamation mark.
During worker placement all action spaces with actions the player can currently perform are marked with a red border. Action spaces with actions the player
cannot perform right now are nevertheless clickable. But keep in mind that you have to perform all obligatory actions otherwise you won't be allowed to finish
your move.
No matter whether workers or coins are used for an action there will always be workers displayed on the board.
If you are interested in the detailed 'payment' for an action just have a look at the game log.
Since coins are very much like higher valued workers, an action will be automatically 'paid' with workers using coins only when there are not enough
workers left.
To use the black worker you have to click on it before choosing the action space.
The number in parentheses behind the points of a player indicates the current 'value' of his player board.
Clicking on that number will open a dialog with a detailed summary of that points (not available during replay).
If you hover over or click on the number of workers of a player you will get a hint, how many workers are available for this player (basic + additional).
The range of the locomotive(s) of a railroad is depicted with small green dots.
Since you may only close a foundry you just have used, foundry actions are treated special. If you use a foundry all currently open actions
will be postponed. After you performed the foundry actions and decided whether to close the foundry or not you will gain control over those actions
again.
If you play using the DSP expansion and randomly selected engineers, Olga will not be part of the selection if playing
with more than 2 players.
If you use Ludmilla (DSP expansion), your move will be interrupted. As soon as all players have chosen their bonus provided by Ludmilla your move
will be continued if there were open actions left. This may be the case when using Ludmilla with factory 3.
Possible settings:
show animations: device dependent, standard: checked
When a player makes his move the actions will be animated. But using coins will be animated in any case to make sure the player notices that he is using coins instead of workers.