Show
→ summary only
→ detailed version only
→ both summary and detailed version
→ english original rules (pdf, link to publisher's website)
→ german original rules (pdf, link to publisher's website)
→ french original rules (pdf, link to publisher's website)

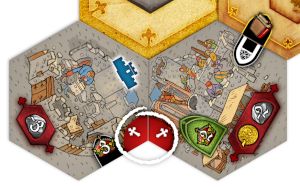
Praga Caput Regni
Charles IV has been crowned King of Bohemia and ruler of the Holy Roman Empire. From his castle in Prague, he oversees construction of new fortifications,
a bridge across the Vltava River, a university, and a cathedral rising within the walls of the castle itself. Prague is already among the largest cities in Europe.
King Charles will make it the capital of an empire!
Players take the role of wealthy citizens organizing various building projects in medieval Prague. By expanding their wealth and contributing to the construction,
they gain favor with the king. Players choose from six actions which are always available, but weighted with a constantly shifting array of costs and benefits.
Clever players will discover synergies between carefully timed actions and the rewards from constructing the civic projects. At the end of the game,
the winner is the player who most impressed King Charles.
Clarification of rules as agreed with author and publisher:
-
The bonuses offered by the bridge can be set up in any combination AND orientation.
-
If an upgrade tile was overbuilt in the current turn you can choose whether you want to use the bonus from the overbuilt tile or the new tile
whenever you perform the associated action in that turn.
-
Players have a limited supply of cubes. They start with 2 free cubes, which can be used to mark buildings or claim seals. Additional cubes can be freed
when gaining Wealth Bonuses.
Cubes placed on buildings will be blocked until the associated plaza is scored.
The cubes on the quarry and gold mine track will NEVER leave the player board. They may not be used to claim seals.
-
If an action tile leaves the blue area and therefore gets the five-point token, and there is no open space left in the green zone,
it will be placed in the first open space in the red zone.
-
Please also pay attention to the sections "Notes on Timing" and "Rules Reminders".
To make things clear and easy to handle following restrictions apply:
-
If a plaza gets scored, players not on turn with a claim on that plaza will get their plaza bonuses at the beginning of their turn.
If a player already made his last turn he nevertheless will get the chance to choose his plaza bonus in a special turn. Since this is not a regular turn
you may not perform any optional action or use technologies.
-
Whenever you overbuild an upgrade tile, you will only get the adjacent and corner bonuses if none of the overbuilt tiles had an adjacent/corner bonus at
this very position.
Due to this simplification it is possible (in very rare and constructed cases) that you are denied an adjacent/corner bonus even though you have not yet used it.
-
The hextiles display will not be filled up immediately but only on demand.
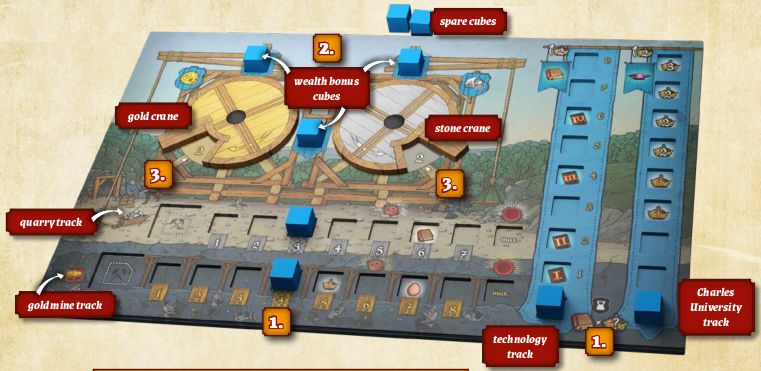
Game Components
1
main board
4
4
30
36
36
11
24
8
2
quick reference sheets
1+2
1+2
1
Charles Bridge
12
3
assorted wooden and cardboard markers
Setup
Setup board
-
Place Charles Bridge across the river. Note: The bonuses offered by the bridge are double sided and can be set up in any combination.
-
Separate the bridge tiles by number (IV or V).
Shuffle the IV stack and place it face down by the bridge.
Shuffle the V tiles and divide the stack in half. Place one stack of 3 tiles by Charles Bridge. The other half goes by the Cathedral.
-
For a variable setup you can use the alternate tiers for Hunger Wall and Cathedral. You always have to use a complete set for each project. But you may use
different sets (or the basic ones) on the two projects. For example you can use A tiers on the Hunger Wall and the basic ones at the Cathedral.
-
Assign the plaza tiles randomly to plaza hexes of the same color. Return any leftover plaza tile to the box according to the number of players.
Depending on the number of players, certain hexes in the city will be occupied by randomly drawn Era I buildings.
-
Sort the technology tiles by number, shuffle each stack separately, and place them face down beside the board.
-
Separate the hex tiles by type (building, wall, or upgrade), by rarity (special or normal), and by era (I or II).
Set the Era II stacks aside. Shuffle the Era I stacks face down and place them by the board. For each type of hex tile, turn up 1 special tile and 3 normal tiles.
-
Turn the wheel so that the white arrow points to the icon depicting the number of players.
The six action tiles go in the first six empty slots, starting with the first red slot on the top of the Crane. That is, none of them go in the blue zone; they all go in the red or green zones.
For the first game it is recommended to use the A side of the action tiles and place them in a specified order.
-
The turn counting cube is not needed for the online implementation.
Setup player
-
Each player gets a player board and pieces in their chosen color, as well as an action board.
-
Each player places one cube on the lower right corner of the Hunger Wall and the lower left corner of the Cathedral and his
pawn beside the board next near the King's Road.
Setup player board
Player boards are setup as illustrated.
Action board
Each player takes an action board.
Gameplay
Players take turns in order, clockwise around the table. On your turn, you do the following:
-
Choose one action tile from the action crane.
-
Perform one action, and possibly one extra action.
-
End your turn by rotating the action crane and returning the action tile.
The game will end when each player has taken 16 turns.
Depending on the number of players the Era I hex tiles are removed and replaced with the hex tiles for Era II:
Solo and 2 players: at the end of round 8
3 players: in round 9 at the end of the turn of the 2nd player
4 players: in round 8 at the end of the turn of the 3rd player
Choosing an Action Tile
Your action board depicts the six actions available to you.
Choose a tile from the action crane.
Each action tile depicts two actions, one inside the wheel and one outside. This inside-or-outside position does not matter. You simply choose the action you want and ignore
the other.
The action tile you choose grants you a bonus. Generally, you take this bonus right away, but it is legal to delay the bonus until
later in your turn.
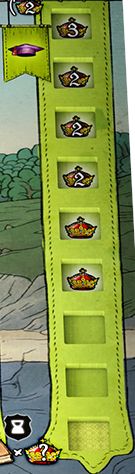
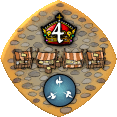
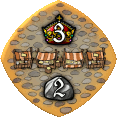
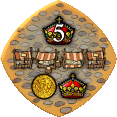
Action tiles that have been chosen most recently will be in the red zone of the crane. If you choose one of these tiles, you must
immediately pay the cost depicted on the board. If you cannot pay the cost, you cannot take that tile.
Tiles in the green zone may be taken without additional bonuses or penalties.
Tiles that have not been chosen for a while will end up in the blue zone of the crane. When you choose one of these, score the
number of points depicted on the board.
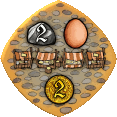
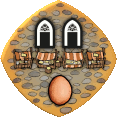
Example

When you take this tile, you gain the opportunity to buy an egg. If you have gold, you can buy it immediately.
But if you don’t have gold, it is legal to use the tile to perform an action that earns you gold during your turn, then use the gold to buy an egg.
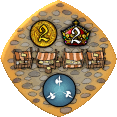
Action "Manage Mines"

This action gives you gold. You have a certain number of gold mines, represented by the highest number to the left of your marker on your gold mine track.
When you choose this action, do one of the following:
-
Gain 1 gold and increase your gold mines
 by 1.
(Move the marker one space to the right.)
by 1.
(Move the marker one space to the right.)
-
or Produce gold:
 :
gain gold equal to your number of gold mines, and gain all production bonuses shown to the left of your marker.
:
gain gold equal to your number of gold mines, and gain all production bonuses shown to the left of your marker.
Represent gold you gain by turning the wheel of your gold crane.
This may give you a wealth bonus the first time you hit a certain number.
When your marker reaches spaces 6, you get a production token for your mines.
When your marker reaches the end of your gold mine track, you gain the ability to claim one of the five seals.
You are limited to 9 gold. If gaining gold ever gives you more than 9, you end up with 9 and the excess is wasted.
Action "Manage Quarries"

This action gives you stone. You have a certain number of quarries, represented by the highest number to the left of your marker on your quarry track.
When you choose this action, do one of the following:
-
Gain 1 stone and increase your quarries
 by 1.
(Move the marker one space to the right.)
by 1.
(Move the marker one space to the right.)
-
or Produce stone:
 :
gain stone equal to your number of quarries, and gain all production bonuses shown to the left of your marker.
:
gain stone equal to your number of quarries, and gain all production bonuses shown to the left of your marker.
Represent stone you gain by turning the wheel of your stone crane.
This may give you a wealth bonus the first time you hit a certain number.
When your marker reaches space 5, you get a production token for your quarries.
When your marker reaches the end of your quarry track, you gain the ability to claim one of the five seals.
You are limited to 9 stone. If gaining stone ever gives you more than 9, you end up with 9 and the excess is wasted.
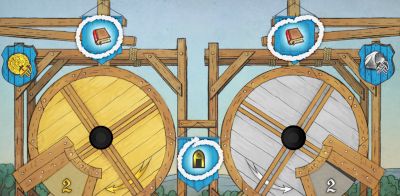
Action "Upgrade an Action"

When you perform this action, choose a hex tile from the upgrade row.
The tile goes on your action board, on the matching hex.
You can choose any of the six orientations. Orientation is important, but it won’t come into play until you add another upgrade or a wall.
See Adjacency Bonus and Corner Bonus.
Every time you upgrade an action, you move up 1 or 2 spaces on your Charles University track – 1 point for an Era I upgrade tile or 2 points for an Era II
upgrade.
Whenever you perform the action that you upgraded, you get the bonus printed in the middle of the upgrade tile.
If you perform that action twice in one turn, you get the bonus twice.
Furthermore, when you place the upgrade, you can retroactively take the bonus for that action if you performed it earlier during the current turn.
It is legal to upgrade an action that is already upgraded, but the upgrades are not cumulative.
Stack the new one on top and ignore the old one. You don’t get any bonuses from already used connections. Brand new connections are evaluated like usual.
Action "Construct a Wall"

When you perform this action, choose a hex tile from the wall row.
You must immediately pay the tile’s cost, depicted on the red sign printed on the tile. If you cannot pay the cost, you cannot choose that tile.
The tile immediately gives you the rewards depicted in the green window.
Then you place the tile adjacent to your action board. A new wall tile does not have to be adjacent to any previously placed wall tiles.
Depending on how you place the tile, you may gain Adjacency Bonuses
and/or Corner Bonuses.
Action "Construct a Building"

When you perform this action, choose a hex tile from the building row.
You must immediately pay the tile’s cost, depicted on the red sign printed on the tile. If you cannot pay the cost, you cannot choose that tile.
The tile immediately gives you the rewards depicted on its green sign.
Then you place the tile on any legal building site.
Depending on how you place the tile, you may gain Corner Bonuses.
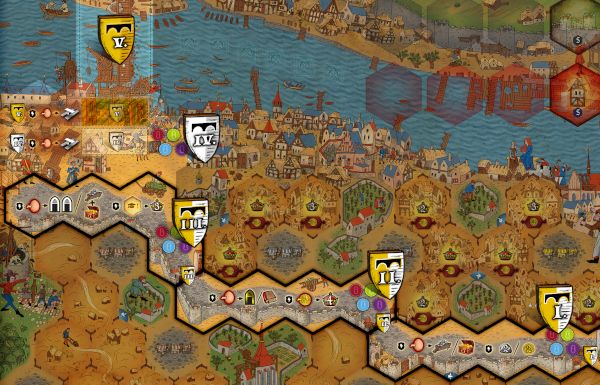
On the Old Town side of the King’s Road, building space is at a premium.
A building on one of these hexes will cost you extra gold.
If you can’t pay the cost immediately, you can’t build there. In return, you gain the number of points depicted on the building site.
If your building has a space for a cube, put a cube of your color on that space when you place the building. This indicates you have a claim on the plaza.
If your building has no space for a cube, it will score you points immediately. Score 1 point for every building tile currently around the plaza,
including the one you just placed.
If your building is the last one that can be built around that plaza, each player with a claim on that plaza gets to choose one of the two
rewards depicted on the plaza.
Action "Construct the King‘s Road"

To perform this action, advance your marker one space along the King’s Road.
Spaces I-III are street spaces, spaces IV and V are part of the Charles Bridge.
Street Spaces
When you advance on the King’s Road, move your marker to the next space in your color. To the left of the colored spaces are two effects, which you resolve immediately.
One of the effects requires an egg. If you choose to not spend the egg and not gain the benefits of that effect, you still resolve the other effect.
Charles Bridge
Space IV is by Charles Bridge. To advance to space IV, you must pay one egg. If you don’t pay the egg, you cannot perform the action.
When you advance to space IV, draw the top 3 bridge tiles from the silver IV stack.
Choose one, and return the others to the bottom of the stack. Place your chosen tile as a plank in the bridge. Gain the bonuses depicted on the spaces
you cover up and gain the bonus on the tile.
Space V is actually on the bridge. Again, to advance to space V, you must pay one egg.
When you advance to space V, choose any of the bridge tiles from the gold V stack.
Place it as a plank on the bridge and put your marker on it. Gain the bonuses on the spaces you cover up. Your chosen tile will play a role in the final scoring.
Once you are on Charles Bridge, your marker can no longer advance along the King’s Road, and you can no longer perform that action.
Once 5 planks have been placed, the bridge is complete.
If you advance to space IV when the bridge is complete, you choose a tile from the IV stack and gain its bonus, as usual, but you cannot gain the bonuses from placing it on the bridge.
If you advance to space V when the bridge is complete, take the tile from the V stack, place it in front of you, and put your marker on it to remind you that its bonus will play a role in final scoring.
Production Tokens
 Your gold mine and quarry tracks each have a space marked like this.
When you reach that space, choose 1 production token from the river Vltava. Put your chosen token on the leftmost
space of the track that earned it. From now on, whenever you choose the produce option on that track, you also get that bonus.
Wealth Bonuses
The first time you reach these levels of wealth, you gain a wealth bonus.
When you reach 6 gold, remove the corresponding cube and gain the bonus depicted underneath. Similarly when you reach 6 stone.
When you reach maximum gold or stone, remove the cube in the center and gain that bonus.
You can use removed cubes as markers elsewhere in the game.
Each bonus can be gained only once per game. Removing the cube reminds you that you have already taken that bonus and cannot take it again.
Seals
When you reach the end of your gold mine track, and also when you reach the end of your quarry track, you gain the ability to claim one of the five seals – the five
red spaces in the upper left part of the board. The seal can be claimed immediately or later in the game during one of your turns.
To claim an unclaimed seal, pay the cost depicted at the bottom of the seal (if any) and put a cube of your color on it.
Once someone has claimed a seal, no one else can claim it.
The seals affect final scoring at the end of the game.
Choosing Hex Tiles
Three actions involve choosing a hex tile from one of the rows on the board. After taking a tile, immediately deal a replacement from its stack.
Special Tiles
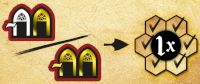
The rightmost tile of the row is a special tile. It is unavailable to you unless you have the special tile bonus.
The only way to get the special tile bonus is to choose an action tile from a slot with this symbol  .
.
The special tile bonus applies only to the action you choose from the action tile; it does not apply to your extra action, if you take one. If you do not use the special
tile bonus, score the indicated number of points instead.
Refreshing a Row
Once per turn you may pay 1 gold or 1 stone to remove two hex tiles from one of the three rows.
The removed tiles can both be regular tiles, or you can remove one regular tile and the special tile. Each removed tile goes face down to the bottom of the
corresponding stack. Replace each removed tile with a new one from the same stack, face up.
You are allowed to refresh a row any time during your turn – even before choosing an action tile from the wheel. You have no obligation to choose
an action that uses the row you refreshed.
Corner Bonuses
Some hex tiles offer a corner bonus. Walls and upgrades can have red corner bonuses, building tiles blue ones.
Red Corner Bonuses
When you place a tile with a corner bonus that matches another corner bonus, take one corner bonus token of that color
Blue Corner Bonuses
A building tile can give you its blue corner bonus by matching the corner with another building or with a corner bonus printed on the board.
If the tile you place matches two other corner bonuses, take two corner bonus tokens of that color.
Adjacency Bonuses
Wall tiles and upgrade tiles may give you an adjacency bonus.
When you place a tile, check for a symbol on one of the sides. If you place this tile so that the symbol lines up with a symbol on an adjacent tile,
you gain the bonuses represented by each symbol.
If you place the symbol adjacent to a side that has no symbol, you get no adjacency bonus.
The symbol  is not an adjacency bonus.
They are a reminder that placing an upgrade tile always gives you 1 or 2 advancements on your Charles University track.
For example, the placement illustrated here would give you a bonus silver window and a bonus advance on your technology track.
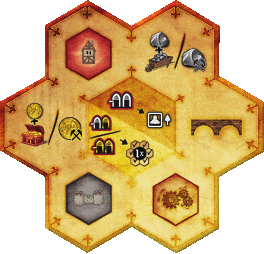
Plaza Bonuses
The city board has 8 to 10 plazas placed during setup. Players compete for the bonuses these plazas offer. Every time you place a building, it will be next to exactly one plaza

If your building has a space for a cube, put a cube of your color on that space when you place the building. This indicates you have a claim on the plaza.

If your building has no space for a cube, it will score you points immediately. Score 1 point for every building tile currently around the plaza, including the one you just placed.
If your building is the last one that can be built around that plaza, each player with a claim on that plaza gets to choose one of the two rewards depicted on the plaza.
The player with the most cubes around the plaza gets to take both rewards (instead of just one).
Break ties in favor of the player who spent the most on their buildings. (Add stones and gold together; ignore buildings with no cube.) If players are still tied for the most, all tied players get both rewards.
If you have no cubes on buildings around the plaza, you get no reward from it.
Technologies

During play, you will have various opportunities to advance on your technology track. During the game, you may gain up to four technologies.
When your marker moves onto a marked space, draw the top three tiles from the corresponding stack. Choose one and return the other two face down to the bottom of the stack.
Keep your chosen technology face up by your player board – no one else can use it.
Level I and II technologies give you permanent abilities you can use throughout the game, beginning with your next turn.
By contrast, level III and IV technologies give one-time benefits that can be used immediately. Alternatively, you can save the tile and use it on a later turn.
Once you use it, discard the tile to help you remember that it can be used only once.
You can’t gain any more technologies after the space labeled IV, but being higher on the track will give you more points at the end of the game.
If you are at the top space, for each further advance, you immediately score 2 points instead of advancing.
Charles University
During play, you will have various opportunities to advance on your Charles University track.
Your height on this track determines the worth of your technology track at the end of the game.
In general, you gain no immediate reward for advancing along the Charles University track.
However, if you are already at the top, for each further advance, you immediately score 2 points instead of advancing.
The Hunger Wall and St. Vitus Cathedral
Construction of the Hunger Wall and St. Vitus Cathedral is represented by two tiered grids in the corner of the board.
The king will appreciate your help with these important projects.
Upward moves will give you more points at the end of the game.
Sideways moves will make your red or blue tokens worth more.
Moving Sideways

When you construct a wall tile with the Hunger Wall icon, move your marker one space sideways on the Hunger Wall grid.
On the Hunger Wall, a sideways move is always to the left.

When you construct a building tile with the Cathedral icon, move your marker one space sideways on the Cathedral grid.
On the Cathedral, a sideways move is always to the right.
You might also gain sideways moves from other effects.
Moving Up

To move up, you must pay 2 silver windows. You can do this as often as you want at any time during your turn.


The grid is split into 3 tiers. Crossing from tier I to tier II or from II to III has an additional cost, which must be paid.
Consequences of Moving
Some moves have immediate effects:
If your marker lands on a square with a sideways arrow on it, move one more space, in the indicated direction.
If your marker lands on a square with an up arrow, you may move one space up, but if this moves you to a different tier,
you must pay the standard gold-and-stone cost for crossing tiers.
If you don’t pay, you will stay on the space with the arrow, you can’t save the arrow for later.
If you reach the top tier of the Cathedral, you may claim one of the three final-scoring tiles that were placed by the Cathedral at the beginning of the game.
Take the tile and keep it in front of you to show that no one else may claim that tile.
Windows
During play, you will encounter various ways to earn silver and gold windows.
Silver windows are used to move up on the Hunger Wall or St. Vitus Cathedral. Gold windows (possibly with the help of a silver window) are used to buy an extra action.
You can’t save more than 2 windows for your next turn; use them up, or you will have to discard any extras.
Buying an Extra Action
In addition to the action you get from your action tile, you may be able to pay for an extra action:
Once per turn, you may pay two gold windows or one gold window and one silver window to buy an extra action. You may choose any of the six actions.
It can be used at any time during your turn, even before you take an action tile.
End of Turn
At the end of your turn, you do the following:
-
Discard down to 2 windows if you have more than 2.
-
Rotate the wheel of the action crane one space clockwise.
-
Place your action tile in the empty space at the beginning of the red zone. If this space is blocked by the square box on the action wheel,
rotate it one more space so you can put your action tile there.
-
In the rare event that a tile rotates beyond the blue zone, remove it and place it in the first open space in the green zone.
It is still worth 5 points. Place the 5-point bonus token on it as a reminder.
End of Game
The game ends after 16 rounds.
Final Scoring
In addition to the points you accumulate during the game, you will also receive points during final scoring.
-
unresolved Plazas
Any plaza that was not enclosed during the game will give out rewards at this time. Every player with a claim on the plaza will get the reward depicted in the
lower half of the plaza tile.
-
Points for Academics
You score 0, 1, 2, or 3 points for each space you advanced on the technology track.
The number of points you score is determined by your height on the Charles University track. For example, let’s say you advanced in technology 7 times.
That is, your marker is one space above the level IV technology space. You would score zero points if your Charles University marker is still in the lower end of the track. But you would score 21 points if your Charles University marker is on the 3 space at the very top.
-
Hunger Wall and St. Vitus Cathedral
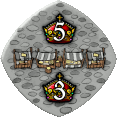
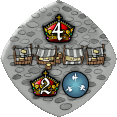
Score points for your row on the Hunger Wall and Cathedral tiers. Each row has a point value depicted in a black box at the end of the row. You score that many points.
Score points for your red and blue corner bonus tokens. Each column has a point value depicted at its head. Multiply that point value by the number of
corresponding tokens and score that many points. The Hunger Wall gives you points for blue tokens for each sideways advancement you made. The Cathedral rewards red tokens.
-
Walls
Gain 4 points for 3 walls, 10 points for 4 or 5 walls and 18 points for 6 or more walls.
Count the total number of wall tiles you built; they don’t have to be adjacent to each other.
-
Final-Scoring Abilities
During play, players can claim personal final-scoring abilities by claiming a V tile at Charles Bridge or at the Cathedral or by claiming one or two seals.
Use your final-scoring abilities at this time.
-
leftover Eggs
Finally, gain the indicated number of points based on the number of eggs you have left:
1 Egg: 1 point
2 Eggs: 3 points
3 Eggs: 6 points
4 or more Eggs: 10 points
Winning
The winner is the player with the most points.
In the unlikely event of a tie, break ties in favor of the player who started later.
For example, the player on the starting player’s right will win all ties.
Modifications
For a less symmetrical set of actions, try the B sides of the action tiles. Do not mix A and B sides.
Some or all of the non-egg effects on the King’s Road can be replaced with these tiles. Roman numerals indicate where the tile should be placed.
The Hunger Wall and the Cathedral can be given different tiers. Tiers are in sets, so a project should either get all A tiers or all B tiers.
However, the two projects are independent. For example, if you give the Hunger Wall its A tiers, the Cathedral can use A tiers, B tiers, or even the original tiers.
Solo Variant
For a single-player game, set up the game as you do for 2 players. You will be the starting player.
After each of your turns, play the opponent’s turn as follows:
-
Choose the action tile that is farthest ahead (closest to the blue zone).
-
Immediately return the tile to the crane according to the usual rules.
-
You are playing to see how high a score you can get. We think anything over 140 points is a good score.
Solo Game vs. Peter Parler
Peter Parler’s actions will be determined by a set of 5 cards.
Shuffle Peter Parler’s cards to make his deck and place it face down besides the board.
Setup
-
Choose a color for Peter Parler and set up his board: His markers on his gold mine
track and quarry track start in the usual places. You do not need to worry about his
cranes or his other tracks, so all other cubes in his color can be kept beside his board.
-
Only use these 4 production tokens:


-
Choose a third color (not yours, not Peter Parler’s) to represent projects that Peter
Parler is planning to work on.
Place the pawn figure on a plaza of your choice. This is where
Peter Parler is planning to build.
Place one cube in each row of hex tiles – on an available upgrade tile, wall tile, and
building tile of your choice. These are the three tiles Peter Parler is planning to take first.
Gameplay
-
If Peter Parler’s deck is empty, shuffle all 5 cards to make a new deck.
Reveal the top card of the deck.
-
Perform the indicated actions.
-
Recycle one of the three oldest action tiles on the wheel, as indicated.
-
You are playing to see how high a score you can get. We think anything over 140
points is a good score.
Peter Parler's Actions
Taking a Hex Tile
-
If the card indicates that Peter Parler takes an upgrade or a wall tile, remove the tile
under the cube and return it to the bottom of its stack.
-
The cube that marked the chosen tile moves to the right, onto the next tile in the
row. If the cube can’t move right (because it’s on the special tile space) move it to the
leftmost tile in the row.
-
Deal a new tile to replace the one that was taken.
Constructing a Building
-
Peter Parler chooses a building
tile similarly, but instead of
putting the tile on the bottom
of its stack, place it on the main
board adjacent to the marked
plaza.
-
If the tile has a blue corner,
you must place it so that it
matches up with a blue corner,
if possible. Otherwise, you may
place it however you wish.
-
Give the new building one of
Peter Parler’s cubes, if it has a
space for one.
-
If the building is the last that can be built at that plaza, you immediately get zero,
one, or both plaza bonuses, according to the usual rules. Peter Parler’s cubes compete
against yours, although he does not gain any plaza rewards himself.
-
Move the pawn figure clockwise around the board.
The number of spaces to move is determined by the cost printed on the building tile.
Add the resource costs together.
If the figure lands on a plaza that has already been evaluated, keep advancing it
clockwise until it lands on a plaza that still has room for a new building. Similarly,
on your turn, if you build the last possible building on the marked plaza, advance
the figure to the next plaza that Peter Parler can still build on.
-
Deal a new tile to replace the one that was taken.
Increasing Production
-
If the action card has
 or
or  on it,
increase Peter Parler’s indicated track by one.
on it,
increase Peter Parler’s indicated track by one.
-
If the action card shows both symbols, Peter Parler
will increase either his gold mines or his quarries,
depending on which you have more of.
He increases
on both tracks if your number of gold mines and
number of quarries are equal.
-
When he reaches the space marked with a production tile, he takes one of the
tiles at random.
-
If he reaches the end of a track, he claims a seal (the first available one in this order):
,
,
If none or these seals is left, he doesn't claim one.
Note: To make things easy, the cubes and pawn in the third color are placed randomly at the beginning and
the construction sites for Peter Parler's buildings are chosen at random.
Rules Reminders
-
Bonuses from the action crane can be delayed until later in your turn.
-
When you upgrade an action, you can retroactively gain the upgrade bonus if you have already used that action on that turn.
-
The upgrade bonus on an action applies whenever you perform that action – as an action on a tile taken from the wheel, as your turn’s extra action, or as an effect of a technology.
-
When taking a hex tile, the special hex tile is available only if you are using the action from your chosen action tile, and only if you have the special tile bonus
(which is available only from the wheel).
-
Level I and level II technologies cannot be used during the turn in which you gain them.
-
Level III and level IV technologies can be used immediately or saved for a later turn.
-
If other players have already built Charles Bridge, you can’t get the bridge bonuses anymore, but you can still get the bonuses from the IV and V tiles.
Notes on Timing
In general, timing is loose enough to allow you to do things in the order that works best for you.
In particular, the following things may be done in any order during your turn:
-
Using a single-use technology.
-
Buying an extra action.
-
Performing that extra action.
-
Taking an action tile.
-
Choosing one of the actions from that tile and performing it.
-
Resolving horizontal moves on the Cathedral or the Hunger Wall that you get from building tiles or other sources.
-
Buying vertical moves on the Cathedral or the Hunger Wall.
-
Resolving “immediate” effects from a King’s Road action you have performed this turn.
Despite the flexibility of your turn, it is not possible to use a thing or gain its rewards before you have paid for it. For example:
-
You can‘t take an action tile from the red zone until you have paid for it.
-
You can‘t gain any benefits from a wall or building tile until you have paid for it.
Appendix
Plaza tiles (printed double-sided)


Technology tiles Level I
On your turn, if you score 1 or more points when choosing your action tile, score 1 additional point.
The points could come from the wheel or the blue zone. This technology gives you at most 1 additional point per turn.
Whenever you gain a gold as bonus from the wheel, gain one more and score 1 point.
Whenever you gain a stone as bonus from the wheel, gain one more and score 1 point.
Each time you advance on the quarry track, score 2 points.
Each time you advance on the gold mine track, score 2 points.
Whenever you move up one row on the Cathedral or the Hunger Wall, score 2 points.
Technology tiles level II
Once per turn, if you gain a blue bonus token, score 1 point and gain 1 stone.
Once per turn, if you gain a red bonus token, score 1 point and gain 1 gold.
When you construct a wall tile with this symbol, gain 1 gold and score 1 point.
Whenever you construct a building that does not have the indicated symbol, gain 1 gold and score 1 point.
When you construct a building with this symbol, gain 1 stone and score 1 point.
Whenever you gain (or buy) an egg, score 1 point and gain 1 stone.
Technology tiles level III
Gain 1 egg. Perform the action Construct the King’s Road.
Move up one space on the Cathedral or the Hunger Wall. If you cross to the next tier, ignore the usual stone and gold costs.
Advance 4 times on your Charles University track.
Perform the action Upgrade an Action, and score 3 points.
Produce gold and gain 2 stone. (This is not a Manage Mines action, so it does not trigger bonuses from a Manage Mines upgrade.)
Produce stone and gain 2 gold. (This is not a Manage Quarries action, so it does not trigger bonuses from a Manage Quarries upgrade.)
Technology tiles level IV
Perform the action Construct a Building. The total cost of the building is reduced by 2 gold.
(The total cost includes the cost printed on the tile and any cost printed on the board. The total cost cannot be reduced below zero.)
Perform the action Construct a Wall. The cost of the wall tile is reduced by 2 stone.
Perform the action Upgrade an Action, and gain 1 gold window.
Gain both rewards depicted on one plaza tile. (It doesn’t matter whether the plaza has been evaluated yet; however, it can’t be one of those that was not put on the board.)
Increase either your gold mines or your quarries by 1. Then either produce gold or produce stone.
(The two choices are independent. For example, if you increase your gold mines by 1, you still get to choose whether you produce gold or stone.
This triggers no upgrades.)
Production tiles
2x:

Bridge tiles
silver bridge tiles (IV)
Gain 2 blue bonus markers.
Gain 2 red bonus markers.
You may move 1 space left on the Hunger Wall. You also gain a silver window and score 2 points.
You may move 1 space right on the Cathedral. You also gain a silver window and score 2 points.
Gain 1 gold window and 2 gold.
Advance on the indicated track three times.
golden bridge tiles (V)
3 tiles besides the Cathedral and 3 besides the Charles bridge
Immediately score 3 points. At the end of the game, score points equal to your height on the Charles University track.
At the end of the game, score 3 points for each upgrade tile you have.
At the end of the game, score 2 points for each wall tile you have.
Immediately score 3 points. At the end of the game, score points equal to your number of quarries.
Immediately score 3 points. At the end of the game, score points equal to your number of gold mines.
At the end of the game, score points based on the row you achieved on the Hunger Wall and the Cathedral.
Seals
At the end of the game, you can buy 2 points for every gold you spend. (So the maximum possible is 18 points.)
At the end of the game, you can buy 2 points for every stone you spend. (So the maximum possible is 18 points.)
At the end of the game, you can buy 3 points for every pair of gold and stone you spend. For example, if you had 5 gold and 8 stone, this seal could give you (at most) 15 points – you would spend 5 gold and 5 stone and have 3 stone left.
At the end of the game gain 6 points.
At the end of the game gain 4 points.
King's Road: basic version
You may pay 1 egg to increase the number of your quarries or the number of your gold mines by one.
You can’t pay more to buy more.
You may pay 1 gold to score 4 points.
You can’t pay more to buy more.
You may pay 1 egg to gain one of the two indicated rewards.
You can’t pay more to buy more.
Score 3 points for each Era I upgrade tile you have.
You may pay 1 egg to gain one of the two indicated rewards.
You can’t pay more to buy more.
King's Road: Modifications
Immediately gain one of the two indicated rewards.
While your marker is on this space of the King’s Road, whenever you take the Upgrade action, you score 2 points and gain either 1 gold or 1 stone.
Immediately score 2 points for every silver window token you have. You do not pay anything; just score the points.
While your marker is on this space of the King’s Road, whenever you take the Construct a Wall action, you score 2 points.
Immediately gain the indicated rewards.
While your marker is on this space of the King’s Road, whenever you construct a building without the Cathedral symbol, you score 3 points.
Solo Game vs. Peter Parler: Peter Parler's cards
The list of possible actions may be too long to fit in the silver colored info label. If that is the case, the text will be truncated. Clicking inside the info label will
reveal the complete text.
Sometimes it is not easy to find all bonuses you may perform. You can get a selection dialog of all available bonuses when clicking on the blue info icon in the silver colored
info label.
In case the info label got truncated and the blue info icon is not visible, you can display the complete text as explained above.
You need the special action crane bonus to take a special hex tile. You will be offered the special hex tile in that case automatically, provided you can afford the cost.
Clicking on the bonus will trigger the alternative points and therefore you will lose the opportunity to take a special hex tile.
There are a bunch of clickable icons all over the game window. It's worth to just click on every single one and see where it gets you.
The hex tiles in the display, at the players' action boards and in the city can be magnified on click.
This also applies to plazas.
Tiles displayed in the game log may also be magnified on click.
Clicking on the green number in the tabular display of the players' resources you will get an overview of the technologies for the given player.
As soon as you gain technologies those will replace the according technology pile. If you are only an onlooker, the technologies of the first player in the tabular
player overview will be displayed in that way.
Clicking on the number of points in the tabular player overview will reveal details to the projected final scoring.
The first version changed from era I to era II after the end of round 8. That is not correct for games with 3 or 4 players.
For games that where setup with at least version 1.1 the timing for the change is fixed. In that case the current era is shown in parenthesis behind the number of rounds.
When playing a solo game vs. Peter Parler, Peter Parler gets his own row in the tabular player overview. Since points don't matter for Peter, an icon is
displayed instead of the points. Clicking on that icon will reveal the remaining cards in Peter's action card draw pile.
If this pile is empty, all cards will be added to the draw pile again, before drawing the next card.