Down below you can see the planet Magnastorm. It is not as quiet as it seems
from space. The giant magnetic storm repeatedly emits thunderbolts, piercing
the thick atmosphere and reaching up to your lander.
Meanwhile your scout runner explores the surface and
reports fascinating discoveries of departed cultures.
A “highly developed” civilization once lived here, but it seems
that survival was too hard after the storms began.
You and your team want to recover as much knowledge of the lost civilization
as possible to achieve the best possible benefit for your own population.
But others have the same plans.
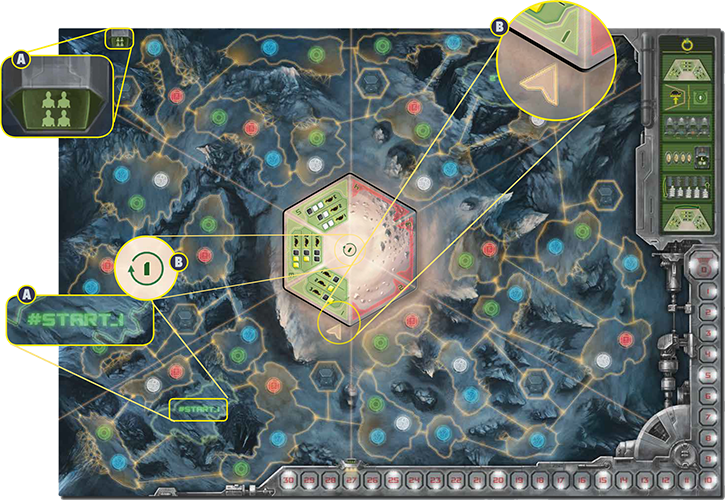
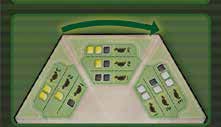
The following pictures illustrate the setup for a 4-player game. You can find the setup for the 2- or 3-player variant in the text below.

Place the game board between you and the other players. In a 4-player game use the side with the 4-player symbol. In a
2-player or 3-player game use the side with the corresponding 2-to-3 player symbol. Decide if you want to begin in
starting area #START_1 or #START_2. For your 1st game, we recommend that you use starting area #START_1 in the
lower left sector.

Place the center tile in the middle of the board with 1 or 2 (for starting area 1 or 2) facing up. Place the center tile so that
the round indicator arrow on the board is pointing at the round number 1.

Place the research board next to the game board. In a 4-player game use the side with the
4-player symbol. In a 2-player or 3-player game use the side with the 2-to-3 player symbol.
In a 2-player game also cover up each of the 4 reputation spaces showing the number “3“
with a cover-up tile.
Shuffle the 8 research commander tiles and randomly place 4 of
them on the empty spaces at the top of the research board.
In a 2- or 3-player game only use the three spaces on the left (the dark
right space remains empty). The remaining commander tiles are not
needed for the rest of the game.

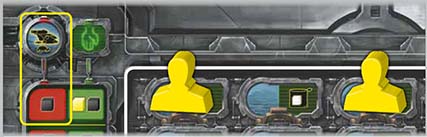
Place the action board next to the game board and place the 2 action panels on their
designated spaces on the board. In a 4-player game use the sides with the 4-player symbol.
In a 2-player or 3-player game use the sides with the 2-to-3 player symbol.

Place the first player token in the left-most commander space at the top of the action board.

Shuffle the 8 administrative commander tiles and randomly place 4 of them on the remaining empty spaces at the
top of the action board. In a 2- or 3-player game only use the three spaces to the right of the first player token (the dark space on
the right remains empty). The remaining commander tiles are not needed for the rest of the game.

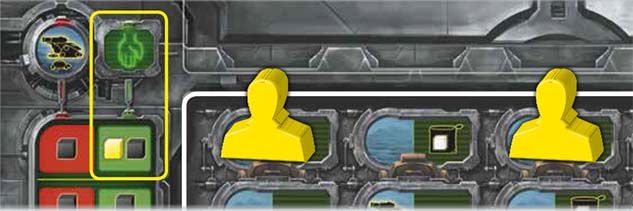
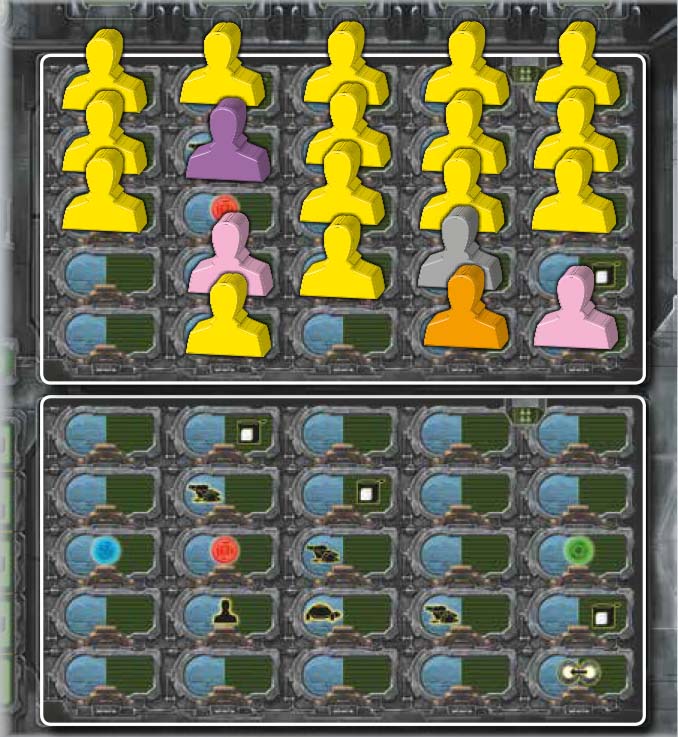
Place 3 neutral (yellow) crew members under each commander tile on the top empty spaces of the upper
action panel. Do the same for the left column below the first player token. (In a 2- or 3-player game the rightmost column
stays empty.)

Find all commander cards corresponding to the selected commander tiles
and place them face up on the table. The remaining commander cards are
not needed.

Shuffle the research objective cards and randomly place 2 of
them face up in the slots on the left side of the research board.

Shuffle the sector objective cards and randomly place 2 of them face
up in the slots on the right side of the research board.
In the yucata.de interface, the objective cards appear near the top left of the game window.
The remaining objective cards are not needed for the rest of the game.


Players choose a federation color. Put 25 black CreditCubes into the black bag and add 3 yellow and 3 of each player‘s color.
Put the yellow CreditCubes and the remaining player color CreditCubes next to the board, they form the
general supply. Place all CreditCubes with colors not participating in the game back into the box.

Place the artifact cards aside, you only need them at the end of the game.
Rounds
Each round consists of two phases. In the 1st phase, each player takes turns in order, performing a single action (starting with the
player on position 1 of the turn order). This continues until the upper action panel is empty. When the last crew member has been moved
from the upper action panel to the lower action panel, the 1st phase ends. The 2nd phase is the administration phase.
On your turn, you will choose between 1 of the 2 following options:
1) Take over a commander or 2) Perform an action on the lower action panel
Afterwards you may fulfill 1 objective as a free action.
To perform this action, pay 1 CreditCube of the corresponding color for every crew member standing on the upper
action panel below the commander. The paid CreditCubes are returned to the general supply. Then take these crew members from the
upper action panel and place them on any available spaces on the lower action panel.
(Placing them on the lower panel has no effect
other than to block these spaces for later actions.)
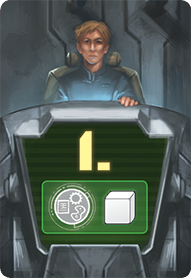
Place 1 of your markers in the space directly under the commander tile. Take the corresponding commander card, which you place in
front of you. You immediately receive reputation as indicated by the green number on the card. From now on, the commander will be at
your disposal. (If the commander has an instant effect, you may now use it once. See the section below for the explanation of the cards.)
A commander, who has no crew members below, cannot be taken over. So every commander can only be taken over once per
round.
If a commander is already controlled by another player, you have to pay an additional CreditCube of this player‘s color to the
general supply to take over the commander. Proceed as above: Place 1 of your markers under the commander tile and gain reputation as
indicated by the green number on the card. The other player takes back their marker and hands the commander‘s card over to you, and
loses reputation as indicated by the red number on the card.
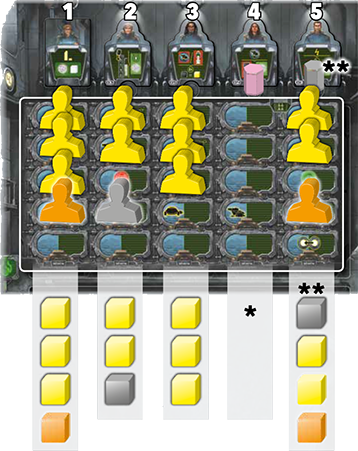
In this situation, you have to pay the indicated CreditCubes in order to acquire the first player token or to take over the commander.
* Takeover not possible, since there are no crew members below the commander.
** Since the commander is currently controlled by grey.
|
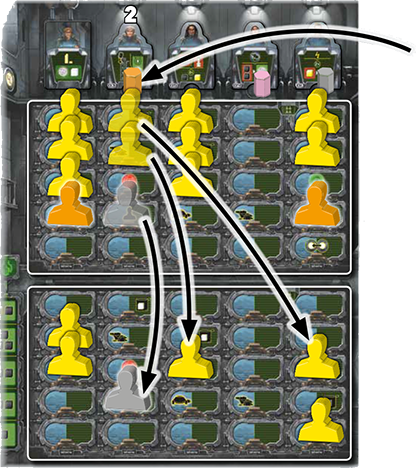
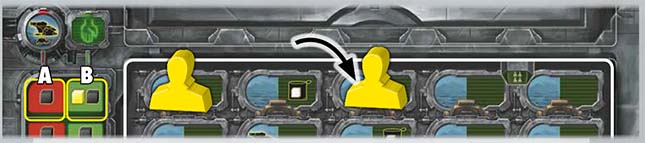
First, orange places 1 of their markers under the commander tile to show that the commander is under their control.
Orange has taken over commander #2. They pay 2 yellow and 1 grey CreditCube and place the 3 crew members from the upper action panel on any available spaces of the lower action panel.
|
 The commander in the left-most column has a
special function. Whoever controls him will be the
first player in the following round. Take the first
player token and get the bonus shown on it. Do
not place a marker under this commander. (Place
the first player token next to you. In the following
administrative phase you will put it back on the
game board.)
The commander in the left-most column has a
special function. Whoever controls him will be the
first player in the following round. Take the first
player token and get the bonus shown on it. Do
not place a marker under this commander. (Place
the first player token next to you. In the following
administrative phase you will put it back on the
game board.)
|
 Then orange takes the corresponding commander card and receives reputation as indicated by the green number (2). From now on they can use the ability of the commander.
|
You cannot take over a commander who is already under your control.
|
To perform an action on the lower action panel, take a neutral (yellow) or a
crew member of your own color from the upper panel and place it on
any
free space
on the lower action panel.
Only if there are no neutral (yellow) crew members and no crew members of
your own color left on the entire upper panel may you take a crew member of
an opponent player’s color.
|

In this situation, grey may place a neutral yellow crew member or an
own crew
member
onto the lower action panel. The orange crew member cannot be moved.
|
The lower action panel offers you 2 different options, but you may only choose 1 of them:
move your scout runner (and drop off a turtle lab) or gain credit cubes.
The lower action panel offers you 2 different options, but you may only choose 1 of them.

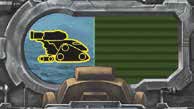
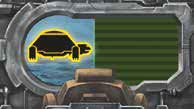
A) MOVE your SCOUT RUNNER (and drop off a turtle lab)
|
OR |
B) GAIN CREDITCUBES
|
|
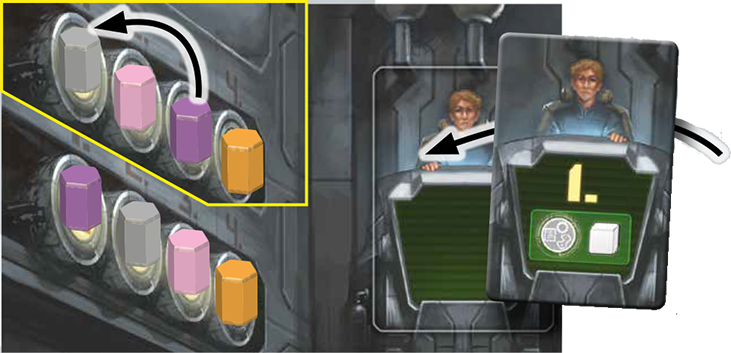
For option A the row you placed your crew member in
determines the cost you must pay for the movement.
For option B it determines which CreditCubes you
receive.
|
Purple places a crew member in the 3rd column. The costs (A) or
benefits (B) for this action are shown on the left.
|
A] Move a scout runner (and drop off a turtle lab)
 Purple pays 1 own CreditCube for the action.
The costs for the scout runner movement are shown under the scout runner icon.
Look at the section of the red display on the left, corresponding to the row in which
you placed your crew member, and pay the cost (CreditCubes) in the displayed
colors to the general supply. Black always stands for your own player color! After
paying the cost you may move your scout runner.
Scout runner movement
The catastrophe that happened here left a desolate and rugged surface. Your scout runner struggles through dust and rubble to search
for possible landing spots for your turtle labs.
|
A scout runner can move to another space (empty or occupied) within
its current area or via a connecting line to a space in an adjacent area.
Spaces are represented by round research icons on the game board.
An area consists of 1-3 spaces. When you end a movement on a
space without a turtle lab, you can place 1 of your own turtle labs there
(you may have to pay extra costs).
It's difficult to show the scout runner being located on a specific lab space in all cases
without making the scout runner icon very small and hard to find. So since it does not matter
for gameplay reasons which lab space the scout runner is on after you have built a turtle
lab, the scout runner is shown as being in the correct area, but not necessarily next to the
lab space you have chosen.
Movement details
-
You can end your movement on a space with your own turtle lab or a
turtle lab belonging to another player. However, you are not allowed
to place a turtle lab there.
-
If there is at least 1 transmitter station on the board, you can start
your movement at one of these stations.
(If you own the station, you
don’t have to pay anything to use it; otherwise pay 1 CreditCube of
your choice to the owner.)
You cannot move through a transmitter
space, even if there is no transmitter station there yet.
-
You cannot move your scout runner onto a space within any of the
3 storm sectors.
-
If your scout runner is already in one of the 3 storm sectors, you
must move your scout runner into a quiet sector. If that is not possible,
you must move clockwise towards the nearest quiet sector.
-
You cannot drop off turtle labs in storm sectors.
|
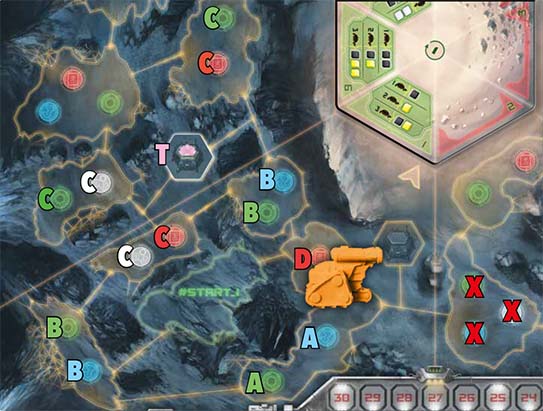
Orange has the following options for their movement:
A: Move the scout runner to another space in their current area.
B: Move the scout runner to a space in an adjacent area.
C: Use a transmitter station (T) to move to a space in an area adjacent
to it. (To use the transmitter station, they must pay pink a
CreditCube of their choice.)
D: Leave the scout runner on its current space.
X: They cannot move right into the red (X) storm sector.
Note: We suggest you move onto a space without a turtle lab, and
drop off a turtle lab of your own!
|
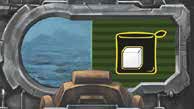
Turtle labs
Wherever you land and dig, you find relics of the alien civilization. Before you share your new knowledge with the rest of mankind, you
first have to study them.
|
If you finish your movement (or stay) on a space without a turtle lab,
you may drop off 1 of your turtle labs there. You can choose freely which
of your turtle labs to drop. The first 2 turtle labs on your player board
(on the left) can be placed without any costs. For all others you must pay
the shown CreditCubes.
After placing a turtle lab, you immediately advance 1 level in the
research area as the same color as that space. If this is a white space,
you advance in 1 research area of your choice.
If the research space you advance onto shows a bonus, you immediately
gain that bonus (most of the time you will gain CreditCubes).
You can get the following bonuses:
 1 CreditCube in your own color 1 CreditCube in your own color
 1 yellow CreditCube 1 yellow CreditCube
 1 CreditCube in any player color (no yellow one!) 1 CreditCube in any player color (no yellow one!)
  2 or 3 CreditCubes drawn from the bag 2 or 3 CreditCubes drawn from the bag
 place 1 of your own crew members (see details here) place 1 of your own crew members (see details here)
(You must pay the costs for the turtle lab first before you gain any bonuses.)
|
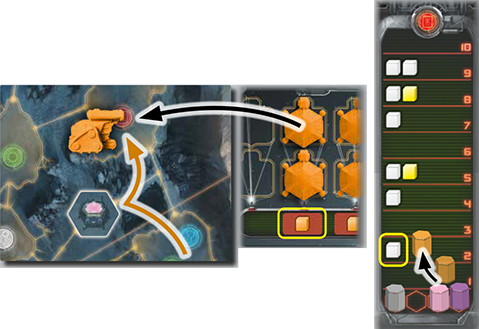
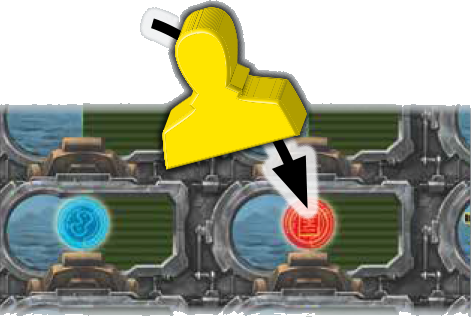
The cost to place the turtle lab is 1 CreditCube of their own player color.
Orange uses the transmitter station to move to the next area and ends their movement on a red space.
(They pay 1 CreditCube of theit choice to pink, who is the owner of the transmitter station.)
After placing the turtle lab on the red space, Orange advances 1 level on the red research area
and takes the shown bonus: 1 CreditCube in any player color (white cube).
|
Transmitter Stations
|
When moving between sectors, if there is an
empty transmitter space connected to the path,
you can build a transmitter station there. Take
any station from your player board and pay the
costs shown next to it. Put the station in the free
space and immediately gain 2 reputation.
(In
the same turn you can also drop a turtle lab.)
|
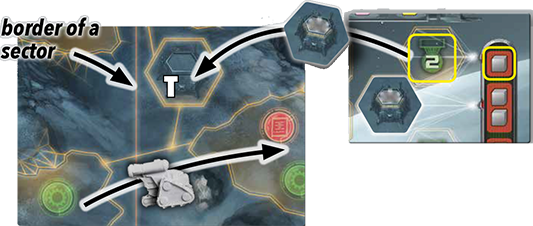 Grey moves their scout runner via a connecting line into an area in the adjacent sector. They may build a transmitter
station (T) on the free space next to the connecting line. They must pay 1 CreditCube of their player color to place the
upper transmitter station from their player board on the free space of the game board. They gain 2 reputation.
Grey moves their scout runner via a connecting line into an area in the adjacent sector. They may build a transmitter
station (T) on the free space next to the connecting line. They must pay 1 CreditCube of their player color to place the
upper transmitter station from their player board on the free space of the game board. They gain 2 reputation.
|
B] Gain CreditCubes
|
Instead of moving your scout runner, you may take CreditCubes. Look at the
section of the green display on the left, corresponding to the row in which
you placed your crew member. You gain the CreditCubes shown there from
the general supply. The black CreditCube always stands for your
own player color!
|
 Purple gets 1 yellow and 1 of their own purple CreditCubes.
|
Bonus spaces
|
Some spaces on the lower action panel show a bonus. You receive this bonus if you place a crew member on this space.
For some bonuses you must use a specific action A) MOVE SCOUT RUNNER or B) GAIN CREDITCUBES. You must pay for the action first, before you receive the bonus.
|
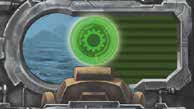
 The player is allowed to advance 1 level in the red research area.
|
These bonuses are available for both actions A) and B)


|
Use your marker to immediately advance 1 level in the research area with the corresponding color. If
the research space you advance onto shows a bonus, you immediately gain the bonus from the general supply.
|
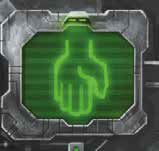
 You can immediately take a crew member from your player board
and place it on a free space on the upper or lower action panel. If
you put it on the upper action panel, you must place it under another
crew member. (You cannot place it in an empty column of the upper action panel!)
If you place it on the lower action panel, no other action will be triggered.
The new crew member will not gain you any extra action. But during the game it may
be advantageous if there is another crew member of your color on the action panel.
You can immediately take a crew member from your player board
and place it on a free space on the upper or lower action panel. If
you put it on the upper action panel, you must place it under another
crew member. (You cannot place it in an empty column of the upper action panel!)
If you place it on the lower action panel, no other action will be triggered.
The new crew member will not gain you any extra action. But during the game it may
be advantageous if there is another crew member of your color on the action panel.
|
 This bonus allows you to advance 1 position on the turn order track
(only available in the 4-player game). Swap the position of your marker
with the marker above. The new turn order takes effect on your next
turn. So the remaining players each still take one more turn in the old turn order.
This bonus allows you to advance 1 position on the turn order track
(only available in the 4-player game). Swap the position of your marker
with the marker above. The new turn order takes effect on your next
turn. So the remaining players each still take one more turn in the old turn order.
|
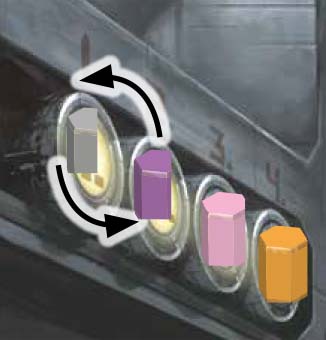 Purple receives the bonus and swaps the position with Grey. Pink
and orange continue with their action normally. After that, purple is the first player.
Purple receives the bonus and swaps the position with Grey. Pink
and orange continue with their action normally. After that, purple is the first player.
|
These bonuses are only available for action A)
 You can move up to 2 areas with your scout runner. The rules for movement and dropping off turtle labs are still the same.
(This bonus does not allow you to drop off an extra turtle lab!)
You can move up to 2 areas with your scout runner. The rules for movement and dropping off turtle labs are still the same.
(This bonus does not allow you to drop off an extra turtle lab!)
|
 If you drop a turtle lab at the end of your movement action, you may drop off an additional
turtle lab on the same space. (You must still pay the usual costs for the extra turtle lab).
Your marker on the research track still only moves up one space.
If you drop a turtle lab at the end of your movement action, you may drop off an additional
turtle lab on the same space. (You must still pay the usual costs for the extra turtle lab).
Your marker on the research track still only moves up one space.
|
This bonus is only available for action B)
In addition to the CreditCubes you receive through the action, you may randomly take 1 CreditCube from the bag. If you draw a black CreditCube, put it back into the bag
and take a CreditCube of your player color from the general supply. Otherwise, keep the CreditCube. (The CreditCube you take from the bag will not be replaced.)
For all bonuses: If on your turn you gain bonuses both from a commander card and from the chosen action space, you always receive the bonus from the commander card first.
Free exchange actions
 The free exchange action is shown near the player info table in the top right of the window.
At any time in the game, you may trade
3 CreditCubes for
1 different CreditCube.
(You trade with the general supply. The 3 CreditCubes do not have to be of
the same color.)
Action panel full
In rare cases there will be no more free spaces to place a crew member on the lower action panel. In this situation, you may place your
crew member on an already used space in the bottom row.
At the end of your turn, you may
fulfill 1 objective. After completing an objective, place 1 of your markers
from your player board onto the highest available reputation space next to the objective card and advance the
shown spaces on the reputation track. There are 2 types of objectives:
- Sector objectives (remove turtle labs)
- Research objectives (move down research markers)
Sector objectives (remove turtle labs)
|
The alliance is anxious for new resources! After your turtle labs
have harvested enough, you send them back to supply the
factories of the alliance.
Remove the turtle labs needed to complete the objective
from the game board and return them to your player
board. Always refill the free spaces on your player board
from right to left.
Details:
- You may also pick up turtle labs from the storm sectors to fulfill the objective.
- If a majority is required, it means the sole, simple majority.
- Place the regained turtle labs on the empty spaces farthest right on your player board.
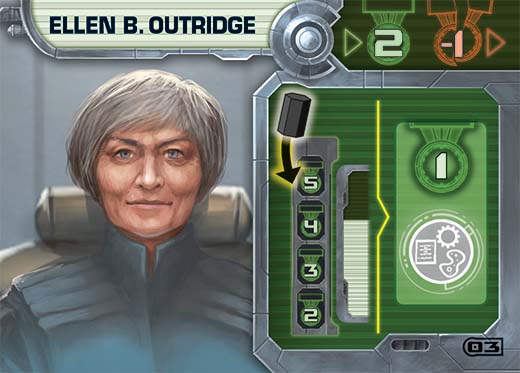
|
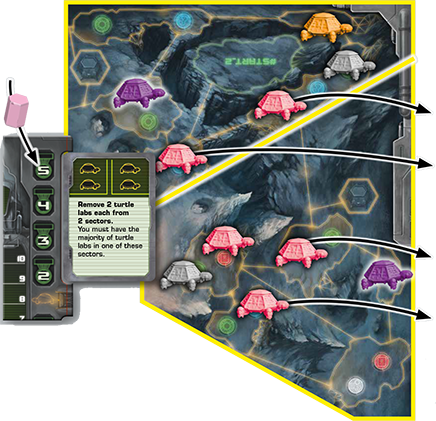 Pink can fulfill the shown objective because they got the required 4 turtle labs in
2 sectors and the majority in the lower sector.
They remove 2 turtle labs from each sector and put them back on their player board from right to
left. Then, they place 1 marker from their player board on the highest available reputation space next to
the objective and advance 5 spaces on the reputation track.
Pink can fulfill the shown objective because they got the required 4 turtle labs in
2 sectors and the majority in the lower sector.
They remove 2 turtle labs from each sector and put them back on their player board from right to
left. Then, they place 1 marker from their player board on the highest available reputation space next to
the objective and advance 5 spaces on the reputation track.
|
Research objectives (move down research markers)
|
Mankind thirsts for news! By sharing your knowledge with the
public, you increase your reputation.
Move 1 or more of your marker(s) down on the research track(s). The
track color as well as the required number of spaces are shown on the
objective card. The conditions to fulfill the objective cards are often
linked to the current round and become more difficult later in the
game.
Details:
- When you move your marker downward in a research area, you do not get any bonuses.
- When you advance in a research area again, you can also gain bonuses again.
- When the "most knowledge" is required, you alone must have the greatest knowledge in this research area.
|
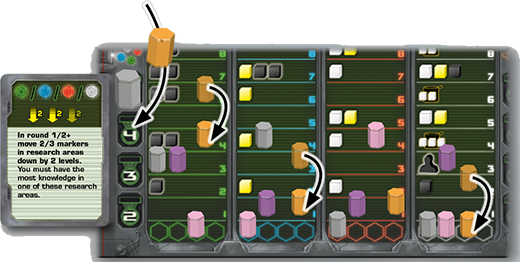 Orange can complete the shown research objective in
round 3. They move 3 of their markers down by 2 levels.
Now they place 1 marker from their player board on the
highest free reputation space next to the objective card
and advance 4 spaces on the reputation track.
Orange can complete the shown research objective in
round 3. They move 3 of their markers down by 2 levels.
Now they place 1 marker from their player board on the
highest free reputation space next to the objective card
and advance 4 spaces on the reputation track.
|
Conditions with a round number:
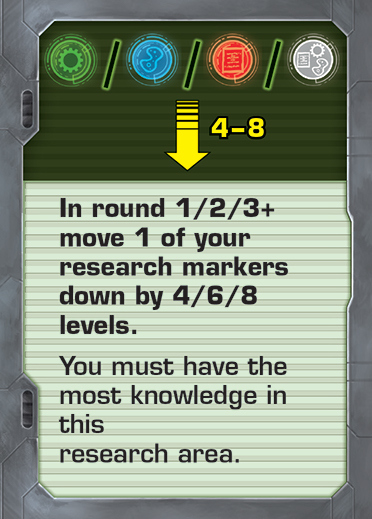 In round 1 you must move 1 of your markers down by 4 levels, in round 2 by 6 levels, and from round 3 by 8 levels.
|
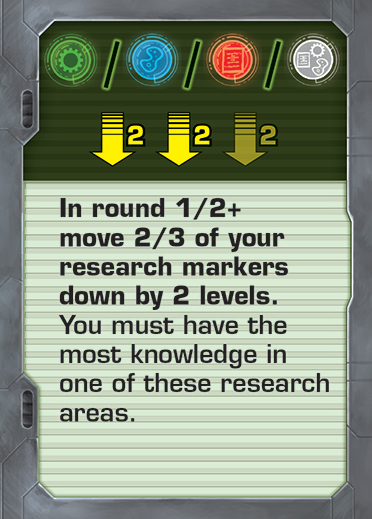 In round 1 you must move 2 markers down by 2 levels. From round 2, you must move 3 markers down by 2 levels.
|
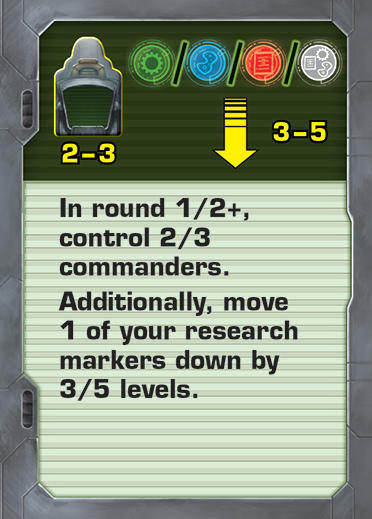 In round 1, you must control at least 2 commanders and move 1 of your markers down by 3 levels. From turn 2, you must control at least
3 commanders and move 1 of your markers down by 5 levels.
(It does not matter if it is an administrative or research commander. You do
not lose the commander.)
In round 1, you must control at least 2 commanders and move 1 of your markers down by 3 levels. From turn 2, you must control at least
3 commanders and move 1 of your markers down by 5 levels.
(It does not matter if it is an administrative or research commander. You do
not lose the commander.)
|
When the last crew member has been moved from the upper action panel to the lower action panel, the first phase ends. Then
the second phase starts: Administration.
The administration phase is divided into the following steps, which are carried out in order.
The administration phase is divided into the following steps, which are carried out in order.
You can see an overview on the action board:
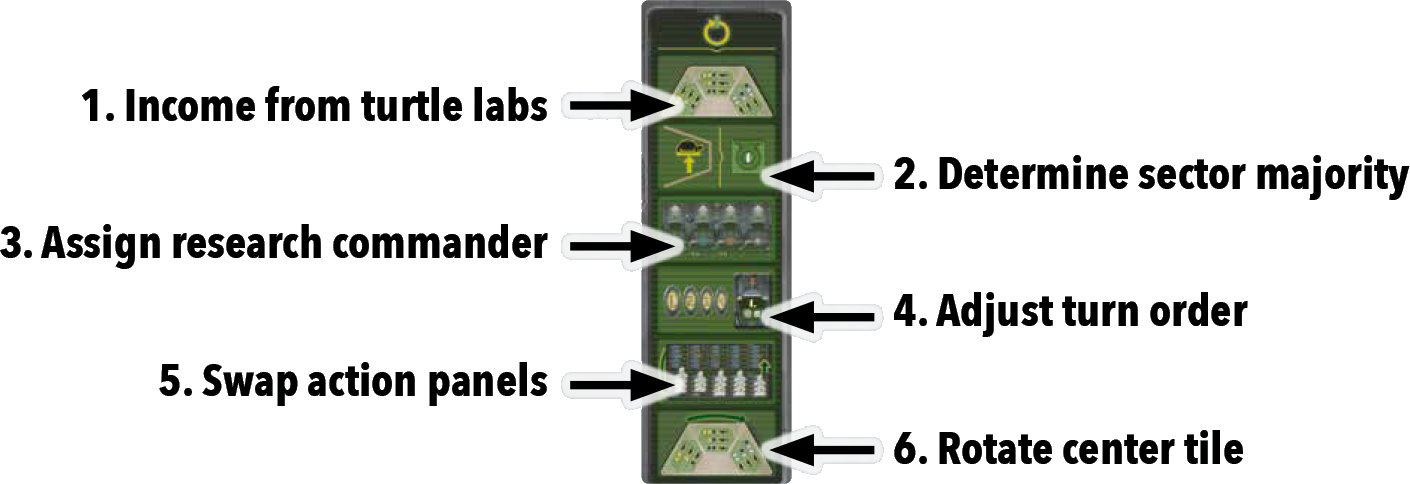
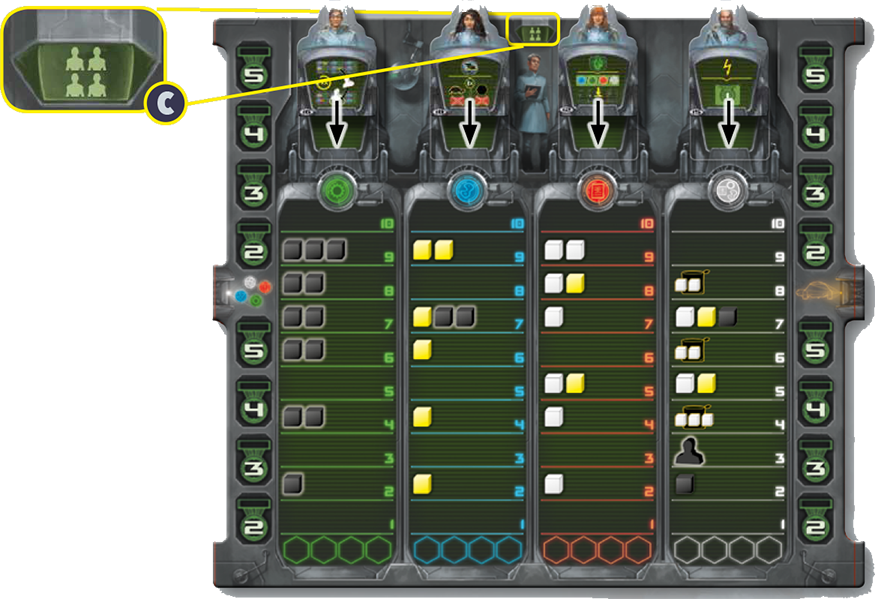
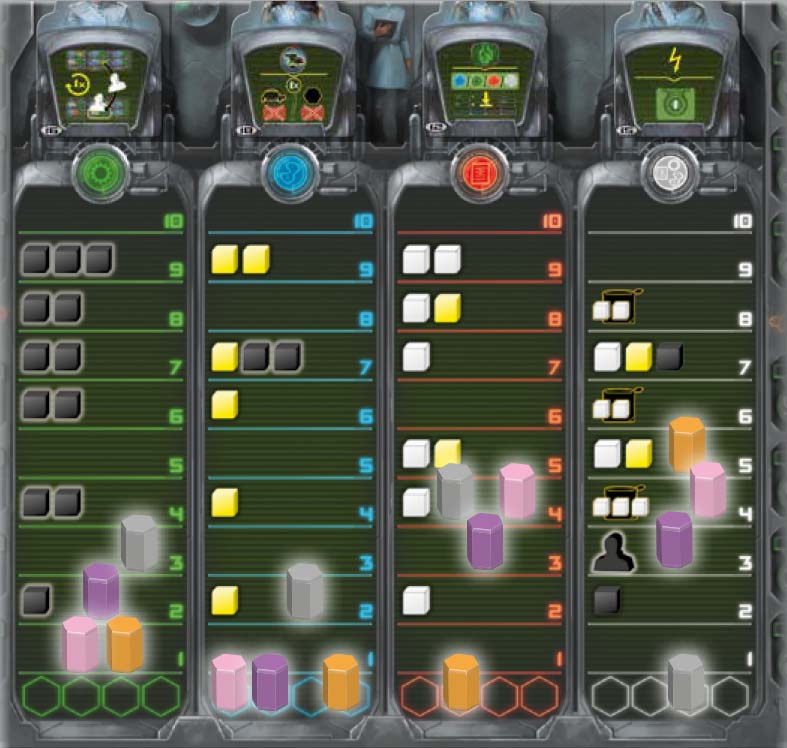
1) Income from turtle labs
Compare the number of your turtle labs in each of the 3 green quiet sectors with the
corresponding table on the center tile and take the shown number of CreditCubes.
(The turtle labs stay on the game board.)
In the example on the right:
In the upper sector: Grey and Orange gain 1 CreditCube in their own color for their turtle lab.
Purple and Pink gain 1 yellow for their 2 turtle labs.
In the right sector: Pink gains 1 CreditCube in their own color and 2 yellow CreditCubes for the
3 turtle labs. The other players gain 2 CreditCubes in their own color for their turtle labs.
In the lower sector: There are no turtle labs here. The players do not gain anything in this sector.
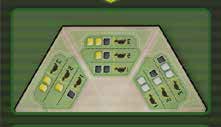
2) Determine sector majority
Compare your number of turtle labs in each of the 3 quiet (green) sectors.
Gain 1 reputation for every sector in which you have more turtle labs than any other player.
In the example on the right:
Pink gains 1 reputation for the majority in the right sector. No player has the sole majority in the upper sector.
|

|
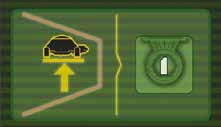
3) Assign research commander
Compare your markers in each research area. Whoever's marker is highest in an area takes control of the commander above and gains the
corresponding card. (You do not place any markers under the research commander.) Immediately receive reputation as indicated by the
green number on the card. From now on, the commander will be at your disposal.
(If the commander has an instant effect  , use it once now.) , use it once now.)
If the commander was previously controlled by another player, that player must hand over the card to you and lose reputation indicated
by the red number on the card. If the commander is already under your control, you will not gain the reputation again. (If the commander
has an instant effect, you also cannot use it again.)
If there is a tie in any area, nobody takes control of the corresponding commander. The commander card must be returned and the previous
owner loses reputation as indicated by the red number on the card.
|
 Grey takes control of the 1st and 2nd commander (from left),
takes their cards and gets 4 reputation. The 3rd commander is
not controlled by any player. (If they were in the possession of
a player, the player must now return the card.) Orange takes
control of the 4th commander. They take the card and receive
2 reputation. The players lose 1 reputation for each commander
card they must return.
Grey takes control of the 1st and 2nd commander (from left),
takes their cards and gets 4 reputation. The 3rd commander is
not controlled by any player. (If they were in the possession of
a player, the player must now return the card.) Orange takes
control of the 4th commander. They take the card and receive
2 reputation. The players lose 1 reputation for each commander
card they must return.
|

4) Adjust the turn order
If a player has the first player token, they place their
marker on position 1 of the turn order track. The
other players’ markers move 1 position downward (as
necessary). Then put the first player token back on the action board.
|
 Purple returns the first player token and advances from position 3 to position
1 on the turn order track. Pink and grey each move 1 position backwards.
Purple returns the first player token and advances from position 3 to position
1 on the turn order track. Pink and grey each move 1 position backwards.
|
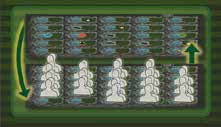
5) Swap action panels
Take the upper action panel from its place
and push the lower action panel onto the
upper space, leaving all crew members in
their spaces. Place the empty action panel on the lower space.
 After exchanging the action panels, all crew members are once again on the upper panel.
|
6) Rotate the center tile
Rotate the center tile 1 position (60°) in clockwise direction so that each side on the center tile moves forward by 1 sector.
After the 1st rotation, the round indicator changes from 1 to 2.
|
6) Rotate the center tile
Rotate the center tile 1 position (60°) in clockwise direction so that each side on the center tile moves forward by 1 sector.
After the center tile has been rotated, the current round ends. The first player starts the new round with their first action.