Lorenzo il Magnifico - General game info
Lorenzo
2-4 players, 60-120 minutes, 12 years and older
AuthorsVirginio Gigli
Flaminia Brasini
Simone Luciani (magobaol77)
IllustratorKlemens Franz
Published byCranio Creations
Online since 2020-12-04
Developed byBart De Cock (be_com4)
Boardgamegeek203993
Yucata.de owns a license for the online version of this game. A big "thank you" to the copyright owners (publisher and/or author and illustrator) who make it possible to have this game for free online here!
Note: This online implementation uses slightly changed rules!
Lorenzo il Magnifico - Rules
If you are reading these rules for the first time, ignore the text along the right hand side. These rules serve as a summary to help you quickly familiarize yourself with the game.

Show → summary only → detailed version only → both summary and detailed version

Lorenzo il Magnifico

In Lorenzo il Magnifico, each player takes the role of a head of a noble family in Florence during the Renaissance. You must accumulate prestige and fame to gain more Victory Points than the others. To do so, you will send your family members to different areas of the city where they can attain various achievements. In some areas, you will get useful resources. In others, you will get development cards representing new territories, sponsored buildings, influenced characters or encouraged ventures. Elsewhere, you can activate the effects of these cards. Family members are not identical. At the beginning of each round, 3 dice are rolled to determine the family members’ value. You must carefully choose where to send your family members with a higher value.
There are several ways to gain Victory Points, but you must also pay attention to your relations to the Church. The game is divided into 3 periods, each formed by 2 rounds. At the end of each period, players must show their faith. Anyone who hasn’t prayed enough will suffer harsh penalties. After 6 rounds, you will calculate your final score and the player with most Victory Points will be the winner.

Components
1
board
4
Personal boards
4
Personal Bonus Tiles
Coins
3
dice (white, black, orange)
Wooden resources:
Wood (16 small, 4 large)
Stone (16 small, 4 large)
Servant (18 small, 5 large)
16
Family Members (each player has 3 colored pawns and 1 uncoloured pawn)
16
Marker Discs
12
Excommunication Cubes (3 for each player color)
21
Excommunication Tiles
4
Covering Tiles
96
Development Cards (4 types divided into 3 Periods)
20
Leader Cards
Setup
1
Place the Board in the center of the table.
2
Separate the Development Cards by type and period (color and back number). Shuffle each deck (formed by 8 cards) separately. Create 4 different decks (one for each type of card) by placing third period cards on the bottom, second period cards in the middle, and first period cards on the top. Place the decks next to the board, near the towers.
3
Separate the Excommunication Tiles by period (back number), shuffle them separately, then draw one tile from each stack and place them in the appropriate space on the board. (Place the leftover tiles back in the box.)
4
Place the resources and coins next to the board. They form the general supply. Small resources count as 1. Large resources count as 5. Resources are considered to be unlimited. (If you run out, find a way to take note of the resources you receive).
5
Place the 3 Dice next to the Board
6
In a 2-player game, place all the Covering Tiles in the appropriate spaces (with the and symbol).
In a 3-player game, place the 2 small Covering Tiles in the appropriate spaces (with the symbol).
7
Each player chooses a color and receives:
  • a A Personal Board
  • b 1 Personal Bonus Tile. (In the basic game, all players use this side.)
  • c 3 Family Members of their color and the uncolored Family Member with the sticker of their color
  • d 3 Excommunication Cubes
  • e 4 Marker Discs. Place 1 disc each on the 0 step of the Victory Points track, Military Points track, and Faith Points track, respectively. Place the last disc on the Turn Order track. See on the right.
  • f 2 wood, 2 stone, 3 servants
8
Randomly choose the turn order and place the marker discs on the Turn Order track.
9
The first player receives 5 coins, second player receives 6 coins, third player receives 7 coins, fourth player receives 8 coins.

Lorenzo il Magnifico is played in 3 periods, each divided into 2 rounds, for a total of 6 rounds. Each round is divided into 4 phases.

  1. Round Setup
  2. Actions
  3. Vatican Report (only during round 2, 4, 6 at the end of a Period)
  4. End of the Round

Lorenzo il Magnifico is a complex strategic game. Here we present the rules for the basic game to introduce play. To play a full game, read the Advanced Rules section and integrate them with the basic rules.

  1. Round Setup
  2. Actions
  3. Vatican Report (only during round 2, 4, 6 at the end of a Period)
  4. End of the Round

Lorenzo il Magnifico is played in 3 periods, each divided into 2 rounds, for a total of 6 rounds. Each round is divided into 4 phases.

A Round Setup

  • Draw Development Cards.
  • Roll the dice and place them on the board.
  • Draw 4 Development Cards from the top of each deck and place them in the appropriate spaces of the board, from bottom to top.
  • The First player rolls the dice and places them on the appropriate spaces on the board.

B Actions

Place one of your Family Members in an action space and perform the corresponding action.

To take an action, you must place one of your Family Members in an action space and perform the corresponding action.

Each Family Member can perform an action at the value of its corresponding die.

The neutral Family Members have a value of 0.

The minimum value needed for every action is depicted inside the die symbol under the action space.

Before placing a Family Member, you can always spend servants to increase the Family Member’s value, in a 1:1 ratio, without limit. It is not allowed to spend more servants than you need!

Following Turn Order, players must take their actions.

To take an action, you must place one of your Family Members in an action space and perform the corresponding action.

For example, if you rolled a 4 on the white die, all Family Members with the white die symbol on top will have a value of 4 during the current round).

On top of each Family Member, there is a symbol (a colored or a neutral die) . This symbol is related to the value of the corresponding die.

Each Family Member can perform an action at the value of its corresponding die.

The neutral Family Members have a value of 0. (The colored sticker reminds that an uncolored Family Member belongs to a certain player.)

For some actions, you will need a Family Member of value 1. For other actions, you will need higher values. Some actions allow you to decide your Family Member’s value depending on your needs. The minimum value needed for every action is depicted inside the die symbol under the action space.

For example, you can spend 3 servants to increase your uncolored Family Member’s value to 3.

Note: A Family Member with a certain value can always take an action that requires a lower value.

Before placing a Family Member, you can always spend servants to increase the Family Member’s value, in a 1:1 ratio, without limit. It is not allowed to spend more servants than you need!

There are 5 different areas where you can place your Family Members. Different rules are applied to the action spaces in different areas.

Towers for Development Cards

There are 4 Towers, each with 4 floors. On every floor, there is an action space that allows the player to take the corresponding card and, if present, some bonuses.

All cards, Territories excepted, have a cost indicated in their upper left corner.

Most cards have an immediate effect. This is indicated in the middle part of the card, beside the flash symbol.

For a list of possible immediate and permanent effects see here.

There are 4 Towers, each with 4 floors. On every floor, there is an action space that allows the player to take the corresponding card and, if present, some bonuses. If a player cannot pay a card he may not choose the corresponding action.

The Cards

There are 4 different types of Development Cards: Territories (green), Buildings (yellow), Characters (blue), and Ventures (purple).

All cards, Territories excepted, have a cost indicated in their upper left corner. When you have to take a card (as an effect of a Family Member placed or another card’s immediate effect) , you must always pay its cost.

Most cards have an immediate effect. This is indicated in the middle part of the card, beside the flash symbol. You may receive resources, Points (Victory, Military or Faith) or bonus actions. These bonus actions could be taking a card without placing a Family Member or performing a Harvest/Production action.

Most cards have a permanent effect. This is indicated in the lower part of the card. Each type of card has a permanent effect that is activated in a different way.

For a list of possible immediate and permanent effects see here.

Territories

Territories don’t have a cost, but it is not that simple to conquer new territories.

The first 2 left spaces are always available. The others will become available when your military power increases. You don’t have to spend the required Military Points. You only have to have them in the moment you place the card.

Territories are an important source of goods. Their permanent effects are activated with a Harvest action.

Territories don’t have a cost, but it is not that simple to conquer new territories. To take a new Territory Card, you must place it in the first free space on the left of your Personal Board (in the lower line).

The first 2 spaces are always available. The others will become available when your military power increases. On every space of the lower line of your Personal Board (except the first 2), you can see the number of Military Points required to place a card there. You don’t have to spend Military Points. You only have to have them in the moment you place the card. (After you have placed a card, the requirement is covered and you can forget it.)

Territories are an important source of goods. Their permanent effects are activated with a Harvest action.

In addition, they provide Victory Points at the end of the game in relation to the total number of Territory Cards you have. (See End of the Game and Final Scoring)

Buildings

Buildings always cost resources (wood, stone, servant, coin) to acquire them.

Buildings provide resources or allow you to exchange a resource for either another resource or Points. Their permanent effects are activated with a Production action.

Buildings always cost resources (wood, stone, servant, coin). When you acquire a Building Card, you must spend the required resources and return them to the general supply. If you don’t have the required resources, you can’t take the card.

Place the Building in the appropriate space on your Personal Board (in the upper line) from left to right.

Buildings provide resources or allow you to exchange a resource for either another resource or Points. Their permanent effects are activated with a Production action.

Characters

Characters only ever cost coins to acquire them.

Characters’ permanent effects are activated in specific circumstances (usually when you are performing another action) . Some of them give a bonus to the action value, some provide a discount on the costs.

Characters only ever cost coins. When you acquire a Character Card, you must spend the required coins and return them to the general supply. If you don’t have the required coins, you can’t take the card.

Place the card in a line beside your Personal Board (in the lower right corner).

Some Characters’ immediate effects may give you the ability to perform a bonus action without using your Family Members. In this case, all rules are applied normally to that action.

Characters’ permanent effects are activated in specific circumstances (usually when you are performing another action) . Some of them give a bonus to the action value, some provide a discount on the costs.

In addition, Character Cards provide Victory Points at the end of the game in relation to their total number. (See End of the Game and Final Scoring.)

Ventures

Ventures cost resources or Military Points.

Some Venture Cards have a double cost, which means you can choose which cost to pay.

Ventures’ permanent effects are always activated at the end of the game during Final Scoring.

This symbol means that you must pay 2 Military Points and may do so only if you have at least 4 Military Points before taking the card. (Move your disc back on the Military Track.) -
OR pay using resources.

Ventures cost resources or Military Points.

Some Venture Cards have a double cost, which means you can choose which cost to pay. If you don‘t have the resources or Points required, you can‘t place the Family Member to take the card.

Place the card in a line next to your Personal Board (in the upper right corner).

Ventures’ permanent effects are always activated at the end of the game, when you calculate the final scoring. (See End of the Game and Final Scoring on page 11.)

Rules for placing a Family Member on a tower

  • Place a Family Member on a tower floor. (It must have a value equal to or higher than the value required by the action space. If there are already Family Members in the same tower, pay 3 additional coins to the supply. There can’t be 2 Family Members of the same color in the same tower.)
  • Take the bonus if present.
  • Pay the cost of the card (and if it is a Territory, you must have the Military Points required) .
  • Take the card and place it on your personal board. Apply the immediate effect of the card if present.
  • The Family Member you want to place here must have a specific value, depending on the floor where you will place it:
    On the first floor, you must place Family Members of value 1 or more.
    On the second floor, you must place Family Members of value 3 or more.
    On the third floor, you must place Family Members of value 5 or more.
    On the fourth floor, you must place a Family Member of value 7 or more. To place here, you must spend at least 1 servant or have a card power that increases a Family Member’s value
  • There is no rule regarding the placement order on the floors. (Players don’t have to place on the first floor first.)
  • Beside the action spaces on the third and fourth floor, you will find some bonuses: 1 or 2 wood, 1 or 2 stone, 1 or 2 Military Points, 1 or 2 coins. When you place a Family Member in one of these spaces, immediately receive the bonus. You may use this bonus to pay the cost of the card you want to take.
  • If there are Family Members (one or more, yours or of other players) already present in the same tower where you want to place your Family Member, you must pay 3 coins to the supply before placing it. If you place in a space that gives coins as a bonus, you can’t use them to pay these 3 additional coins.
  • There can’t be two Family Members of the same color in the same tower. Uncolored Family Members are considered to be of a neutral color. (A single player can take 2 cards from the same tower in the same round, but only using their uncolored Family Member or using a card effect.)
  • After taking a card, place it in the corresponding space of your Personal Board: Territories on the lower line, Buildings on the upper line, Characters on the lower right, Ventures on the upper right. If the card has an immediate effect, resolve it now.
  • You may not have more than 6 cards of the same type on your Personal Board.

Recap: Place a Family Member on a tower floor. (It must have a value equal to or higher than the value required by the action space. If there are already Family Members in the same tower, pay 3 additional coins to the supply. There can’t be 2 Family Members of the same color in the same tower.) Take the bonus if present. Pay the cost of the card (and if it is a Territory, you must have the Military Points required) . Take the card and place it on your personal board. Apply the immediate effect of the card if present.

Harvest and Production Area

Both of these areas are divided into two action spaces. The first action space on the left may contain only one Family Member. The larger action space on the right may contain any number of Family Members. (This space is not available in 2-players games.)

  • The Family Member you want to place here must have a value of 1 or higher. The second section gives a penalty of -3 to the action value.
  • Players may not place two of their colored Family Members in the two action spaces of each area, but they can place a colored and the uncolored Family Member.
  • The value of the Family Members you place here determines the value of the action. Their value can be increased by spending servants or by cards’ effects.

Harvest or Production activates

  • the corresponding personal bonus
  • the permanent effects of all Territories or Buildings on your Personal Board, but only of those that have a value equal to or lower than your action value.

All the resources you want to use to activate the exchanging effects (those effects that change a resource into another) must already be present in your personal supply before starting the activation. (You can’t use resources that you received from a permanent effect for another building’s permanent effect.)

Both of these areas are divided into two action spaces. The first action space on the left may contain only one Family Member. The larger action space on the right may contain any number of Family Members. (This space is not available in 2-players games.)

  • The Family Member you want to place here must have a value of 1 or higher. The second section gives a penalty of -3 to the action value. To place a Family Member here, you must activate an action at value 1 or higher.

    Players may not place two of their colored Family Members in the two action spaces of each area, but they can place a colored and the uncolored Family Member.

    The value of the Family Members you place here determines the value of the action. Their value can be increased by spending servants or by cards’ effects.

  • Harvest activates the corresponding personal bonus and the permanent effects of all Territories on your Personal Board, but only of those Territories that have a value equal to or lower than your Harvest action value.
  • Production activates the corresponding personal bonus and the permanent effects of all Buildings on your Personal Board, but only of those Buildings that have a value equal to or lower than your Production action value.
  • Personal bonus is indicated on your Personal Bonus Tile beside your Personal Board. This bonus is activated with an action at value 1, so it is always activated when you perform a Harvest/Production action.

Activating permanent effects

You place a Family Member with a value of 3 on the first Harvest action space. You have 2 servants in your personal supply and decide to spend them to increase your action value up to 5. You receive 1 wood, 1 stone, and 1 servant from your Personal Bonus Tile; 3 wood from the Forest; 2 Military Points and 2 servants from the Manor House; and 1 Victory Point and 2 stone from the Marble Pit.

You don’t receive bonuses from the Monastery because it has an activation value of 6 and your action has a value of 5.

When you activate a line of Territories, you receive resources and Points from the activated cards. In addition, you receive bonuses from your Personal Bonus Tile.

When you activate a line of Buildings, you activate their permanent effects. In addition, you receive bonuses from your Personal Bonus Tile.

All the resources you want to use to activate the exchanging effects (those effects that change a resource into another) must already be present in your personal supply before starting the activation. (You can’t use resources that you received from a permanent effect for another building’s permanent effect.) To remember, place the resources you want to use from your personal supply on the cards that will use those resources before activating.

You place a Family Member with a value of 6 on the second Production action space, so your action has a value of 3. You can decide

  1. not to spend servants and activate only the Treasury and the personal bonus. You gain 1 Military Point and receive 2 coins from the Personal Bonus Tile and you spend 1 or 2 coins to gain 3 or 5 Victory Points
  2. to spend 1 servant to also activate the Carpenter’s Shop. You spend 1 wood to receive 3 coins or 2 wood to receive 5 coins
  3. to spend 2 servants to also activate the Fortress. You receive 1 Council Privilege and gain 2 Victory Points

In any case, you can’t use the coins you receive from the Personal Bonus Tile (or from the Carpenter’s Shop) to activate the Treasury. You must already have the coins in your personal supply before the activation.

The Market

There are 4 action spaces in the Market area.

(The 2 spaces with this symbol are only available in 4-players games.)

  • Each space may contain only 1 Family Member. There can be any number of Family Members of the same color in the Market area. (A player can place a Family Member in more action spaces here.)
  • The Family Members you want to place here must have a value of 1 or higher.
Receive 5 coins
Receive 5 servants
Gain 3 Military Points and receive 2 coins
Receive 2 different Council Privileges

There are 4 action spaces in the Market.

(The 2 spaces with this symbol are only available in 4-players games.)

  • Each space may contain only 1 Family Member. There can be any number of Family Members of the same color in the Market area. (A player can place a Family Member in more action spaces here.)
  • The Family Members you want to place here must have a value of 1 or higher.
Receive 5 coins Receive 5 servants Gain 3 Military Points and receive 2 coins Receive 2 different Council Privileges. (You may not take the same bonus twice.)

When you receive resources, take them from the general supply and place them in the appropriate spaces on your Personal Board. When you gain Points, move your Marker Disc on the appropriate track.

The Council Palace

There is one action space in the Council Palace.

This space may contain any number of Family Members. There can be more than one of any color of Family Member in the Council Palace. (A player may place multiple Family Members in this action space.)

  • Immediately receive 1 Council Privilege and 1 coin.
  • At the end of each round, Turn Order changes in relation to the order in which Family Members are placed in the Council Palace.

1 Council Privilege is a bonus of your choice between:

1 wood and 1 stone / 2 servants / 2 coins / 2 Military Points / 1 Faith Point

There is one action space in the Council Palace.

  • This space may contain any number of Family Members. There can be more than one of any color of Family Member in the Council Palace. (A player may place multiple Family Members in this action space.)
  • The Family Member you want to place here must have a value of 1 or higher.
  • When you place in the Council Palace, place the Family Members in order from left to right.
  • Immediately receive 1 Council Privilege and 1 coin.

Note: At the end of each round, Turn Order changes in relation to the order in which Family Members are placed in the Council Palace. (See End of the Round.)

Council Privilege is a bonus of your choice between:

1 wood and 1 stone / 2 servants / 2 coins / 2 Military Points / 1 Faith Point

C Vatican Report

This phase only occurs in rounds 2/4/6.

Faith Points required: 3/4/5 Faith Points for Period 1/2/3, respectively.

There are 3 different possibilities:

  • If a player does not have the Faith Points required at the end of a Period, they are not able to support the Church and will suffer an Excommunication.
  • If a player does have the Faith Points required at the end of a Period, they can decide to support or not to support the Church. If they decide not to support it, they will suffer an excommunication as if they did not have the required level of Faith Points.

Excommunicated players must place one of their cubes on the Excommunication Tile of the current period. From now on, they will suffer the negative effects of their excommunication. They leave their disc on the Faith Points track where it is.

Players who decide to support the Church must spend all their Faith Points to prevent themself from receiving an excommunication. The players receive the Victory Points indicated on the step of the Faith track they are currently on. Then they move their marker back to the first step of the Faith track.

At the end of the 6th Round, the players who suffer excommunication, gain the Victory Points indicated on the step of the Faith track they are currently on.

This phase only occurs in rounds 2/4/6. There is no round marker in the game. You must look at the Development Cards to calculate the round, if you don’t remember it. If the cards on the top of the decks are a different period than the cards on the board, then it is an even round.

During this phase, players must show their support to the Church through their Faith Points.

Each period has a certain amount of Faith Points required: 3/4/5 Faith Points for Period 1/2/3, respectively. This is indicated on the Faith Points track.

There are 3 different possibilities:

  • If a player does not have the Faith Points required at the end of a Period (their marker on the Faith track isn’t on the required step), they are not able to support the Church and will suffer an Excommunication. Excommunicated players must place one of their cubes on the Excommunication Tile of the current period. From now on, they will suffer the negative effects of their excommunication. They leave their disc on the Faith Points track where it is.

    If a player does have the Faith Points required at the end of a Period (their marker on the Faith track is on the required step or further), they can decide to support or not to support the Church.

  • If they decide not to support it, they will suffer an excommunication as if they did not have the required level of Faith Points. They must place their cube on the Excommunication Tile of the current Period and suffer the negative effects of their excommunication from now on. They leave their disc on the Faith track where it is.
  • If they decide to support the Church, they must spend all their Faith Points to prevent themself from receiving an excommunication. However, the Pope will thank them with a certain amount of Victory Points. The players receive the Victory Points indicated on the step of the Faith track they are currently on. Then they move their marker back to the first step of the Faith track.

After the Actions phase of round 2, the red player has 2 Faith Points and does not have the 3 Faith Points required by the first Period Vatican Report. They suffer the first Period Excommunication. They leave their disc where it is.

The green player has 3 Faith Points and can decide whether or not to support the Church.

If not, they suffer Excommunication and leaves their disc where it is.

If they support the Church, they gain 3 Victory Points and move their disc back to the 0 space of the Faith track.

(Suffering an excommunication will give you negative effects for the rest of the game, but it preserves your Faith Points.)

At the end of the 6th Round, the players who do not have the Faith Points required, after suffering excommunication, gain the Victory Points indicated on the step of the Faith track they are currently on. Then they move their marker back to the first step of the Faith track.

For a detailed description of Excommunication Tiles, see the Appendix.

D End of the Round

  • Take all the faceup Development Cards from the board.
  • Change the Turn Order following the order of the Family Members placed in the Council Palace. Players who didn’t place a Family Member in the Council follow in their relative order.
  • Players then move their Family Members from the Board to their Personal Board.

At the end of the round, perform the following actions.

  • Take all the faceup Development Cards from the board. They won’t be used again in this game.
  • Change the Turn Order following the order of the Family Members placed in the Council Palace. The player who placed first becomes first player for the next round. Place their disc on the first space of the Turn Order, and so on with other players. If some players didn’t place a Family Member in the Council Palace, they remain in their relative order. Uncolored Family Members count for the Turn Order as well. If a player placed more Family Members here, the first on the left is counted for Turn Order. If there are no Family Members in the Council Palace, leave the Turn Order as it is.
  • Players then move their Family Members from the Board to their Personal Board.

You are now ready to start the following round.

The game ends at the end of the sixth round, after the End of the Round phase.

Final Scoring indicated by symbol .

  • Conquered Territories: 1/4/10/20
    Victory Points for 3/4/5/6 Territory Cards
  • Influenced Characters: 1/3/6/10/15/21
    Victory Points for 1/2/3/4/5/6 Character Cards
  • Encouraged Ventures: The sum of all Victory Points on the Venture Cards
  • Military Strength: If there is a tie between first players, they all gain 5 Victory Points and nobody gains 2 Victory Points. If there is a tie between second players, they all gain 2 Victory Points.
  • Collected Resources: 1 Victory Point for every 5 resources of all types.

The player with most Victory Points is the winner.

In case of a tie, the player more advanced on the Turn Order is the winner.

The game ends at the end of the sixth round, after the End of the Round phase. You can now calculate the Final Scoring.

Players will score Victory Points for the following results, indicated by symbol .

  • Conquered Territories: 1/4/10/20
    Victory Points for 3/4/5/6 Territory Cards on your Personal Board.
  • Influenced Characters: 1/3/6/10/15/21
    Victory Points for 1/2/3/4/5/6 Character Cards next to your Personal Board.
  • Encouraged Ventures: The sum of all Victory Points on the Venture Cards next to your Personal Board.
  • Military Strength: If there is a tie between first players, they all gain 5 Victory Points and nobody gains 2 Victory Points. If there is a tie between second players, they all gain 2 Victory Points.
  • Collected Resources: 1 Victory Point for every 5 resources of all types. (Add all the resources together, then divide the result by 5.)

The player with most Victory Points is the winner.

In case of a tie, the player more advanced on the Turn Order is the winner.

Setup

Each player chooses a Personal Bonus Tile and places it next to their Personal Board.

Shuffle the Leader Cards and give 4 cards to each player. Choose 1 card to keep and pass the others to the player on your right. Continue drafting cards until each player has 4 cards.
Leader Cards

Each Leader card has some requirements you must satisfy to play it. These are indicated in the upper part of the card. Requirements are not costs. You don‘t have to pay them.

Each Leader has a special ability that is either Once Per Round or Permanent, indicated in the lower part of the card.

  • Once Per Round abilities give you bonuses when you activate it with a Leader Action (see below). These effects can be activated only once per round.
  • Permanent abilities usually have effects that are applied in specific circumstances, so they can be applied more than once per round.

Leader Actions

During their Actions Phase, players may perform one or more special actions without placing a Family Member. These instant actions can be performed at any time, before or after placing their Family Member.

  • Discarding a Leader Card from your hand and immediately receive a Council Privilege.
  • Playing a Leader Card from your hand if you satisfy the Leader requirements.
  • Activating a Leader’s Once Per Round Ability

To play the full game, add these advanced rules. A setup rule provides the ability to customize your Personal Bonus Tile. Then, an important element of the game is introduced: the Leader Cards. These cards are used in the Actions phase. They have strong special abilities, but you will need to satisfy some requirements to play them.

Setup

  • Instead of taking a Personal Bonus Tile, place them with the advanced side faceup on the table. In a reverse turn order, each player chooses a Personal Bonus Tile and places it next to their Personal Board.
  • Shuffle the Leader Cards and give 4 cards to each player. Choose 1 card to keep and pass the others to the player on your right. Continue drafting cards until each player has 4 cards.

Leader Cards

Each Leader card has some requirements you must satisfy to play it. These are indicated in the upper part of the card. Requirements are not costs. You don‘t have to pay them. You only need to have them when you play the card. (It doesn’t matter if you lose some requirements afterward.)

Each Leader has a special ability that is either Once Per Round or Permanent, indicated in the lower part of the card.

Once Per Round abilities give you bonuses when you activate it with a Leader Action (see below). These effects can be activated only once per round.

Permanent abilities usually have effects that are applied in specific circumstances, so they can be applied more than once per round.

(For a detailed description of Leader cards, see the Appendix.)

Leader Actions

During their Actions Phase, players may perform one or more special actions without placing a Family Member. These instant actions can be performed at any time, before or after placing their Family Member.

Leader actions cannot be performed in the middle of eventual effects which were triggered by placing your Family Member.

Discarding a Leader Card

You can decide to discard a Leader card from your hand. If you do so, you immediately receive a Council Privilege. You may do this more than once per turn.

Playing a Leader Card

You can play a Leader Card from your hand if you satisfy the Leader requirements. Place the Leader card face up next to your Personal Board. You may do this more than once per turn.

Activating a Leader’s Once Per Round Ability

Turn the Leader Card face down and resolve its “Once Per Round” Ability. You may activate more than one card per round.

End of the Round

Turn facedown Leader cards faceup.

Take the depicted number of resources or Points

Perform a specific action at a specific value without placing a Family Member

Pay the resources or Points on the left to receive the resources or Points on the right, only one time per activation (if there are two arrows, you must choose which one to execute)

Receive the coins or Victory Points on the left for each number of Cards or Military Points on the right you have

When buying a Development Card of the specified type (shown left of the discount), you get the card at a discount of the resources shown.

When you are performing a specific action (Harvest, Production, or Taking a specific Card), increase your action value by the depicted number of dots

You don’t take the bonuses when you take a Development Card from the third and the fourth floor of the towers (through a Family Member or as an effect of another card.)

Leader cards

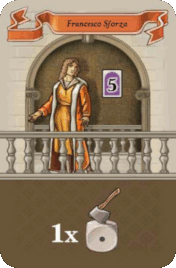
Francesco Sforza

Requirement: 5 Venture Cards

Effect (Once per Round):
Perform a Harvest action at value 1. (You can increase this action value only with servants; you can't increase it with Farmer or Peasant Development Cards)

Ludovici Ariosto

Requirement: 5 Character Cards

Effect (permanent):
You can place your Family Members in occupied action spaces.

Filippo Brunelleschi

Requirement: 5 Building Cards

Effect (Permanent):
You don't have to spend 3 coins when you place you Family Member in a Tower that is already occupied.

Federico Da Montefeltro

Requirement: 5 Territory Cards

Effect (Once Per Round):
One of your coloured Family Members has a value of 6, regardless of its related die.

You can activate this effect before selecting the Family Member you want to use this turn.

Girolamo Savonarola

Requirement: 18 Coins

Effect (Once Per Round):
Gain 1 Faith Point.

Giovanni Dalle Bande Nere

Requirement: 12 Military Points

Effect (Once Per Round):
Receive 1 wood, 1 stone and 1 coin.

Sandro Botticelli

Requirement: 10 wood

Effect (Once Per Round):
Gain 2 Military Points and 1 Victory Point.

Michelangelo Buonarroti

Requirement: 10 stones

Effect (Once Per Round):
Receive 3 coins

Ludovico III Gonzaga

Requirement: 15 servants

Effect (Once Per Round):
Receive 1 Council Privilege.

Leonardo Da Vinci

Requirement: 4 Character Cards and 2 Territory Cards

Effect (Once Per Round):
Perform a Production action at value 0. (You can increase this action value only with servants; you can't increase it with Artisan or Scholar Development Cards).

Pico Della Mirandola

Requirement: 4 Venture Cards and 2 Building Cards

Effect (Permanent):
When you take Development Cards, you get a discount of 3 coins (if the card you are taking has coins in its cost). This is not a discount on the coins required to place in a tower already occupied.

Sisto IV

Requirement: 6 Wood, 6 Stone, 6 Coins and 6 Servants

Effect (Permanent):
You gain 5 additional Victory Points when you support the Church in a Vatican Report phase.

Lucrezia Borgia

Requirement: 6 Development Cards of the same type

Effect (Once Per Round):
Your coloured Family Members have a bonus of +2 on their value (You can increase their value with servants or Character Card effects.

Sigismondo Malatesta

Requirement: 7 Military Points and 3 Faith Points

Effect (Permanent):
Your uncoloured Family Member has a bonus of +3 on its value. (You can increase their value with servants or Character Card effects).

Lorenzo De' Medici

Requirement: 35 Victory Points

Effect (Once Per Round):
Copy the ability of another Lead Card already played by another player. Once you decide the ability to copy, it can’t be changed.

Ludovico Il Moro

Requirement: 2 Territory Cards, 2 Character Cards, 2 Buildings and 2 Venture Cards

Effect (Permanent):
Your coloured Family Members have a value of 5, regardless of their related dice. (You can increase their value with servants or Character Card effects).

Cesare Borgio

Requirement: 3 Building Cards, 12 Coins, 2 Faith Points

Effect (Permanent):
You don't need to satify the Military Point requirement when you take Territory Cards.

Santa Rita

Requirement: 8 Faith Points

Effect (Permanent):
Each time you receive wood, stone, coins or servants as a immediate effect from a Development Cards (not from Action spaces) you receive the resources twice.

Cosimo De' Medici

Requirement: 2 Character Cards and 4 Building Cards

Effect (Once Per Round):
Receive 3 Servants and gain 1 Victory Point

Bartolomeo Colleoni

Requirement: 2 Venture Cards & 4 Territory cards

Effect (Once Per Round):
Gain 4 Victory Points.

Excommunication Tile Effects

Each time you gain Military Points (from action spaces or from your Cards) , gain 1 fewer Military Point.

If you have more Cards that give you Military Points, consider each Card a single source, so you gain -1 Military Point for each Card.

Each time you receive Coins (from action spaces or from your Cards) , you receive 1 fewer Coin.

If you have more Cards that give you coins, consider each Card a single source, so you receive -1 coin for each Card.

Each time you receive servants (from action spaces or from your Cards) , you receive 1 fewer servant.

If you have more Cards that give you servants, consider each Card a single source, so you receive -1 servant for each Card.

Each time you receive wood or stone (from action spaces or from your Cards) , you receive 1 fewer wood or stone.

If you have more Cards that give you wood or stone, consider each Card a single source, so you receive -1 wood or stone for each Card.

Each time you perform a Harvest action (through the action space or as a Card effect) , descrease its value by 3.

You may still spend servants to increase the action value and you must apply your Card's effects. (If you place in the second action space, your action value is decreased by 6)

Each time you perform a Production action (through the action space or as a Card effect) , descrease its value by 3.

You may still spend servants to increase the action value and you must apply your Card's effects. (If you place in the second action space, your action value is decreased by 6)

All your colored Family Members receive a -1 reduction of their value each time you place them. (For example, if you roll a 5 on the black die, your Family Member with the black die symbol has a value of 4)

You may still spend servants to increase their value and you must apply your Card's effects.

Each time you take a Territory Card (through the action space or as a Card effect) , your action receives a -4 reduction of its value. You may still spend servants to increase the action value and you must apply your Card's effects.

Each time you take a Building Card (through the action space or as a Card effect) , your action receives a -4 reduction of its value. You may still spend servants to increase the action value and you must apply your Card's effects.

Each time you take a Character Card (through the action space or as a Card effect) , your action receives a -4 reduction of its value. You may still spend servants to increase the action value and you must apply your Card's effects.

Each time you take a Venture Card (through the action space or as a Card effect) , your action receives a -4 reduction of its value. You may still spend servants to increase the action value and you must apply your Card's effects.

You can't place your Family Members in the Market action spaces.

You have to spend 2 servants to increase your action value by 1 (and 4 servants to increase it by 2, and so on...).

Each round, you skip your first turn. (When you have to place your first Family Member, you have to pass.) You start taking actions from the second turn (in the appropriate turn order). When all players have taken their turns, you may still place your last Family Member.

At the end of the game, you don't score points for any of your Influenced Characters.

At the end of the game, you don't score points for any of your Encouraged Ventures.

At the end of the game, you don't score points for any of your Conquered Territories.

At the end of the game, before the Final Scoring, you lose 1 Victory Point for every 5 Victory Points you have. (For example, if you have 26 Victory Points before the Final Scoring, you lose 5 Victory Points.)

At the end of the game, you lose 1 Victory Point for every Military Point you have. (For example, if you end the game with 12 Military Points, you lose 12 Victory Points.)

At the end of the game, you lose 1 Victory Point for every wood and stone on your Building Card's costs. (For example, if all your Building Cards cost 7 wood and 6 stone, you lose 13 Victory Points.)

At the end of the game, you lose 1 Victory Point for every resource (wood, stone, coin, servant) in your supply on your Personal Board. (For example, if you end the game with 3 wood, 1 stone, 4 coins and 2 servants, you lose 10 Victory Points.)

Your tableau shows the Family Members who are still available for actions. Click the hand above to select the Family Member of your choice.
The active Family Member is displayed half transparent.

If you want to spend additional servants when selecting Harvest or Produce action, please do so before selecting the action space using the spinner. It is not allowed to spend more servants than you need!

Wherever rules left an opening for discussion, basic rules are always applied: you can never use two colored Family Members in the same action group. When a Leader allows to use already occupied spaces, this must still respect the base rule.
Some excommunication tiles from the first era reduce the number of one resource by one when receiving some of that type. This penalty also includes Council privileges when taken as that particular resource. Excommunications reduce the number of a resource by one when you take it from any source (included Council privileges) and are applied by source.
Combination of excommunication effect if you play the advanced version with Leaders:
Example:
  1. You receive an immediate Card effect of 1 coin
  2. You have the leader card which doubles the resources of immediate Card effects
  3. You receive 1 coin less due to excommunication
  4. In total, you still receive 1 coin: 1 * 2 - 1 = 1
You can magnify all cards of one type on your tableau by clicking the corresponding symbol in the lower left corner of your tableau (Example: buildings)
The game board renders correctly on tablet format (1024 x 768 pixels), consider closing the side panel. Playing on devices with smaller screen resolution is not recommended.
 
Privacy statement | Editorial | FAQ To Top YST: 00:00:00 |