Lift Off - General game info
Lift Off
2-4 players, 60-120 minutes, 12 years and older
AuthorJeroen Vandersteen
IllustratorsKreativbunker
Nache Ramos
Andreas Resch
Published byHans im Glück
Z-Man Games
Online since 2021-01-16
Developed byMatthias (9M9K9)
Boardgamegeek260757
Yucata.de owns a license for the online version of this game. A big "thank you" to the copyright owners (publisher and/or author and illustrator) who make it possible to have this game for free online here!
Lift Off - Rules
If you are reading these rules for the first time, ignore the text along the right hand side. These rules serve as a summary to help you quickly familiarize yourself with the game.

Show → summary only → detailed version only → both summary and detailed version

Lift Off

In Lift Off, your goal is to establish the most prestigious space agency by accumulating the most victory points. The player with the most points at the end of the game wins.

Below is a brief summary of the setup rules:
When playing with two or three players, remove the indicated specialist and mission cards (decks “3” and “4”), and cover up the necessary space station spaces (two players: 6/6/8, three players: 6/8).
Each player chooses a color and takes the following:
  • Player board
  • The two-part rocket in their color
  • The wooden rockets in their color
  • A level lab
  • Three facedown objective cards (return undealt objective cards to the game box)
Player Setup
  • Place one rocket on space “5” of your cost track.
  • Place one rocket on space “1” of your weight track.
  • Place one rocket on space “5” of your income track.
  • Draft objective cards clockwise, keeping one and passing two, then keeping two and passing one.
  • Take 10 money and three specialist cards.

Game Board Setup

1
Game Board: Place the game board in the middle of the table, within reach of all players.

2a
Specialist and Mission Cards:
When playing with three players, return all specialist and mission cards with the number “4” in the bottom-left corner to the game box. When playing with two players, return all specialist and mission cards with the numbers “3” or “4” in the bottom left corner to the game box.

2b
Specialist Cards:
Shuffle the remaining specialist cards and place them facedown next to the board, leaving room for a discard pile.

2c
Mission Cards:
Separate the mission cards by level, through , and shuffle each deck separately. Place the level and decks on the corresponding spaces on the game board.
The level and decks are not available at the start of the game. Set aside these decks and the phase 2 overlay .

3
Space Station and Player Colors:
Place the space station tokens next to the game board.
Each player chooses a player color and takes the wooden rockets in that color ( red, blue, yellow, green).
When playing with three players, place two rockets of the unused color on the space station track: one rocket on a “6” space and one rocket on the “8” space. When playing with two players, place three rockets: one rocket on each of the “6” spaces and one rocket on the “8” space.

4
Technology Cards:
There are four different colors of technology cards: Fuel ( red), Energy ( yellow), Life Support ( blue), and Food ( green).
These colors do not correspond to the player colors in any way!
Separate the Technology cards by color and place them next to the game board with the “1” side up.

5
Money:
Choose one player to be the banker, and place the money tokens next to the game board near that player. Players can make change at any time, and money is not limited by the tokens in the supply.

6
Starting Player and 100/200 Score Markers:
The player who has most recently been in space (or the youngest player) takes the first player rocket and will be the starting player for the first round. The starting player places one of their wooden rockets on space 2 of the scoring track. In clockwise order, each player places one of their rockets two spaces higher than the previous player on the scoring track (for example, on spaces 2, 4, 6, and 8 in a four-player game).
Place the 100/200 score tokens next to the 0/100 space of the scoring track.

7
Objective Cards :
Shuffle the objective cards and deal three cards facedown to each player. Players draft these cards during the final step of setup, as described in detail on page 5.
Return all remaining objective cards to the game box without looking at them.

8
Player setup:
Each player takes a player board, a lab with the level side faceup, and the two-part rocket in their player color.
Place the level / labs next to the game board. Return the unused player boards, rockets, and level / labs to the game box.
Individual player setup is described in detail on page 4.

9
Rocket Upgrades:
Place the 4 capacity and 4 propulsion upgrade tokens in each player’s color next to the game board with the icons faceup.
Return the upgrades for any unused player colors to the game box.

Player Setup

1
Place your player board faceup in front of you, leaving space for cards and tokens on both sides of the player board.

2
Place your lab, with the side faceup, in the notch on the left side of your player board. During the game, you can upgrade your lab, eventually replacing it with the level / card.

3
Each of the four colored notches on the right side of your player board holds a different color of technology card, which you will gain over the course of the game.

4
Place your two-part rocket to the left of your lab, with the icons faceup.

5
The red bar on the left is the cost track, which indicates the current cost , in money, to launch a rocket. Place one of your rockets on the 5” space of the cost track .
The black bar on the right is the weight track , which indicates how much your rocket can carry. Place one of your rockets on the “1” space of the weight track .
The green bar on the bottom indicates your current income : the money you receive each round. Place one of your rockets on the “5” space of the income track .
Gaining and spending money: Effects that require you to spend money (such as launching a rocket ) have a red icon. Effects that cause you to gain money have a green icon (such as the income track).

6
Leave room next to your rocket for your mission cards. During the game, mission cards will either be on Earth, waiting to be launched, or in space, after being launched. Place missions that are on Earth next to the base of your rocket, and missions that are in space next to the top of your rocket. Keep these areas separated.

In Lift Off, your goal is to establish the most prestigious space agency by accumulating the most victory points (). The player with the most points at the end of the game wins.
Specialists allow you to improve your technologies, upgrade your rockets and lab, invest in the space station, and load and launch your rockets more efficiently. You use your rockets to launch missions into space, securing valuable victory points for your agency. Whenever you score victory points, move your rocket up that many spaces on the score track. If a player’s score exceeds 100 or 200, use the score markers to indicate this.
Lift Off is played in two phases, with four rounds in each phase. The game begins in phase 1 and continues in phase 2 after the fourth round. After the eighth round, the game ends, and players resolve final scoring.

Each round contains the following steps:

  1. Take income and draw new specialist cards.
  2. Draft specialist cards, then play two specialists (may score victory points).
  3. Draw mission cards and place them on Earth.
  4. Launch rockets to send mission cards into space (may score victory points).
  5. Discard played specialist cards.
Before the beginning of the first round, players draft objective cards, take their starting money, and draw starting specialist cards.
First, players draft the three objective cards they were dealt during step 7 of setup. Each player chooses one card to keep and passes the remaining two cards to the player on their left. Then, each player chooses two cards from the three they are currently holding and passes the remaining one card to the player on their left. You can choose to pass a card that you previously kept. The three objective cards you have after drafting will be your objectives for this game. See here for detailed rules on objective cards.
Next, the banker gives each player ten money.
Finally, each player draws three specialist cards, facedown.

Income and Specialists

1. Take income and draw new specialist cards

At the beginning of each round, the banker gives each player money equal to the current value on their income track. Each player then draws two specialist cards.
Exception: Skip step 1 during the first round of the game.

2. Draft and play specialists

Now that each player has three specialist cards, players draft specialists. The starting player chooses which direction specialists will be passed this round (left or right).
First, each player chooses one specialist card in their hand to keep, and passes the remaining two cards to the next player in the direction of the draft.
Then, each player chooses two specialist cards in their hand to keep, and passes the remaining card to the next player in the direction of the draft. You can always choose to pass a card that you previously kept during the draft.
After the draft is concluded and each player has three specialist cards in hand, players play their specialists. Beginning with the starting player and proceeding in the same direction as the specialist draft, each player plays and resolves one specialist card from their hand. After each player has played one specialist card, each player plays and resolves a second specialist card, proceeding around the table in the same order. After playing specialists, you will have one specialist card left in your hand to carry over to the next round.
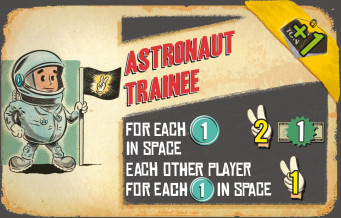
Each specialist has either a blue or a yellow banner in the top right corner of the card, and either one or two actions associated with it. When you play a specialist card, you automatically gain the effect shown on the banner, and you can choose to either perform the actions on the card, or gain money instead.
The effects from blue banners are resolved immediately as soon as you play that specialist, giving you either three money or five points , as shown on the banner. The effects from yellow banners are resolved later in the round, while launching missions. See the appendix for a detailed description of the banner effects.
When you play a specialist card, you can choose to perform one or both of the actions shown on the card. Specialists with two actions have a dividing line indicating the separate actions. If the specialist has two actions on the card, you can perform the actions in any order, but must complete one action before performing the next action. Alternatively, you can choose not to perform any of the actions on the card and gain two money instead (strategically, this can be a good idea). See the appendix for details on specialist actions.

Missions

3. Draw mission cards and place them on Earth

First, in clockwise order beginning with the starting player, choose one of the available mission decks on the game board. During phase 1, only decks and are available. Decks and become available during phase 2.
Draw three mission cards from the chosen deck. Choose one of these three cards and place it faceup on Earth next to your rocket. Place the other two cards in the corresponding mission discard pile. If a mission deck is empty, shuffle the discard pile to form a new facedown mission deck.
You can have only one copy total of each mission, both on Earth and in space. If you already have a copy of a mission, either on Earth or in space, you cannot take another copy of that mission (except as noted on individual cards). If you cannot take any of the mission cards you drew, you must continue drawing mission cards from the same deck, one at a time, until you draw one that you do not already have. Take that mission card, discarding all other drawn mission cards. You cannot have more than seven mission cards total from each deck. If you already have seven mission cards from a deck, you cannot draw mission cards from that deck.
On Yucata only those drawn missions are displayed which could be kept by that player. You can check all missions in the discard pile after finishing the current move.

4. Launch rockets to send mission cards into space

You launch rockets to send mission cards from Earth into space, moving them from the Earth area to the space area next to your rocket. Beginning with the starting player and proceeding clockwise, each player can send up to three missions into space by launching rockets. You can launch multiple rockets during this step.

The following is required to launch a rocket:

  • You must have a launch symbol from your lab or played specialists. Your lab has one launch symbol, and some specialists give you additional launch symbols when played, which you can use to launch additional rockets during that turn. Each launch symbol you have allows you to launch one rocket.
  • You must pay for the launch. The cost track on your player board shows the cost in money to launch a rocket. Some specialists reduce the cost of launching a rocket.
  • Your rocket must have sufficient capacity to send up the missions. The weight track on your player board shows the capacity of your rocket. Your rocket can send up any number of missions with a combined weight less than or equal to the capacity of the rocket.
    For example, if your rocket has three capacity, it can send up one mission with a weight of three or less, or multiple missions whose weights add up to three or less.
    Some specialists can increase the capacity of your rocket for a single launch.
  • The level of your lab must be equal to or higher than the level of the mission(s) you are sending up.
  • You must meet the minimum technology requirements for the mission level. The requirements for each level are printed on the game board above the corresponding mission decks. A slash between requirements means that you need to meet only one of the indicated requirements. Technology cards are not expended when you launch rockets; they track your level of advancement in that technology.
  • You must have at least one mission on Earth that you can launch, based on the requirements above. You must launch at least one mission with each rocket launch.
If you meet all of these conditions, you can launch a rocket. You immediately score victory points for each launch, regardless of the number of missions you sent up, based on the level of your lab and the current phase, as shown on the lab card.
Move each mission card you sent up from Earth to space. Missions in space score you victory points and can have additional effects.

Mission Card Structure and Effects

Some mission cards show victory points on the left side of the card. When you send one of these missions to space, you score that many victory points.
Most missions have an effect depicted in the lower half of the card. If the mission has an hourglass symbol, the mission’s effect resolves during final scoring. Otherwise, the effect resolves immediately, when the mission is sent to space. If you send multiple missions into space with a single launch, you choose the order in which their effects resolve.
Note: If everyone is familiar with the game, players can launch rockets simultaneously.

Example: Launching a rocket and sending missions to space

It is phase 2, and you have an assortment of upgrades and technologies. You want to send two missions, one level and one , to space. You check whether you meet the requirements:

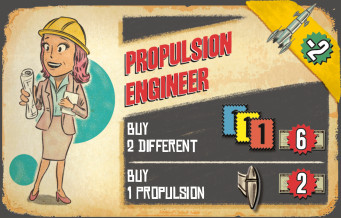
You played these two specialists earlier this round.

  • The level of each mission is less than or equal to your lab level .
  • You have the three red and one yellow technology cards necessary to send the level mission, and the three yellow, two blue, and one green technology cards necessary to send the level mission (based on the technology requirements shown above each mission deck).
  • Your rocket can carry the combined weight of the two missions: (3 + 2 =) 5. Although your rocket currently has a capacity of four (as shown on your weight track), you played a specialist who temporarily increases your capacity for this launch.
  • You can pay to launch your rocket. Although it costs you six money to launch your rocket (as shown on your cost track), you also played a specialist who reduces the cost to launch one rocket by two.

You meet the requirements and pay the reduced cost of four money to launch your rocket and send your missions into space. First, you score points for the launch: during phase 2, a level lab scores you five victory points .

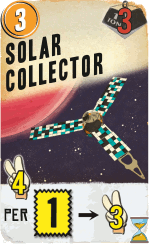
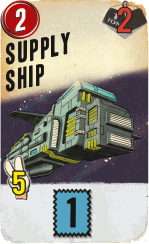
You move both mission cards from Earth to space. You immediately score five victory points and gain one blue technology card for sending the Supply Ship to space. You immediately score four victory points for sending the Solar Collector into space, and during final scoring you will score three points for each yellow technology card you have.

You still have one launch remaining . You used the launch symbol and launch discount from the Propulsion Engineer, but you still have the launch symbol from your lab. A normal launch would have a capacity of four and cost six money. However, you are out of money and cannot afford to launch another rocket. If you had the money to launch another rocket, you could have sent the two missions separately, or even sent a third mission, scoring an additional five points from the second launch.

End of Round

End of the Round After all players have launched rockets, the round ends. Discard the specialists you played this round, keeping the specialist still in your hand for the next round. The starting player gives the starting player rocket to the player to their left. Begin the new round by taking income and drawing specialist cards.
At the end of the fourth round (the first time the specialist deck is empty at the end of the round) proceed to phase 2. At the end of the eighth round (the second time the specialist deck is empty at the end of the round) the game ends and players resolve final scoring.
  1. Place the level and mission decks on the game board
  2. Place the phase 2 overlay on the game board
  3. Sell objective cards
At the end of the fourth round, the first time the specialist deck is empty at the end of the round, phase 1 ends and phase 2 begins.
  1. Place the level and mission decks in the corresponding spaces on the game board. Level and missions are now available.
  2. Place the phase 2 overlay on the corresponding space on the game board, covering the previous requirements. Level missions now require a higher level of technology.
  3. Beginning with the starting player, each player can discard any number of their objective cards. For each objective card you discard, you gain five money. Return discarded objective cards to the game box.
Once each player has had the opportunity to discard objective cards, the game continues with phase 2.
At the end of the eighth round, the second time the specialist deck is empty at the end of the round, the game ends, and players resolve final scoring.
Each player totals up their points as follows:
  1. Score points for each of your missions in space with an hourglass symbol , based on their individual conditions.
  2. Score points for each of your objective cards.
  3. Score three points for each of your green technology cards, and one point for every five money you have.
The player with the most victory points after final scoring wins the game!
In the event of a tie, the player with the most level missions in space wins the game. If there is still a tie, the tied players share the victory.

Final Scoring Example

You got your lab on , 8 , 6 , 4 , 4 , 3 , 5 , and 1 .

1. Missions in space with hourglass symbols

First, count up the points from your missions in space with hourglass symbols. Your Solar Collector scores points based on your yellow technology cards. You have five yellow technology cards, so you score 15 points. Your Trading Posts score points based on your income. You have two Trading Posts and your income is eight, so you score 24 points. Your Colony Ship scores points for green technology cards. You have four green technology cards, so you score 20 points.

2. Objective cards

You have only two objective cards left because you discarded one of them for money at the beginning of phase 2.

One objective card scores you points based on the number of yellow technologies you have. You have five yellow technology cards, so you score 11 points.

The other objective card scores you points based on the number of level and missions you have in space. In addition to the missions with hourglass symbols show, you have an additional four level missions in space, for a total of seven level and missions in space, so you score 25 points.

3. Green technologies and money

You score three points for each of your green technology cards. You have four green technology cards, so you score 12 points. You also score one point for every five money you have. You have 11 money, so you score two points.

Appendix

Objective Cards

You score points from objective cards during final scoring by fulfilling the conditions shown on the cards. The top of each objective card shows what the objective card will score points for. The column on the right shows how many points you will score, based on the quantities on the left.

These cards score you points based on the number of missions of specific level(s) you have in space.

This card counts your level and mission cards in space. You must have at least one level mission card in space to score points from it.

If you have five or six level and missions, at least one of which is level , you score 12 points from this card. If you have seven or more such missions, you score 25 points.

This card scores you points based on how many times you invested in the space station. To track this, count your rockets on or next to the space station track.

If you have two rockets on or next to the space station, you score six points. If you have three, you score 18 points. If you have four or more, you score 30 points.

These cards score you points based on the number of technology cards of a specific color you have.

This card counts your yellow technology cards. If you have three yellow technology cards, you score three points. If you have four to six, you score 11 points. If you have seven or more, you score 25 points.

This card scores you points based on how many capacity and propulsion upgrades (total) you have.

If you have four total upgrades, you score five points. If you have five or six, you score 15 points. If you have seven or more, you score 30 points.

Labs

The higher the level of your lab, the more points you will score for each rocket launch. Rocket launches during phase 1 are worth more points than launches during phase 2, with labs of equal level. The level lab has an additional benefit: The launch using the launch symbol from your lab has one additional capacity.

Specialist card effects

Each specialist has a banner and either one or two actions. You always gain the effect of the banner, and can choose to use one or both of the actions.
Banner Effects:
  • - Immediately gain three money. [Astronaut Explorer, Politician, Tech Investor]
  • - Immediately score five points. [Capitalist Robot, Communist Robot]
  • - When drawing mission cards: [Administrator, Planing Supervisor, Unhinged Professor]
    You can draw one additional mission card of the chosen level, and place one additional card on Earth. If you have two specialists with this effect, you can draw and keep up to two additional cards.
  • - When launching rockets: [Astronaut Trainee, Cargo Specialist, Lead Researcher]
    You can use this effect to increase the capacity of one rocket for one launch by the indicated amount. The additional capacity applies only to a single rocket launch.
    If you have two specialists with this effect, you can combine the effects on a single launch.
  • - When launching rockets: [Astronaut Commander, External Consultant, Propulsion Engineer]
    You have one additional launch symbol. When using this launch symbol to launch a rocket, the launch costs two less money than normal.
Actions:
Each specialist has either one or two actions. When you perform a specialist’s actions, you can perform one or both actions, in any order.
You can always choose not to perform any of a specialist’s actions, and instead take two money. You always gain the banner effect, regardless of whether or not you perform the actions.
Action effects:
  • You gain six money. Each other player gains gaIn two money. [Communist Robot]
  • You score two victory points and gain one money for each level mission you have in space. Each other player scores one victory point for each level mission they have in space. [Astronaut Trainee]
  • You score three victory points and gain one money for each level mission you have in space. Each other player scores two victory points for each level mission they have in space. [Astronaut Commander]
  • You score four victory points and gain two money for each level mission you have in space. Each other player scores three victory points for each level mission they have in space. [Astronaut Explorer]
  • You can buy one red, yellow, or blue technology card for four money. Place the purchased technology card in the corresponding space next to your player board. If you have four of one technology and purchase a fifth, turn one of the cards over to the “5” side and return the rest to the supply. [Administrator, Planning Supervisor]
  • You can buy two different technology cards, choosing from red, yellow, or blue, for six money. [Propulsion Engineer, Tech Investor]
  • You can buy up to three red, yellow, or blue technology cards for the indicated cost. You can buy any combination of colors. [Lead Researcher]
  • You can exchange up to two of your technology cards for an equal number of technology cards.
    For example, you could trade one red and one blue for one green and one yellow. [Unhinged Professor]
  • You can buy one green technology card for four money. [Tech Investor]
  • You can buy one or two green technology cards for four or seven money, respectively. [Politician]
  • You can sell one red, yellow, or blue technology card for six money. [Capitalist Robot]
  • You can upgrade your lab by one level for the indicated cost in money. To upgrade to level , return your current lab to the game box and take a level lab from the supply; otherwise, flip your current lab to the upgraded level.
    You can only upgrade your lab by one level with a single effect. For example, you cannot upgrade from level directly to level . [Administrator, External Consultant, Lead Researcher]
  • You can purchase one capacity upgrade in your player color for four money. Add it to your rocket between the top and bottom half.
    Each capacity upgrade increases your weight track by one. However, it also increases your cost track by one. Move the rockets on both tracks up one space. [Cargo Specialist, External Consultant, Unhinged Professor]
  • You can purchase one propulsion upgrade in your player color for two money. Add it along the sides of your rocket.
    Each propulsion upgrade decreases your cost track by one. Move the rocket on your cost track down one space. [Cargo Specialist, Propulsion Engineer]
  • You can invest in the construction of the space station. Pay money equal to the number on the cheapest visible space on the space station track and cover that space with one of your rockets.
    You immediately score five victory points, plus one additional victory point for each mission you have in space, regardless of mission level. You can also either take one green technology card or increase your income track by one.
    If the cheapest visible space on the space station track is the red “12” space, do not cover that space with a rocket. You can always continue to invest in the space station with a cost of 12 money, but do not add a rocket to the track. [Capitalist Robot, Planning Supervisor, Politician]

Mission Cards

You can have only one copy of each mission card total, whether on Earth or in space. For mission cards with “Max X”, “X” is the number of copies of that mission you can have in total, unless indicated on the card.

Some mission cards have immediate effects, while others have effects that are applied during final scoring (indicated by an hourglass icon).

When you draw a mission card, immediately place it on Earth, next to the lower half of your rocket. You can send it to space by launching a rocket, immediately scoring the points on the left half of the card and applying any immediate effects (effects cannot be skipped if they are doable).

You gain one red technology card.
You can exchange one red, yellow, or blue technology card for one card each of the other two colors.
Advance your income track by one space.
You gain one propulsion upgrade, moving the rocket on your cost track down one space.
You gain four money.
This mission has no additional effect.
Upgrade your lab one level (if possible).
Advance your income track by two spaces.
You gain one blue technology card.
You gain one capacity upgrade, moving the rockets on your cost and weight track up one space each.
You gain one yellow technology card.
Draw five mission cards from any one available mission deck. Keep one card and discard the rest.
During final scoring, score two points for each of your red technology cards.
This mission has no additional effect.
During final scoring, score three points for each of your yellow technology cards.
You can have up to two copies of this mission card (Max 2). During final scoring, score one point for each of your rocket upgrades (capacity and propulsion) for your first Exoplanet Landing. Score two points for each of your rocket upgrades for your second Exoplanet Landing. This effect is cumulative, so if you have two Exoplanet Landings, score three points for each rocket upgrade.
You can have up to two copies of this mission card (Max 2). During final scoring, score points equal to your current income track value for your first Trading Post. Score points equal to twice your current income track value for your second Trading Post. This effect is cumulative, so if you have two Trading Posts, score points equal to three times your current income track value.
Invest in the space station without paying any money, taking a reward as normal. Regardless of whether or not there are free spaces on the space station track, place one of your rockets on the grey box next to the final space of the track. This rocket counts as a rocket on the space station track.
You gain one red, yellow, or blue technology card, as well as either a capacity or propulsion upgrade.
You can have up to three copies of this mission (Max 3). During final scoring, score 15 points for your first Satellite Network. Score 30 points for your second Satellite Network. Score 50 points for your third Satellite Network. Thus, if you have three Satellite Networks, you would score 95 points.
During final scoring, score points equal to the sum of the levels of all of your missions in space. For example, score one point for each level mission in space, score two points for each level mission in space, etc.
During final scoring, score five points for each of your green technology cards.
During final scoring, score seven points for each of your rockets on the space station track.
During final scoring, score five points for each of your blue technology cards.

Many elements have a hover text and/or a click show a help text when clicking on them.

The symbol allows you to check a text version of a card.

Via the symbols you can get additional information. E.g. to show the discard piles or the specialists of previous rounds on the round display.

Via clicking the eye symbol individual player areas can be shown or hidden.

The hour clock symbol in the player area can be clicked to show your objective cards.

To better distinguish between keeping a card () or hand it () to the next player those symbols are shown on the cards.

The setting allow for an individual appearance of the game depending on the players habits:

  • Show the player area of the active player:
    on: The player area of the currently active player will be shown while the others get hidden. On the main board is the information of the active player shown.
    off: The player areas keeps as they are set by show/hide. If the window gets reopened only the own board is shown. The information on the main board shows the own values, too.
  • Show mission overview of missions in space:
    on: On the mainboard is an overview of the missions shown, whose the players already brought into orbit.
    off: The mission overview is not shown.
  • Show rocket:
    on: On the main board is the rocket of the active player shown.
    off: The rocket images do not get loaded.
  • Show the player area below the main board:
    on: All areas use the full available width. The player areas can be found below the main board. (Warning: the design is not optimized for that mode)
    off: The player area are next to the main board.
  • Show vertical scroll bar permanently:
    on: The vertical scroll bar is shown all the time. This avoids that some browsers switch them on and off.
    off: The browser will decide whether a scroll bar is shown or not.
  • Confirmation before drawing new missions:
    on: When drawing new missions you need to confirm that you can't undo this action.
    off: No warning for obviously undoable actions.
  • Always use the technology icons:
    on: All over the game only the technology icons are uses (e.g. instead of ). Thus, the technology dialogues get smaller and less colourful.
    off: The nicer technology images are used. Those are better to differentiate for people with colour blindness.
  • Show images in the help dialogues:
    on: In help dialogues are the images of the cards shown in their original size beside the text.
    off: Only the texts are shown to hide less of the game in the background.

 
Privacy statement | Editorial | FAQ To Top YST: 00:00:00 |