If you are reading these rules for the first time, ignore the text along the right hand side. These rules serve as a summary to help you quickly familiarize yourself with the game.
Welcome to East Frisia
Arle is a small village in East Frisia.
Today, only the size of its village church implies its former importance.
In the past centuries, the area around Arle stood out due to its excellent farmland. It was said the
best flax of all North Germany grew in Arle. As the demand for this versatile resource grew, the local
farmers quickly became rich. The people of Arle had a considerably better life than the residents
of any other place in East Frisia. In this game, you can share the fortune of living in Arle with the
flax farmers of that time. You can decide whether you want to participate in farming flax yourself or,
as a consequence of the increasing wealth in Arle, meet the demand in other areas. You can grow
grain, breed animals, cut peat, colonize the moor, or build dikes. You can cultivate forests, run a
vehicle fleet, or build workshops and inns. Your biggest task is to build prestigious buildings like the
previously mentioned village church.
A game of “Fields of Arle” is played over nine half years – alternating between summer and winter.
In summer, you can carry out different actions than in winter. At the end of each half year, there is a
season-specific Inventorying. Finally, a single scoring at the end of the game will determine which
player made the most out of the four and a half years he had in Arle.
For those who come from the sea,
East Frisia is not at the end of the world,
but rather at its very beginning.
Ewald Christophers
In Order to Get Started
In this game, you build a village and take care of the area around it. The following illustration shows the goals you try to
accomplish. The wind roses indicate the number of Victory Points you get for the depicted actions.
Yellow wind roses stand for Victory Points.
1
Dike the Tidal Flat Area on your
Home Board to get access to more
Fields, Pastures and building land.
( If you do not finish this process by the end of the game, you will lose points.)
2
Build Buildings.
( They have a fixed number of Victory Points.)
3
You can breed Animals in Stalls
and Stables.
( At the end of the game, Stalls and Stables will be worth 2 and 6 Victory Points, respectively. Animals are also worth Victory Points. See below*.)
Animals can live in Stalls and
Stables or graze outdoors: this is
also covered below*.
4
This is your Travel Experience Track.
( The more villages and towns you provide with goods, the more points you will get.)
5
Dehydrate the Moor so that you
can cut peat.
As soon as you remove the last
Peat Token from a Moor Tile, you
can cultivate that Moor Section by
removing the Moor Tile from your
Home Board.
( Until then, you lose points for it.)
|
|
6
Plow Fields to increase your
income of Grain and Flax.
7
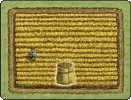
Forests ( worth 2 Victory Points)
provide additional Wood. Later,
you can upgrade them to valuable
Parks ( worth 6 Victory Points).
8
Some goods are represented by
tiles, but most of the goods are
represented by Goods Indicators
and tracked on your Goods Track.
Food, Grain, Hides, Flax, and
Wool are indicated on the Goods
Track. You can have at most
15 pieces of each of these types
of goods due to the limitation
imposed by the Goods Track.
Only exception: Food is
represented by 2 Goods
Indicators ( light blue), so
you can have up to 30 Food.
9
At the end of the game, you will get Victory Points for each
type of good that you have a certain
number of ( indicated by the wind rose symbols on the Goods Track).
You can double these
points by turning one of your Stalls into a Depot.
|
Try to have about the same number of Animals of each type at the end of the game,
so that your Animals will be effectively worth
1 Victory Point per Animal. Empty Land Spaces (also called Pastures)
can hold 2, Stalls 3 and Stables 6 Animals of the same type. Parks
can hold 2 Animals of any type and each of your 5 Dikes can hold 1 Animal of any type.


 Linen
Linen,
Woolen and
Leather are
made out of the corresponding
resources.
(
Each of these upgraded goods is worth 1 Victory Point.)
You can use them to craft Clothing
to increase their value.


 Wood
Wood,
Timber,
Clay and
Bricks are represented by
cardboard tokens.
(
The upgraded goods, Timber and Bricks, are worth Victory Points.)
 Peat
Peat is
represented by wooden tokens.
The Game Board indicates how many Tools of each
type you have. (They are also worth Victory Points.)
About the Home Board and the Vehicles
This section explains basic elements of the game. The exact rules will be explained later in more detail.
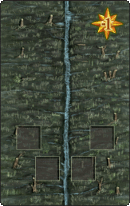
THE HOME BOARD
At the beginning of the game, you have access to 2 empty Land Spaces
on your Home Board.
(The other Land Spaces were covered by tiles during setup.)
On these spaces, you can build Fields, Stalls, Buildings, and Forests.
Directly above your Land Spaces is your Dike
Line (this is what we call 3 Dike tiles lying in a row next to each other)
and beyond that the Tidal Flat Area. You cannot build there,
because this area is flooded by the tide. However, during the course of the game,
you can dike the Tidal Flat Spaces to reclaim land and
get access to more Land Spaces. To do so, you will move the Dike
tiles upwards one by one. This will eventually move your Dike Line
(i.e. the border between the Tidal Flat Area and the Mainland) upwards as well.
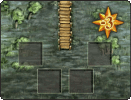
Another way to get access to more Land Spaces is to
cut peat. Peat is cut in the Moor that is located below
your developed Land Spaces. During the course of
the game, you can flip the Moor Tiles over to show
they were dehydrated. Then you can cut peat there
until you have removed all of the peat from the tile.
It will immediately become cultivated and the Moor
Tile will be removed from your Home Board. From
then on, you will have access to (1 or) 2 new Land
Spaces.
THE VEHICLES
Vehicles play a special role in this game and are available for
purchase on the Supply Board. Once you own them, you can put
them to work once per Half Year – outside the normal course
of play.
(The game is played over a total of 9 Half Years. See here for more details on Vehicles.)
You will need
Vehicles to get access to Timber, Bricks, and Clothing, as well as
to sell goods at certain Travel Destinations.
Course of the Game
A game of “Fields of Arle” is played over 9 Half Years –
alternating between Summer and Winter. Each Half Year consists of 3 Phases.
Phase 1: Preparations
In June (during Summer) and in December (during Winter), you
place your Workers for the subsequent Work Phase.
Phase 2: Work Phase
Over the following few months, you place your 4 Workers on
the Game Board.
Phase 3: Inventorying
At the end of each Half Year, i.e. in November and May, you
take stock of your belongings.
COURSE OF A HALF YEAR
PHASE 1: PREPARATIONS
Place Workers on
each of the 4 Month Spaces of the current half year,
with the Starting Players’s Workers
on top of his opponents.
During setup, you have already placed your Workers for the first
Half Year. At the beginning of each Half Year, place Workers on
each of the 4 Month Spaces, with the Starting Players’s Workers
on top of his opponents.
(The Starting Player Marker can change hands via the “Special Action”, an action that can only be taken once per Half Year. You can find more details on this at the bottom of the page.)
PHASE 2: WORK PHASE
-
Take turns placing your Workers on empty Action Spaces
of the current Half Year.
-
Immediately carry
out the corresponding action depicted on the chosen Action Space.
-
Each Action Space can only be occupied
by a single Worker.
-
Spaces with a white/blue Frisian pattern on the Game Board
indicate costs. You have to pay the depicted goods.
-
You can always pay
Timber instead of Wood.
-
You can always pay
Brick instead of Clay.
Take turns placing your Workers on empty Action Spaces
of the current Half Year. Take your Workers from left to right off the
Month Spaces. In each Month, the player with the Starting Player
Marker goes first.
The Summer Action Spaces are only available in odd-numbered Half
Years, the Winter Action spaces only in even-numbered ones. In
each Half Year, there are 15 different Action Spaces to choose from.
After placing your Worker on an Action Space, immediately carry
out the corresponding action.
(See here for details on the various Action Spaces.)
Each Action Space can only be occupied
by a single Worker – an occupied Action Space is blocked until the end of the
current Work Phase.
(Placing a Worker on an Action Space is not mandatory. You can, instead, remove him from the Month Space and do nothing on your turn.)
When placing your Workers, remember
the “Laborer” Action Space. This space
allows you to use an already occupied
Action Space again.
(This space must still belong to the current Half Year.)
Spaces with a white/blue Frisian pattern on the Game Board
indicate costs. You have to pay the depicted goods in order to
-
get the Building below that space (see the “1 Building” action), or
-
move one of your Tool Indicators one space to the right, or
-
use the action on that Action Space.
Please note: regardless of the action you take, you can always pay
Timber instead of Wood and Brick instead of Clay.
SPECIAL ACTION AND STARTING PLAYER
-
If a player uses the Action Space of the other Half Year
(possible at most once per half year),
the opponent will become the Starting Player of the subsequent Half Year.
-
If no player uses an Action Space of the other Half Year,
the Starting Player changes at the end of the current Half Year.
In Summer, 1 of the 8 Workers may use a Winter Action Space
(instead of a Summer ones). Similarly, in Winter, 1 Worker may use
a Summer Action Space (instead of a Winter one). When a player
makes use of this Special Action, his opponent receives the
Starting Player Marker for the subsequent Half Year. If none of the
8 Workers makes use of the Special Action, the Starting Player
Marker changes hands automatically at the end of the Half Year.
ANYTIME ACTIONS
-
At any time during the game you can use the
Actions of your (green) buildings which have a clock symbol.
-
At any time during the Work Phase (in addition to your actions),
you can load your Vehicles. You decide
when to end your Work Phase - so, even after you have placed all
of your Workers, you can still load goods on the remaining free
spaces of your Vehicles.
-
Also at any time during the Work Phase, you can rearrange
the Animals on your Home Board
(according to the “Animal Husbandry” rules).
-
If you own a Peat Boat, you can exchange Peat for goods of
the Goods Track at a 1:1 ratio – at
any time during the game and any
number of times. Adjust the Goods
Indicators on your Goods Track accordingly.
PHASE 3: INVENTORYING
When all of the 8 Workers were used and both
players declared the end of the Work Phase, the Inventorying phase starts.
The Work Phase ends after all of the 8 Workers were used and both
players declared the end of the Work Phase. In November
(at the end of a Summer/Fall Half Year) and in May
(at the end of a Winter/Spring Half Year),
the players take stock of their belongings. Go through the following
sub-phases one by one in the given order.
(When reading the rules for the first time, you can skip this section and come back to it later.)
On your “Travel Destinations and Barn” Storage Board,
there is an overview of the significant values of the Inventorying.
NOVEMBER AT THE END OF A SUMMER/FALL HALF YEAR
- Empty Vehicles, place Travel Destination Tiles on your Travel Experience Track.
- Milking: Receive for your Dairy Animals up to 6 Food.
- Harvest: Receive 1 Grain per Grain field, 1 Flax per Flax field, 1 wood per Forest.
-
Sustenance: 3 Food (Replace with: Grain, then Animal), 2 Peat (Replace with Wood or Timber)
For each missing unit score -2 points (Supply Bottlenecks).
1. Empty Vehicles:
Place the Timber, Bricks, and Clothing from
your Vehicles into your personal supply.
Place the Travel Destination Tiles from your
Vehicles
on your Travel Experience Track.
2. Milking:
You receive 1/2/3 Food for 2/5/8 Sheep and
1/2/3 Food for 1/3/5 Cattle on your Home Board.
(You cannot get more than 6 Food this way.) Indicate
the Food on your Goods Track.
3. Harvest:
You receive 1 Grain per Grain Field and 1 Flax per
Flax Field on your Home Board. Indicate the Grain
and Flax on your Goods Track. You also receive
1 Wood per Forest on your Home Board.
(You do not receive Wood for your Parks.)
4. Sustenance
Pay 3 Food and 2 Peat (as fuel for the upcoming Winter).
-
For each missing Food, pay 1 Grain
instead. If you run out of Grain, pay
1 Animal per missing Food instead.
-
For each missing Peat, pay 1 Wood (or Timber) instead.
-
If you are still missing Food
(because you ran out of Food, Grain, and Animals)
or Fuel (because you ran out of Peat, Wood, and Timber),
you lose 2 Victory Points per missing item. Keep track
of the Victory Point losses in the “Supply Bottlenecks” category
of the Scoring Pad.
You can only eat Grain if you run out of Food.
(The same applies to Animals.) Also, you can only
burn Wood if you run out of Peat.
MAY AT THE END OF A WINTER/SPRING HALF YEAR
- Empty Vehicles, place Travel Destination Tiles on your Travel Experience Track.
- Baby Animals: Pairs of animals in stalls/stables breed (you get another animal of the kind if there is room for it)
- Sheering: You receive 1/2/3 Wool for 1/4/6 Sheep on your Home Board.
-
Sustenance: 3 Food (Replace with: Grain, then Animal)
For each missing unit score -2 points (Supply Bottlenecks).
1. Empty Vehicles:
Place the Timber, Bricks, and Clothing from
your Vehicles into your personal supply.
Place the Travel Destination Tiles from your
Vehicles on your Travel Experience Track.
2. Baby Animals:
In each of your Stalls with exactly 2 Animals of the same type, you
receive a third Animal of that type (from the general supply). In
each of your Stables with 2, 3 or 5 Animals of the same type, you
also receive another Animal of that type. In Stables with
exactly 4 Animals of the same type, you receive 2 Animals of that type
(instead of 1). Double Stalls (upgrades to Stables) are considered
two separate Stalls. Place the newborn Animals with their parents.
(Animals outside of your Stalls and Stables, e.g. those in your Parks, do not breed.)
3. Sheering:
You receive 1/2/3 Wool for 1/4/6 Sheep on your
Home Board. Indicate the Wool on your Goods
Track.
(You cannot get more than 3 Wool this way. Your newborn Sheep can be shorn right away, i.e. they count towards those numbers.)
4. Sustenance:
Pay 3 Food.
-
For each missing Food, pay 1 Grain
instead. If you run out of Grain, pay
1 Animal per missing Food instead.
-
If you are still missing Food, you lose 2 Victory Points per missing
Food. Keep track of the Victory Point losses in the “Supply
Bottlenecks” category of the Scoring Pad.
HALF YEAR END
At the end of each
Half Year, move the
orange Half Year
Counter one space
forward onto the next
Half Year and start
that Half Year. The
game ends after a
total of 9 Half Years.
TRAVEL EXPERIENCE
Whenever you empty your Vehicles,
place the used Travel Destination Tiles
face down on the Travel Experience
Track on the left side of your Home
Board. The first such tile is placed
at the bottom of the track so that the depicted
coastal path is running from bottom to
top. Every subsequent Travel Destination
Tile is placed above the previous ones.
(The first empty space above those tiles indicates the number of Victory Points you will get for your Travel Experience at the end of the game.)
Features of Your Home Board
The landscape on your Home Board consists of a Tidal Flat Area
(above the Dike Line, i.e. above the 3 Dike tiles that are lying in a horizontal line)
and the Mainland (below the Dike Line).
THE MAINLAND
Land Spaces can be used to build on, e.g. Fields, Forests,
Stalls, Stables and Buildings.
At the beginning of the game, you have 2 Land Spaces that you
can build on by placing tiles of appropriate size on them,
like Fields, Forests, Stalls, Stables and
Buildings. 4 Land Spaces are already covered by tiles.
DIKE BUILDING
-
When you are allowed to move a Dike, you move one of the bottom Dikes up
into the next gap between two spaces.
-
Three adjacent Dikes in a line show the transition between
Tidal Flat Area and the Mainland.
-
The top three spaces score -1 points unless they are covered
with a Dike.
CUTTING PEAT IN THE MOOR AREA
-
Moor Tiles can be turned to its reverse side through
certain actions, thereby creating a dehydrated Moor.
-
A dehydrated moor starts with 4 Peat Tokens on top, which can be cut
with “Cut Peat” actions.
-
When the last piece of Peat is cut, the Moor Tile is removed from play.
At the bottom of your Home Board, there are 3 Moor Tiles. Use a
“Dehydrate a Moor Section” or “Warden” action to dehydrate one
of these Moor Sections so that you can cut peat there:
turn the Moor Tile to its reverse side and immediately place
4 Peat Tokens on it. Afterwards, you can use “Cut Peat” actions
to take the Peat Tokens off the Moor Tile and place them in your
personal supply.
(The Peat Cutter Action Space lets you do multiple consecutive “Cut Peat” actions depending on how many Spades you have.)
As soon as you remove the last Peat Token
from a Moor Tile, immediately remove that Moor Tile from play.
This way you gain more Land Spaces on your Home Board
to build on.
ANIMAL HUSBANDRY RULES
- Dike: 1 Animal
- empty Land Space: up to 2 Animals of the same type
- Stall: up to 3 Animals of the same type
- Double Stall = 2 Stalls
- Stable: up to 6 Animals of the same type
- Park: up to 2 Animals (also different)
There are 3 types of Animals in this game: Sheep, Cattle, and
Horses. You can get these Animals via various actions during the
Work Phase and as newborns at the end of each
Winter Half Year. You can only keep your newly gained Animals if
you can accommodate them on your Home Board. You can return
Animals to the general supply (without substitution) at any time.
During the Work Phase, you can rearrange the Animals on your
Home Board at any time according to the following rules:
-
Each of your Dikes can hold 1 Animal of any type.
-
Each empty Land Space of your Home Board can hold up to
2 Animals of the same type.
-
Each Stall can hold up to 3 Animals of the same type.
(Do not forget to get a pair of Animals into each of your Stalls before the end of Winter to get a newborn Animal during the Inventorying in May;)
-
Double Stalls
(reverse side of Stables) are considered two
separate Stalls.
(You can get them via the “Warden” and “Dike Warden” actions.)
-
Each Stable can hold up to 6 Animals of the same type.
(As with Stalls, try to have pairs of Animals in your Stables before Winter ends to maximize the number of newborn Animals you get. You can get Stables via the “Carpenter” action in Winter.)
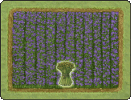
-
Each Park (reverse side of a Forest) can hold up to 2 Animals
of the same or of different types.
(You can get Parks via the “Warden” and “Dike Warden” actions)
MOVING COMPONENTS ON YOUR HOME BOARD
- Animals can be moved at any time.
- Other Tiles can only be moved/turned/removed if a specific action allows this.
- Equipment from the Barn can be returned to the Supply Board.
Animals can be moved at any time during the Work Phase of a
Half Year, but they must always be accommodated on your Home
Board. Dike tiles can only be moved as a result of specific actions.
All the other tiles on your Home Board (including Fields) can only
be placed, turned, or removed via certain actions.
(The tiles on your Home Board cannot change their position, except Dikes.)
As the space in your Barn is limited, you can return Equipment to the
Supply Board at any time (without substitution).
THE GOODS TRACK
-
Goods Indicators cannot go above 15 or below 0.
Indicate the amounts of Food, Grain, Hides, Flax, and Wool you
have with the Goods Indicators on your Goods Track. The Goods
Indicators cannot go above 15 or below 0.
You may move one of the
Food Goods Indicators down on the track to move the other Food
Goods Indicator up by the same number of spaces
(i.e. you may distribute the total amount of Food you have between the two Food Goods Indicators any way you like).
You may want to do this at the
end of the game to maximize the number of points you get for goods.
LIMITED COMPONENTS
-
Unlimited: Animals, Clothing, Building Materials and Peat Tokens.
-
All other components are limited.
The Animals, Building Materials, Clothing, and Peat Tokens are
considered to be an unlimited supply. Please improvise or use the
Replacement Tiles if you run out of any of these goods. Every
other type of tile is limited by the provided supply.
(If it runs out, you cannot get more. This is especially true for Grain/Flax Fields, Stalls, Stables, Peat Boats/Plows, and all the Vehicles.)
Of course,
when a player returns one of these tiles to the supply, it becomes
available again.
Loading Vehicles
As mentioned earlier, Vehicles play a special role in this game.
You can build them via the “Wainwright” action and then
put them to work once per Half Year.
SPACE IS LIMITED IN THE BARN.
- 4 Parking Spaces designated for Small Vehicles and other pieces of Equipment
- 2 Parking Spaces for Large Vehicles
- 1 Parking Space for either Large Vehicles, Small Vehicles or other pieces of Equipment
During the course of the game, you can build one or more
Vehicles. There are 4 Parking Spaces in your Barn designated
for Small Vehicles and other pieces of Equipment
(like Plows and Peat Boats), and 3 spaces for Large Vehicles.
(Alternatively, the bottommost Parking Space can be used for a small piece of Equipment instead of a Large Vehicle.)
You can have multiple
copies of the same piece of Equipment.
There are 6 types of Vehicles with different costs and uses. The
costs are some amount of Wood and Horses.
(You do lose the Horses that you pay this cost with. Thematically, this means the Horse is no longer used for breeding but for pulling the Vehicle.)
- You can load your Vehicles at any time during the Work Phase.
-
Load Vehicles with: Wood, Clay, Linen, Woolen, Leather or Travel Destination Tiles.
At any time during the Work Phase, you can load your Vehicles
(even right after you got them). This is not considered an action –
you can do this on top of your actions. Please note, the tiles you
put on your Vehicles will only be removed from there at the end of the Work Phase.
You can load your Vehicles with…
-
Building Materials, i.e. Wood and Clay, to upgrade them
(to Timber/Bricks)
-
Fabrics, i.e. Linen, Woolen and Leather, to upgrade them
(to Summer/Winter/Leather Wear)
-
Travel Destination Tiles of your color to receive Food at the
given destination
THE SINGLE SPACES ON VEHICLES
-
Single Spaces can be loaded with Wood and Clay tiles.
-
Travel Destinations Hage, Dornum or Beemoor require only one Single Space.
-
Multiple adjacent Single Spaces can be considered as one large space (exception: Wagon).
Single Spaces can be loaded with Wood and Clay tiles. When
placing Wood or Clay on a Vehicle, immediately turn them to
their reverse side, “Timber” or “Bricks” respectively.
When placing Clay on a Vehicle, you must also pay 1 Peat
(as indicated on the Clay Tile).
Alternatively, you can load Single Spaces with the
Travel Destinations Hage, Dornum and Beemoor,
which are of the smallest available size.
On the Large Vehicles, you can
consider multiple adjacent spaces as one large space to place the bigger tiles on them – this way,
you can fit tiles of sizes 2, 3 and 4 on your Large Vehicles.
Combining spaces on Large Vehicles does not only make sense to
fit big Travel Destination Tiles, but also to upgrade Fabrics
(Linen, Woolen and Leather): this is how you make Summer, Winter and
Leather Ware.
THE DOUBLE SPACES ON VEHICLES
Double Spaces cannot be split.
Double Spaces can be joined with adjacent Single Spaces.
Double Spaces on Vehicles limit your options. You may not place
Timber, Bricks, or small Travel Destinations on them. They can
only be used for bigger Travel Destinations and Clothing Tiles.
You may, however, combine Double Spaces with adjacent Single
Spaces to fit even bigger tiles.

|
Here you can see one way to load a Droshky. You
cannot load it with two Summer Ware Tiles, since you cannot
split the Double Space in the middle to use it for two tiles.
|
LOADING TRAVEL DESTINATIONS
-
Travel Destination Tiles will be used immediately,
but remain in the Vehicle until the Vehicle is emptied.
-
Sell at least one of the depicted items, but each item at most once.
When you place a Travel Destination
Tile on a Vehicle, you must
use it immediately: sell at least one of the
depicted items and receive the given
amount of Food. Each item can
only be sold once per Travel Destination.
(When you sell goods, return the tokens to the general supply or adjust the Goods Indicators on your Goods Track. Then adjust the Food Goods Indicator(s) on your Goods Track according to your proceeds.)
When you are done selling, turn the Travel Destination Tile to
its reverse side and leave it on your Vehicle. It remains there and
blocks the spaces of the Vehicle until the
end of the current Work Phase. Only then can you place it on your Travel Experience Track.
(Consequently, you can only use a Travel Destination once. You cannot return to it later to sell more goods.)
LOADING BUILDING MATERIALS AND FABRICS
-
Building Materials and Fabrics are placed into Vehicles with
their upgraded side facing up.
-
You can only access them after the end of the current Work Phase.
When placed on a Vehicle, the basic Building Materials
(Wood and Clay) as well as the Fabrics
(Linen, Woolen, and Leather) are
placed with their upgraded side facing up
(i.e. Timber/Brick and Summer/Winter/Leather Wear, respectively).
However, you cannot
access them until after the end of the current Work Phase, when
you empty your Vehicles.
Details on Vehicles
-
You cannot combine the Single
Spaces of the Wagon to fit bigger
tiles.
-
At the Travel Destinations, you can only sell goods that you have
in your supply – including the goods indicated by your Goods
Track. In a few special cases, you can sell a Plow or Peat Boat
from your Barn, or a Field or Moor Tile from your Home Board
(Again, you cannot sell goods from your Vehicles.)
-
“Bremen” can only be accessed by
Horse Cart or Droshky due to its size
of 4. It requires 4 Single Spaces, or
2 Single Spaces and 1 Double Space.
-
Plows and Peat Boats are not considered
Vehicles, although – like Vehicles
– they must be kept in the Barn.
The End of the Game and the Winner
You can skim this section when reading this rule book for the first time. However, make sure you read the “Animals on Home Board”
section carefully: it provides information on how to score your Animals. Every other source of Victory Points is indicated by yellow
wind roses on the tiles or boards.
-
The game ends after 9 rounds after the November Inventorying.
-
Points for Clothing Tiles and Building Materials according to their printed VPs.
-
Points for Equipment in the Barn according to their printed VPs.
-3 VP if no large vehicle was built.
-
Points for Travel Experience: first empty space of the Travel Experience Track.
-
Points for tools according to the position of the markers on the tool tracks.
-
Points for Goods Track according to the positions of the Goods Indicators.
(with Depot, double the points)
-
VP on Home Board: per tile according to their printed VPs.
Score -1 VP for (up to 3) Tidal Flat Spaces not covered with a Dike.
-
Animals on Home Board: The animal kind you have most of scores 0 VP per animal,
the one where you the second most scores 1 VP per animal, the one where you
have least of scores 2 VP per animal.
The game ends after 9 rounds at the end of the last Summer Half Year, after the November Inventorying.
(Your Animals will not breed anymore, because they only do so in May.)
Then each player may use his Peat Boat (if he has one) to exchange
his remaining Peat for other goods that might provide Victory Points on the Goods Track
(see the “Goods Track” scoring category below).
Use the Scoring Pad to write down your Victory Points (VP) in the various scoring categories.
Clothing Tiles and Building Materials:
Add up the VP of your goods tiles. Bricks, Linen, Woolen, and Leather are each worth 1 VP.
Summer, Winter, and Leather Wear are each worth 2 VP. Each Timber is worth ½ VP.
(Do not round the total.)
Equipment in the Barn:
Add up the VP from your Plows, Peat Boats, and Vehicles. Then,
subtract 3 VP unless you have at least one Large Vehicle in your
Barn.
Travel Experience:
The first empty space (from the bottom) on your Travel Experience Track indicates the
number of VP you get for traveling.
Travel Experience can be worth up to 10 VP.
Tools:
Add up the VP of your
Tools on the 10 Tool
Tracks on the Game Board.
Goods Track:
Each Goods Indicator on space 15 of your Goods Track is worth 3 VP. Each Goods
Indicator on one of the spaces 11-14 is worth 2 VP. Each Goods Indicator on one of the
spaces 7-10 is worth 1 VP.
(You may distribute the total amount of Food you have between your two Food Goods Indicators to optimize the number of VP you get for them.)
If you
have a Depot, double the total number of VP in this category.
(You cannot double them more than once even if you had multiple Depots.)
VP on Home Board:
Add up the VP from your Buildings, Stalls, Stables, Forests, and Parks. Then, subtract 4 VP
for each hydrated Moor Section, 1 VP for each dehydrated Moor Section and 1 VP for each
Tidal Flat Space (of the top row) left on your Home Board.
(Animals have their own scoring category.)
Animals on Home Board:
Each Animal of the type you have the least of is worth 2 VP
(see here for details on Animal Husbandry).
Each Animal of the type you have the second least of is worth 1 VP. Animals of
the third type are not worth any VP.
Examples:
6 Sheep, 5 Horses, and 4 Cattle are worth 0+5+8=13 VP.
5 Horses, 4 Cattle and 0 Sheep are worth 0+4+0=4 VP.
3 Horses, 3 Cattle, and 3 Sheep are worth 0+3+6=9 VP.
Horses and Cattle you paid when acquiring Plows and
Vehicles are not considered in this category – they are not worth any VP.
Supply Bottlenecks:
This category was used during the course of the game.
Here, you kept track of VP losses due
to missing Food and Fuel at the end of each Half Year
(which should happen rarely, if at all).
During scoring, you do not lose any additional VP in this category.
Finally, the player with the most Victory Points wins.
In case of a tie, the Starting Player of a hypothetical
10th Half Year breaks the tie
(i.e. the player who would be Starting Player if another round were played).
Appendix
THE INDEXES
INDEX OF BUILDING TILES
During setup, place the Small Houses on the four spaces at the top
of the Game Board (indicated by their green color). All of the
Small Houses have the same building costs and are each worth 1 Victory Point (VP).
For your first play, we recommend you use the light green Starter Houses.
If you build more than one of these Houses, you may decide
in which order you use them right before the November Inventorying. The Small Houses in detail:
Farmer’s House
| Costs |
any 1 Building Material
and 1 Grain
|
|
Worth
|
1 VP
|
Ability
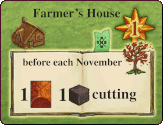
|
Before November
(at the end of each Summer Half Year),
you receive 1 Clay.
Additionally, you may cut
1 Peat before each November
(including the one before final scoring).
(You may not take the Peat from the general supply. You must take it off one of your Moor Tiles.)
|
Plow Maker’s Workshop
| Costs |
any 1 Building Material
and 1 Grain
|
|
Worth
|
1 VP
|
Ability
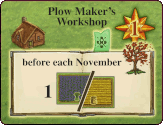
|
Before November
(at the end of each Summer Half Year),
you may place
1 Field of your choice on an
empty Land Space of your
Home Board
(below your Dike Line).
You are not required
to place a Field.
(If you do not, you cannot do so later, retroactively.)
|
Novice’s Hut
| Costs |
any 1 Building Material
and 1 Grain
|
|
Worth
|
1 VP
|
Ability
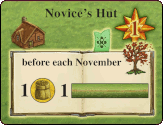
|
Before November
(at the end of each Summer Half Year),
you receive 1 Grain
and 1 Dike
(i.e. move the bottommost Dike to the next free gap above the Dike Line).
|
Workshop
| Costs |
any 1 Building Material
and 1 Grain
|
|
Worth
|
1 VP
|
Ability
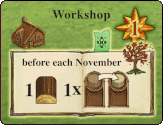
|
Before November
(at the end of each Summer Half Year),
you receive 1 Wood and
1 “Master” action
(i.e. you pay the costs and move exactly one Tool Indicator 1 space to the right).
|
For subsequent plays, choose 4 of the following dark green Small Houses to play with.
(Their back side allows you to differenciate between both types of green.)
Each of the Small Houses can be used at any time during the game (especially the Work Phase).
(Their abilities may seem a little challenging when using them for the first time. Therefore, we recommend you use the Weaving Parlor, Colonist’s House, Carpenter’s Workshop, and Schnapps Distillery in your first game with the dark green Buildings.)
Weaving Parlor
| Costs |
any 1 Building Material
and 1 Grain
|
|
Worth
|
1 VP
|
Ability
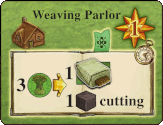
|
At any time during the
game and any number of times,
you may pay 3 Flax to receive
1 Linen and to cut 1 Peat
(i.e. take 1 Peat off one of your Moor Tiles; you may not take the Peat from the general supply).
|
Colonist’s House
| Costs |
any 1 Building Material
and 1 Grain
|
|
Worth
|
1 VP
|
Ability
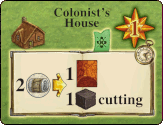
|
At any time during
the game
(and any number of times),
you may pay 2 Wool
to receive 1 Clay and to cut
1 Peat
(i.e. take 1 Peat off one of your Moor Tiles; you may not take the Peat from the general supply).
|
Carpenter’s Workshop
| Costs |
any 1 Building Material
and 1 Grain
|
|
Worth
|
1 VP
|
Ability
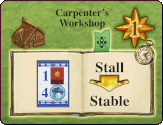
|
At any time during
the game
(and any number of times),
you may pay 4 Food
and 1 Brick to upgrade one of
your Stalls to a Stable.
(You do not need to pay the usual 2 Bricks on top of that. Keep in mind, there are only 3 Stables available.)
|
Schnapps Distillery
| Costs |
any 1 Building Material
and 1 Grain
|
|
Worth
|
1 VP
|
Ability
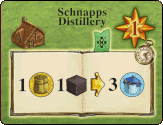
|
At any time
during the game and
any number of times
(even in-between Harvest and Sustenance),
you may exchange
1 Grain plus 1 Peat
for 3 Food.
|
Litter Storage
| Costs |
any 1 Building Material
and 1 Grain
|
|
Worth
|
1 VP
|
Ability
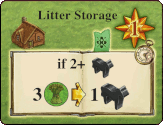
|
At any time during
the game
(and any number of times),
you may exchange
3 Flax for 1 Horse if you
already have at least 2 Horses.
|
Loading station
| Costs |
any 1 Building Material
and 1 Grain
|
|
Worth
|
1 VP
|
Ability
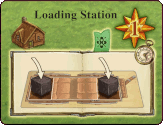
|
At any time during the Work Phase, you may place 1 Peat
on an empty Single Space (but not Double Space) of one of your
Vehicles. You may do so any number of times and for any number
of Vehicles. As usual, you
only receive the Peat from
the Vehicles when emptying
them.
(The Peat you place on the Vehicles comes from the general supply. You may not take it off your Moor Tiles.)
|
Wood Trader
| Costs |
any 1 Building Material
and 1 Grain
|
|
Worth
|
1 VP
|
Ability

|
At any time during
the game
(and any number of times),
you may exchange
1 Timber plus 1 Food for
2 Wood.
(This Building provides easy access to Wood provided you have enough Vehicles.)
|
The following Buildings provide an immediate benefit,
i.e. you receive a one-time reward as soon as you build them. After you have
received your reward, you can ignore them for the remainder of the game.
They also provide Victory Points (VP) at the end of the game.
On the Game Board, below the 4 spaces for the Small Houses, there are 2 spaces
for the Minor Craft Buildings
(indicated by their yellow color).
All of the Minor Craft Buildings have the same building costs.
At the beginning of the game, determine which 2 of those Buildings you will play with.
Turnery
| Costs |
1 Timber and 1 Brick
|
|
Worth
|
5 VP
|
Ability
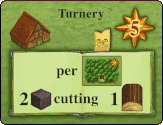
|
Immediately (and only once),
per Forest you have, receive 1 Wood and
2 “Cut Peat” actions.
(Keep your Forests. You may not take the Peat from the general supply.)
|
Smokehouse
| Costs |
1 Timber and 1 Brick
|
|
Worth
|
5 VP
|
Ability

|
Immediately (and only once),
receive 1 “Cut Peat” action per Fish Trap
you have.
(Keep your Fish Traps. You may not take the Peat from the general supply.)
|
Cooperage
| Costs |
1 Timber and 1 Brick
|
|
Worth
|
4 VP
|
Ability
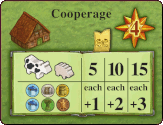
|
Immediately (and only once),
determine the number of Dairy Animals
you have. Dairy Animals are Sheep
and Cattle. For 5/10/15 Dairy Animals,
you may move each of your six Goods
Indicators up by 1/2/3 spaces.
|
Smithy
| Costs |
1 Timber and 1 Brick
|
|
Worth
|
3 VP
|
Ability
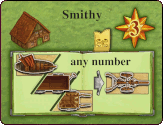
|
Immediately
(and only when building the Smithy),
you may exchange
Peat Boats, Handcarts, and Wagons
(which are called “small pieces of Equipment”)
for Plows. Exchange at a 1:1 ratio and any
number of times.
(Return the exchanged pieces of Equipment to the Supply Board.)
|
Bakehouse
| Costs |
1 Timber and 1 Brick
|
|
Worth
|
4 VP
|
Ability
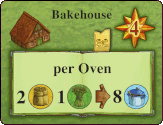
|
Immediately
(and only when building the Bakehouse),
per Oven you
have, you may exchange 2 Grain and
1 Flax for 8 Food. (Keep the Ovens.)
|
At the beginning of the game, place the 6 Major Craft Buildings according to
their names on the orange building spaces of the Game
Board. Each of the Major Craft Buildings has individual costs and is
available in every game of “Fields of Arle.”
Mill
| Costs |
1 Timber and either 8 Flax or
8 Grain
|
|
Worth
|
6 VP
|
Ability
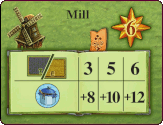
|
Immediately (and only once),
receive 8/10/12 Food if you have
3/5/6 Fields. (Keep the Fields.) The type of
Field does not matter, both Grain and Flax
Fields count.
(If you have 2 or fewer Fields, you do not receive any Food.)
|
Weaving Mill
| Costs |
2 Bricks and either 10 Flax or
10 Wool
|
|
Worth
|
7 VP
|
Ability

|
Immediately (and only once), receive
1 Winter Wear and
move your Weaving
Loom Tool Indicator
(up to) 2 spaces to the
right for free.
|
Textile House
| Costs |
1 Brick and 2 different pieces of
Clothing
(Summer/Winter/Leather Wear)
|
|
Worth
|
9 VP
|
Ability
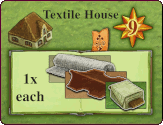
|
Immediately
(and only once),
receive 1 Linen,
1 Woolen, and
1 Leather.
|
Saddlery
| Costs |
2 Timber and 3 Leather
|
|
Worth
|
8 VP
|
Ability
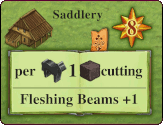
|
Immediately (and only once),
receive 1 “Cut Peat” action per Horse
you have.
(Keep the Horses. You may not take the Peat from the general supply.)
Afterwards, move your Fleshing Beam
Tool Indicator 1 space to the right for free.
|
Joinery
| Costs |
2 Timber and 5 Grain
|
|
Worth
|
6 VP
|
Ability

|
Immediately (and only once),
receive 2 Peat per Peat Boat you have,
and 1 Horse per Plow you have.
(Keep the Peat Boats and Plows. You must accommodate the Horses on your Home Board immediately. You must take the Peat from the general supply.)
|
Waterfront House
| Costs |
2 Bricks and 25 Food
|
|
Worth
|
10 VP
|
Ability
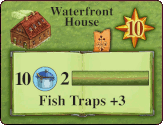
|
Immediately (and only once),
receive 10 Food
(back from the 25 Food you paid),
2 Dikes
(i.e. move the 2 bottommost Dikes to the next free gaps above the Dike Line),
and move your Fish
Trap Tool Indicator (up to) 3 spaces to the
right for free.
|
At the beginning of the game, determine which 3 of the blue Inn Tiles
to play with and place them on the blue spaces at the bottom
left of the Game Board. All of the Inns have the same building costs.
For your first play, we recommend you use the Potter’s Inn, Farmer’s Inn and Junk Dealer’s Inn.
Potter’s Inn
| Costs |
2 different Building Materials and
9 Food
|
|
Worth
|
5 VP
|
Ability
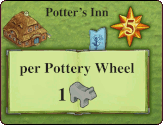
|
Immediately (and only once),
receive 1 Animal of any type per Pottery
Wheel you have.
(Keep the Pottery Wheels. You may choose the same or different Animals. You must accommodate them on your Home Board immediately.)
|
Farmer’s Inn
| Costs |
2 different Building Materials and
9 Food
|
|
Worth
|
3 VP
|
Ability
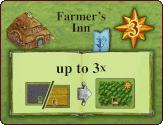
|
Immediately (and only once), you
may replace up to 3 of your Fields with
Forests.
(Return the Fields to the Supply Board. Keep in mind there is only a limited supply of Forest Tiles.)
|
Junk Dealer’s Inn
| Costs |
2 different Building Materials and
9 Food
|
|
Worth
|
4 VP
|
Ability
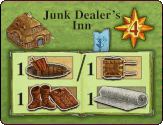
|
Immediately (and only once),
either receive 1 Handcart or 1 Peat Boat for
free.
(Place the new piece of Equipment in your Barn – make room if needed. If there are no more Handcarts or Peat Boats left on the Supply Board, you do not receive any.)
Additionally or alternatively, receive
1 Leather Wear and 1 Woolen.
|
Gulf House Inn
| Costs |
2 different Building Materials and
9 Food
|
|
Worth
|
5 VP
|
Ability
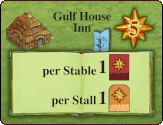
|
Immediately (and only once),
receive 1 Timber per Stall you have, and
1 Brick per Stable you have.
(You may not take Timber instead of Bricks.)
Double Stalls are considered 2 separate Stalls, so
you receive 2 Timber per Double Stall.
|
Milk House Inn
| Costs |
2 different Building Materials and
9 Food
|
|
Worth
|
5 VP
|
Ability
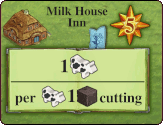
|
Immediately (and only once),
receive 1 Cattle, and afterwards, 1 “Cut
Peat” action per Cattle you have.
(Keep the Cattle. You may not take the Peat from the general supply.)
|
Sluice Yard Inn
| Costs |
2 different Building Materials and
9 Food
|
|
Worth
|
4 VP
|
Ability
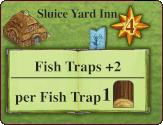
|
Immediately (and only once), move
the Fish Trap Tool Indicator 2 spaces to the
right for free. Then
take 1 Wood per Fish
Trap you have
(i.e. 2, 3, 4, 5, or 6 Wood).
|
At the beginning of the game, place the red Large Buildings next to the Inns.
All of the Large Buildings have the same building costs
and are each worth 15 Victory Points (VP).
Village Church
| Costs |
3 Timber, 3 Bricks, and 15 Food
|
|
Worth
|
15 VP
|
Ability
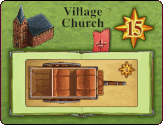
|
Immediately (and only once),
receive 1 (Wedding) Carriage for free and
place it in your Barn
(provided there is still a Carriage left on the Supply Board).
|
Lütetsburg Castle
| Costs |
3 Timber, 3 Bricks, and 15 Food
|
|
Worth
|
15 VP
|
Ability
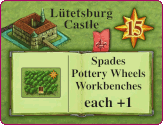
|
Immediately (and only once),
receive 1 Forest Tile and place it on an
empty Land Space of your Home Board
(if available) and move each of your Tool
Indicators for Spades, Pottery Wheels, and
Workbenches 1 space to the right for free.
|
Berum Castle
| Costs |
3 Timber, 3 Bricks, and 15 Food
|
|
Worth
|
15 VP
|
Ability
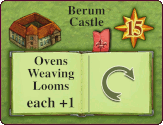
|
Immediately (and only once),
move each of your Tool Indicators for
Ovens and Weaving Looms 1 space to the
right for free. Additionally, you receive
1 “Tile Upgrade” action.
|
INDEX OF TRAVEL DESTINATION TILES
Keep in mind that you may only place a Travel Destination Tile
on one of your Vehicles if you immediately sell
at least one of the depicted items. Each item on the tile can only be sold once.
You cannot sell things that are not
depicted on the tile. The proceeds from the sale are always some amount of Food.
(Keep in mind that you cannot store more than 30 Food.) Food is needed
primarily for the “Waterfront House” Building, the Large
Buildings and Inns, and, of course, for Sustenance.
The Travel Experience Track on the left side of your Home Board has 19 spaces.
Each space has the same size as one Single Space on a vehicle.
When you remove a Travel Destination Tile from a Vehicle and place it on that track, it will
cover 1-4 of these spaces according to its size.
The Travel Destination Tiles in detail::
Hage

Covers 1 space on the Travel Experience Track.
Immediately remove a Field from your Home Board and receive 1 Food.
Beemoor

Covers 1 space on the Travel Experience Track.
Remove 1 Peat from your supply (but not from your Home Board) and receive 2 Food.
Dornum

Covers 1 space on the Travel Experience Track.
Return a Plow from your Barn to the Supply Board and receive 8 Food.
Norden
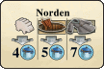
Covers 2 spaces on the Travel Experience Track.
Sell 1 to 3 of the depicted items. You receive 4 Food
for a Sheep and 7 Food for Winter Wear. Additionally
or alternatively, return a Peat Boat from your Barn
to the Supply Board and receive 5 Food.
Aurich

Covers 2 spaces on the Travel Experience Track.
Sell 1 to 3 of the depicted items. You receive 4
Food for Leather (which you cannot replace with Leather Wear),
5 Food for a Horse, and 4 Food for an Animal of any type
(which may be another Horse).
Esens
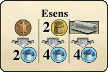
Covers 2 spaces on the Travel Experience Track.
Sell 1 to 3 of the depicted items. You receive 4
Food for 2 Grain (you cannot sell a single Grain),
2 Food for a Hide, and
4 Food for Woolen.
Emden
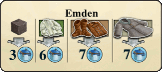
Covers 3 spaces on the Travel Experience Track.
Sell 1 to 4 of the depicted items. You receive 7
Food each for Winter and Leather Wear, and 6 Food for Summer Wear.
Additionally or alternatively, you can remove 1 Peat from
your supply (but not from your Home Board) and receive 3 Food.
Leer
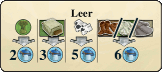
Covers 3 spaces on the Travel Experience Track.
Sell 1 to 4 of the depicted items. You receive 2 Food for Flax,
3 Food for Linen (which you cannot replace with Summer Wear),
5 Food for Cattle, and 6 Food for either Summer, Winter or Leather Wear.
Bremen
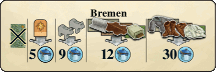
Covers 4 spaces on the Travel Experience Track.
Sell 1 to 5 of the depicted items. You receive 5 Food for Timber,
9 Food for 2 Animals of the same type, 12 Food for a
set of Linen, Woolen and Leather, and 30 Food
(any excess Food is lost) for a set of Summer, Winter and Leather Wear.
Additionally or alternatively, you may remove a Moor Tile from your Home Board
(regardless of which side is facing up and whether there is still Peat left on it or not, including the small Moor Tile that had Peat since the beginning of the game).
Remove the tile immediately. The Peat from the tile, if any, is lost.
You do not receive any Food for this but, on the
other hand, you will not lose points for the tile.
INDEX OF EQUIPMENT AND TOOLS
You keep your pieces of Equipment in your Barn. The space
is limited. You have 4 Parking Spaces for small pieces of Equipment
(including the Small Vehicles) and 3 Parking Spaces for Large Vehicles.
(Alternatively, the bottommost Parking Space for Large Vehicles can be used to store a fifth small piece of Equipment.)
Peat Boat
|
| Category |
Small piece of Equipment |
|
Costs
|
1 Wood
|
|
VP
|
1
|
|
Function
|
allows you to exchange 1 Peat for 1 good of the
Goods Track at any time
|
|
Flip over Tile
|
Plow
|
Plow
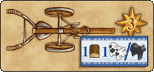
|
| Category |
Small piece of Equipment |
|
Costs
|
1 Wood and 1 1 Horse/Cattle
|
|
VP
|
3
|
|
Function
|
provides Fields with the “Farmer” action
|
|
Flip over Tile
|
not possible
|
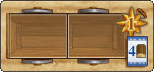
Handcart
|
| Category |
Small Vehicle |
|
Costs
|
2 Wood
|
|
VP
|
0
|
|
Function
|
1 Single Space for loading
|
|
Flip over Tile
|
Wagon
|
Wagon
|
| Category |
Small Vehicle |
|
Costs
|
4 Wood
|
|
VP
|
1
|
|
Function
|
2 Single Spaces for loading that cannot be combined
|
|
Flip over Tile
|
not possible
|
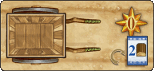
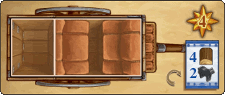
Cart
|
| Category |
Large Vehicle |
|
Costs
|
5 Wood and 1 Horse
|
|
VP
|
1
|
|
Function
|
3 Single Spaces for loading
|
|
Flip over Tile
|
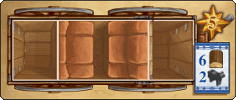
Horse Cart
|
Horse Cart
|
| Category |
Large Vehicle |
|
Costs
|
7 Wood and 1 Horse
|
|
VP
|
2
|
|
Function
|
4 Single Spaces for loading
|
|
Flip over Tile
|
not possible
|
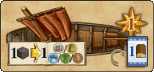
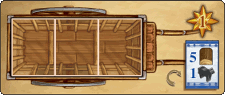
Carriage
|
| Category |
Large Vehicle |
|
Costs
|
4 Wood and 2 Horses
|
|
VP
|
4
|
|
Function
|
1 Single Space and 1 Double Space for loading
|
|
Flip over Tile
|
Droshky
|
Droshky
|
| Category |
Large Vehicle |
|
Costs
|
6 Wood and 2 Horses
|
|
VP
|
5
|
|
Function
|
2 Single Spaces and 1 Double Space for loading
|
|
Flip over Tile
|
not possible
|
The Game Board keeps track of the number of Tools you have.
There are 10 types of Tools. You may get Victory Points (VP) at the end of
the game if you have a lot of Tools of a certain type (see below).
|
Tool
|
Number at the Beginning of the Game
|
Costs per Increase
|
Increments
|
|
Fish Traps
|
2
|
1 Wood
|
3, 4, 5, and finally 6 (3 VP)
|
|
Fleshing Beams
|
3
|
1 Wood
|
5 (1 VP) and finally 6 (3 VP)
|
|
Weaving Looms
|
2
|
2 Wood
|
3 (1 VP), 4 (3 VP), and finally 5 (4 VP)
|
|
Slaughtering
Tables
|
2
|
1 Clay
|
3 (1 VP) and finally 4 (2 VP)
|
|
Spades
|
3
|
1 Wood
|
5 and finally 7 (2 VP)
|
|
Shovels *
|
3
|
1 Wood
|
4, 5, and finally 6
|
|
Pottery Wheels
|
2
|
1 Clay
|
3 and finally 4 (2 VP)
|
|
Ovens
|
1
|
1 Brick
|
2 (1 VP), 3 (5 VP), and finally 4 (7 VP)
|
|
Axes
|
3
|
1 Wood
|
4, 5, and finally 6
|
|
Workbenches
|
2
|
2 Clay
|
3 (1 VP) and finally 4 (4 VP)
|
* Used to determine the number of Pairs of Shovels you have.
Turning Tiles
|
FRONT
|
REVERSE
|
POINTS
|
EFFECT
|
|
Peat Boat
|
Plow
|
+2
|
Increases the efficiency of the Farmer action (Summer)
|
Handcart
Cart
Carriage
|
Wagon
Horse Cart
Droshky
|
+1
|
An additional Single Space
|
|
Hydrated Moor
|
Dehydrated
Moor
|
+3
|
Alternative to the Colonist action (Summer)
(though the latter also provides a Horse)
|
|
Stall
|
Depot*
|
+?
|
Doubles the point values of the goods on the Goods Track.
(Additional Depots do not further increase the value of the goods on the Goods Track).
|
|
Stable
|
Double Stall*
|
+3
|
Provides room for 2 types of Animals instead of just 1
|
|
Forest
|
Park*
|
+4
|
Provides room for 2 Animals
(but does no longer provide Wood during the November Inventorying)
|
* The only way to obtain these structures is to use a tile turning action.
What do I need … for?
Do not read this section before your first game, but consult it if the need arises.
Goods
Food

|
Needed to build the Waterfront House, the Inns, and the
Large Buildings, as well as for Sustenance each Half Year
and for certain actions (like Imitation at the Laborer).
Remaining food scores victory points according to the Goods Track
(3 points for 15, 2 points for 11-14, 1 point for 7-10).
Those victory points can be doubled once if you have a depot.
|
Flax

|
Needed to produce Linen, to use the Weaving Parlor and
the Litter Storage, and to
build the Weaving Mill and the regular Mill,
and for sale in Leer.
Remaining flax scores victory points according to the Goods Track
(3 points for 15, 2 points for 11-14, 1 point for 7-10).
Those victory points can be doubled once if you have a depot.
|
Grain

|
Needed to use the Schnapps Distillery, for the Baker, sometimes
as a replacement for Food, as well as to build the
green buildings, the Joinery, and the Mill,
for sale in Esens.
Remaining grain scores victory points according to the Goods Track
(3 points for 15, 2 points for 11-14, 1 point for 7-10).
Those victory points can be doubled once if you have a depot.
|
Wool

|
Needed to produce Woolen, to build the Weaving Mill, and
to use the Colonist’s House.
Remaining wool scores victory points according to the Goods Track
(3 points for 15, 2 points for 11-14, 1 point for 7-10).
Those victory points can be doubled once if you have a depot.
|
Hides

|
Needed to produce Leather, and for sale in Esens.
Remaining hides score victory points according to the Goods Track
(3 points for 15, 2 points for 11-14, 1 point for 7-10).
Those victory points can be doubled once if you have a depot.
|
Leather
|
Needed for processing into leather wear,
for sale in Aurich or Bremen, and to build the
Saddlery.
Each leather is worth 1 victory point.
|
Woolen
|
Needed for processing into winter wear,
and for sale in Esens or Bremen.
Each woolen is worth 1 victory point.
|
Linen
|
Needed for processing into summer wear,
and for sale in Leer or Bremen.
Each linen is worth 1 victory point.
|
Summer Wear

|
Needed to build the Textile House,
and for sale in Emden, Leer or Bremen.
Each summer wear is worth 2 victory points.
|
Winter Wear

|
Needed to build the Textile House,
and for sale in Norden, Emden, Leer or Bremen.
Each winter wear is worth 2.5 victory points.
|
Leather Wear

|
Needed to build the Textile House,
and for sale in Emden, Leer or Bremen.
Each leather wear is worth 2.5 victory points.
|
Depot

|
Doubles (once) the victory points for the Goods indicators.
(You cannot double them more than once even if you had multiple Depots.)
You cannot directly build a Depot, you get it by flipping over a stall tile.
Worth 2 victory points.
|
Building materials and peat
Wood
|
Needed as a building material for Buildings, as a
resource for Timber and Equipment or tools.
Sometimes can also be used as a replacement for missing peat.
|
Clay
|
Needed as a building material for Buildings, as a
resource for Bricks and Stalls, and for tools.
To produce brick, you need to pay one peat.
|
Timber
|
Needed as a building material for Buildings
(the Large Buildings in particular),
to use the Wood Trader, and for sale in Bremen.
Each timber is worth 0.5 victory points.
Timber can be used as a replacement for wood.
|
Brick
|
Needed as a building material for Buildings
(the Large Buildings in particular)
and to upgrade Stalls to Stables, and for tools.
Each brick is worth 1 victory point.
Brick can be used as a replacement for clay.
|
Peat
|
Needed for sustenance at the end of a Summer Half
Year, to produce Bricks, for the Baker, to trade for
other goods (if you also have a Peat Boat), as well
as to use the Schnapps Distillery or for the Baker.
Can be sold in Beemoor and Emden.
|
Animal husbandry
Sheep

|
Needed to receive Food at the end of a
Summer Half Year, to receive Wool at the end of a Winter Half
Year, for the Butcher, and to use the Cooperage.
Can be sold in Norden, Aurich or Bremen.
Each sheep is worth 0, 1 or 2 victory points (see animal scoring).
|
Cattle

|
Needed to receive Food at the end of a
Summer Half Year, for the Butcher,
to build Plows,
and to use the Cooperage
or to use the Milk House Inn more efficiently.
Can be sold in Aurich, Leer or Bremen.
Each cattle is worth 0, 1 or 2 victory points (see animal scoring).
|
Horse

|
Needed for the Butcher,
for Large Vehicles and Plows as well as for
the function of the Saddlery or the Litter Storage.
Can be sold in Aurich or Bremen.
Each horse is worth 0, 1 or 2 victory points (see animal scoring).
|
Stall
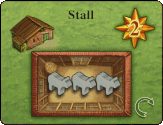
|
Needed for animal husbandry and for the function of the
Carpenter’s Workshop.
Each Stall can hold up to 3 Animals of the same type.
If you have a pair of Animals in a Stall and one empty space,
you get a newborn Animal during the Inventorying
in May.
Worth 2 victory points.
Flip over tile: Depot
|
Stable
|
Needed for animal husbandry, to use your Land Spaces
more efficiently, and as a prerequisite for a Double Stall,
to use the Gulf House Inn.
Each Stable can hold up to 6 Animals of the same type.
If you have a pair of Animals in a Stable and one empty space,
you get a newborn Animal during the Inventorying
in May. For two pairs of Animals and two empty spaces, you
get two newborn Animals.
Worth 6 victory points.
Flip over tile: Double Stall.
|
Double stall
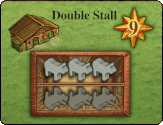
|
Needed for animal husbandry, to use your Land Spaces
more efficiently,
to use the Gulf House Inn.
You cannot directly build a Double stall, you get it by flipping over a stable tile.
A double stall is considered two separate stalls.
Each stall can hold up to 3 Animals of the same type
(it doesn't have to be the same kind for both stalls).
If you have a pair of Animals in a Stall and one empty space,
you get a newborn Animal during the Inventorying
in May.
Worth 9 victory points.
|
Landscape tiles
Forests
|
Needed to receive Wood at the end of a Summer
Half Year, as a prerequisite for a Park,
and to use the Turnery.
Worth 2 victory points.
Flip over tile: Park.
|
Parks

|
Needed for additional Victory Points
(if you do not need the Wood income anymore towards the end)
and to hold two (also different) Animals
(no offspring possible).
You cannot directly build a Park, you get it by flipping over a forest tile.
Worth 6 victory points.
|
Grain Field
|
Needed to receive Grain at
the end of a Summer Half Year,
to use the Mill at all
(at least 3 grain/flax fields are needed),
and to use the Farmer’s Inn more efficiently.
Can be sold in Hage.
|
Flax Field
|
Needed to receive Flax at
the end of a Summer Half Year,
to use the Mill at all
(at least 3 grain/flax fields are needed),
and to use the Farmer’s Inn more efficiently.
Can be sold in Hage.
|
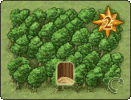
Moor

|
Needed to transform into dehydrated moor.
Can be sold in Bremen.
Worth -4 victory points.
Flip over tile: dehydrated moor.
|
Dehydrated Moor
|
Needed for cutting peat
(each dehydrated moor contains 4 peat).
Can be sold in Bremen.
Worth -1 victory points.
|
Small Dehydrated Moor
|
Needed for cutting peat
(each dehydrated moor contains 4 peat).
Can be sold in Bremen.
Worth -3 victory points.
|
Equipment
Plow
|
Needed to plow Fields at the Farmer, to use
the Joinery and Mill more efficiently.
Can be sold in Dornum.
Worth 3 victory points.
|
Peat Boat
|
Needed to exchange Peat for goods of
the Goods Track,
to receive more Peat at the Peat
Boatman, to use the Joinery
or Smithy more efficiently,
and for sale in Norden.
Worth 1 victory point.
|
Handcarts and Wagons
|
Needed to produce Timber and
Bricks continuously, to sell a Plow for Food in Dornum
or for selling at other "small" travel destinations,
and to receive Plows when building the Smithy.
Worth 0 or 1 victory points, respectively.
|
Large Vehicles
|
Needed for Timber, Bricks, and Clothing, as
well as for all of the large Travel Destinations.
Horse Cart or Droshky are needed
for the travel destination "Bremen".
|
Tools
|
Fish Traps
|
Needed for the Fisherman
and to use the Smokehouse and
the Sluice Yard Inn more efficiently.
|
|
Fleshing Beams
|
Needed for the Tanner.
|
|
Weaving Looms
|
Needed for the Woolen Weaver and the Linen Weaver.
|
|
Slaughtering tables
|
Needed for the Butcher.
|
|
Spades
|
Needed for the Peat Cutter.
|
|
Shovels
|
Needed for the Dike Builder and the Clay Worker.
|
|
Pottery Wheels
|
Needed for the Potter and to use the
Potter’s Inn more
efficiently.
|
|
Ovens
|
Needed for the Baker and to
use the Bakehouse more efficiently.
|
|
Axes
|
Needed for the Woodcutter.
|
|
Workbenches
|
Needed for the Master action spaces.
|