|
|
|
|
| 2-4 players, 60-90 minutes, 12 years and older |
| Author | Bernd Eisenstein (Eisenstein) |
| Illustrator | Lukas Siegmon |
| Published by | Irongames |
| Online since | 2024-01-07 |
| Developed by | Jim Thompson (StCharles) |
| Boardgamegeek | 360206 |
| Yucata.de owns a license for the online version of this game. A big "thank you" to the copyright owners (publisher and/or author and illustrator) who make it possible to have this game for free online here! |
|
|
|
|
If you are reading these rules for the first time, ignore the text along the right hand side. These rules serve as a summary to help you quickly familiarize yourself with the game.
Show
→ summary only
→ detailed version only
→ both summary and detailed version
History and Goal of the game
49 AD:
The Roman Empire approaches the peak of its
power. The first larger settlements on the border
with Germania develop from military outposts on
the Rhine.
The strategic task of these emerging cities is to
jointly secure the border in order to ward off the
raids of Germanic tribes. At the same time, there
is discord in the competition for the best possible
development of the infrastructure for brisk trade.
As governor, you compete to employ sailors,
soldiers, merchants and farmers to achieve your
goals. You only have four years to do this, and
Empress Agrippina travels to these flourishing
provinces with her son Nero to honor the most
successful governor. Lead your city to victory and
reap the glory!
To win the game prematurely, you need to have
no workers in your reserve. Otherwise, you are
victorious with the fewest workers after the end of
the 4th year.

1. Place the game board in the center of the table.
2. Depending on the number of players, lay out certain tiles next to the game board, as well as Stars
on the "Star Cult" space (top right of the game board):
| Players |
Ports
Forts
Marketplaces
Farmlands |
Expeditions
Developments |
Manipulators
Decrees
Privileges |
Military Towers
Trading Towers |
Stars |
| 2 |
4 |
2 |
5 |
3 |
24 |
| 3 |
6 |
3 |
7 |
5 |
36 |
| 4 |
8 |
4 |
10 |
7 |
48 |
Place all remaining tiles of these types and remaining Stars back into the game box.
Note: Ports, Forts, Marketplaces, Farmlands, Expeditions, Development and Manipulators are each
stacked separately. All other tiles are placed next to each other.
3. Sort the Germanic Tiles according to their backs
(A, B, C, D), shuffling the 4 different types separately.
Stack 4 of them face down (CAAA) on the left side of
the board and 4 more (DBBB) on the right side of the
board so that C and D are at the bottom of each stack,
respectively. Place any remaining Germanic Tiles back
in the game box.
4. Place the Seasons Boat on the space of the first
season (Spring) and reveal the top Germanic Tile of the
left stack (A).
Fun Fact: The Romans included a 5th season, the
"Saturnalia", which follows Autumn.
5. Shuffle the 6 Action Tiles and randomly place them face up on the
corresponding 6 spaces on the game board.
6. Shuffle all the City Tiles and stack them next to the game board in
multiple piles. It does not matter whether some are face up or face down.
7. Starting with one pile of City Tiles, lay out as many rows of tiles as there are players,
always from left to right and from top to bottom.
A tile row always consists of 6 City Tiles. One tile is placed under each column of the
printed dice values 1 - 6.
Note: All City Tiles are laid out face up. Always place the doublesided Ship Tiles
with the blue side up. (The market stall and blue anchor symbol on the back are face down).
8. Put all 140 Workers in the Bag.
9. Each player takes a City Map board, a Supply Ring
to place on space "0" of his Aqueduct, and 6 Stars
from the game board space "Star Cult" (→ 2.g) to place into his reserve.
The City Map is divided into different areas:
the Storage Area for fulfilled Decrees, the Expedition
Path, the Development Track, the Aqueduct for the
Supply Ring, and the city itself for placing new City Tiles
and Expansions.
Some city Expansions are already pre-printed on the City
Maps (1 Port, 1 Fort, 2 Marketplaces and 2 Farmlands).
10. Each player takes a Manipulator from the stack and
places it in front of himself with the yellow side facing up.
11. Each player randomly draws 15 Workers from the bag
and places them next to his City Map as his reserve.
12. A Starting Player for the first year is chosen at random. This player
receives the Starting Player Marker and the 3 dice.
13. Starting with the player to the right of the Starting
Player and continuing counterclockwise, each player
takes one of the City Tiles from the game board. (The
Starting Player will choose last.)
The player places this City Tile on the leftmost corresponding empty space in
his city (→ 2.1.1. City Tiles):
a Ship on a Port, Barracks on a Fort, a Market Stall on
a Marketplace, and a Farm on a Farmland.
Play a maximum of 4 years, 5 seasons per year, one turn per player per season.
The Starting Player for the year is the starting player ("Maximus") for the first season.
At the start of a season Maximus rolls the 3 dice and places them on the game board.
Maximus takes his turn for the season by choosing and taking one die
and performing actions based on that die.
In clockwise order the other players take a turn by choosing, but not taking, one of
the two dice not taken by Maximus and performing actions based on that die.
The game lasts for a maximum of 4 years.
Each year consists of 5 seasons (Spring, Summer, Autumn,
the Saturnalia and Winter).
In each season, each player takes one turn performing actions.
The player who will take the first turn in a given season is called "Maximus" (lat. "the greatest").
The Starting Player for a year is Maximus for the first season of that year.
Note: If multiple dice show the same value, they are all placed on the
same corresponding printed die.
Maximus rolls the 3 dice and places them on the corresponding printed dice on
the game board (1 - 6).
Maximus chooses one die, places it on the die symbol at
the top left of his City Map, and uses it for his action(s).
Then the next player clockwise chooses one of the other
two dice to perform his action(s), but does not take the
die.
In this way, more than one of the remaining players may
use the same die.
On Yucata a player's chosen die is displayed for all players, not only for Maximus.
A player may use one or more of his Manipulators (→ 3. Manipulators)
to change the value of his chosen die.
The next player clockwise from the Maximus for a season will be the Maximus for
the next season.
At the beginning of the 4th season refill all empty
spaces in the City Tile rows and reveal the top green Germanic tile.
After the end of the 5th Season, perform the end-of-year
events (→ 7.) and start the next year if no one has won the
game early (→ 9. End of game). The game ends at the end
of the 4th year.
After choosing a die, the player may use one or
more of his Manipulators (→ 3. Manipulators) to change the value of the die for his turn.
The die remains unchanged for later players.
After each player has taken his turn for the season, move the Seasons Boat
one space to the right to begin a new season. The next player clockwise from Maximus
becomes Maximus for the new season.
The Starting Player remains unchanged until the beginning of a new year.
When the Seasons Boat reaches the 4th season (the Saturnalia), refill all empty
spaces in the City Tile rows below the game board with new City Tiles drawn from the
pile. Then reveal the top Germanic tile from the stack on the right which has B and D tiles.
After the end of the 5th Season (winter), perform the end-of-year events (→ 7.).
Then a new year begins. If no one has been able to win the
game early (→ 9. End of game), the game ends at the end
of the 4th year.
The actions you can perform are determined by the die you chose.
You can perform at most one main action and all possible secondary actions.
Actions may be performed in any order.
Actions can give you bonuses. Bonuses must be performed
once and immediately. A bonus that you cannot perform is forfeited.
Your chosen die (possibly changed by Manipulators) determines the actions you may perform during your turn.
Maximus can choose from all 3 dice. The other players can choose only from the 2 remaining dice.
Note: Any action, or parts of an action, may be waived.
The value and color of the die determine which actions you may perform.
You may perform a maximum of 1 main action along with possible secondary actions.
You are free to choose the order in which you want to perform your actions.
Note: All bonuses you receive must be performed
once and immediately, unless otherwise stated. If you cannot
perform a bonus, you forfeit it.
You may perform one of the following main actions if it is shown below
the possibly manipulated value of the die you chose:
- Take a City Tile
- Deployment
- Take a City Expansion
- Develop
- Take Star(s)
Take one of the City Tiles below your chosen
die, and place it on the leftmost corresponding City Extension in your city or
overbuild a tile of the same type.
Workers on an overbuilt tile go back into your personal reserve.
Take one of the City Tiles from the column below your chosen
die and add it to your city either by placing it on the leftmost corresponding City Extension
or replacing ("overbuilding") a tile of the same type.
Overbuilt tiles are removed from the game.
Note: Each City Tile may be overbuilt later, i.e. replaced
by a new tile of the same type. If there are Workers
on the overbuilt tile, they go back into your personal reserve.
You choose the red die with value 1
and perform one of the 3 actions
shown on the action tile below that
die, or you take one of the two City
Tiles in that die’s column.
The City tiles
Some City Tiles allow you to place a Star
onto your Expedition Path or to take a step on your Aqueduct.
Losing or overbuilding such a Tile does
not change your Expedition Path or Aqueduct.
City Tiles are always placed without gaps from left to right except that they can be placed on
any tile ("overbuild") of the same type.
Some City Tiles allow you to place a Star from your reserve
onto your Expedition Path or to take a step with your Supply
Ring on your Aqueduct.
If you lose or overbuild such a Tile during the game, it does
not change your Expedition Path or the Aqueduct.
a) Ships (blue)
A Ship is placed on a Port. Each Port has space for one
Ship. You can instead replace (overbuild) a previously placed Ship with the new Ship.
Ship special case:
If a Ship is completely occupied with Workers
at the end of your turn, return the Workers to the bag,
turn the ship tile over to its Market Stall side, and either place the tile
on a free Marketplace, overbuild an old Market Stall, or discard the tile.
If not discarded, this new Market Stall rewards you with one step on the Aqueduct.
Note: You can not deploy Merchants to this new Market Stall until
the next season.
Ship special case:
If a Ship is completely occupied with Workers, these are returned to
the bag at the end of your turn. Then turn the ship over to
the Market Stall side and either place it on a free Marketplace in your
city, overbuild an old Market Stall, or discard it.
If not discarded, this new Market Stall rewards you with one step on the Aqueduct.
Note: You can not deploy Merchants to this new Market Stall until the next season.
b) Barracks (red)
A Barracks is placed on a Fort. Each Fort has space for one
Barracks. You can instead replace (overbuild) a previously placed Barracks with the new Barracks.
c) Market Stall (white)
A Market Stall is placed on a Marketplace. Each Marketplace has space for one Market Stall.
You can instead replace (overbuild) a previously placed Market Stall with the new Market Stall.
d) Farm (yellow)
A Farm is placed on Farmland. Each Farmland has space for one Farm.
You can instead replace (overbuild) a previously placed Farm with the new Farm.
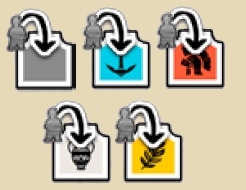
Place Workers from your reserve onto the next empty worker space of a City Tile.
The Action Tile in the column of the chosen die
specifies which City Tile type(s) you may send Workers to.
You must place the exact type(s) and number of Workers printed on the
Worker space.
You send Workers to a Ship, Barracks, Market Stall
or Farm. The Action Tile in the column of the chosen die
specifies which City Tile type you may send Workers to.
You must send the exact types of Workers printed on the
Worker spaces of each City Tile. To do this, you take the
correct Workers from your reserve and place them on one
space of the appropriate City Tile.
The space is then considered occupied. City tiles can have
1-3 Workers spaces, which may each be occupied by 1-3
Workers.
Worker spaces are ordered clockwise starting with the one at the top of the City Tile.
A gray Worker in a worker space indicates a Worker of any color.
If you do not have the required Workers, you may not perform this action.
The first Worker space to be filled is the top one on the City Tile.
The other spaces must be filled in a clockwise direction.
If a gray Worker is shown, it may be filled by a Worker of
any type (color).
If you do not have the required type or number of Workers
in your reserve, you may not perform this action.
Take a Port, Fort, Marketplace or Farmland to enlarge your city or
a Development or Expedition to extend your Development Track or your Expedition Path.
If you take a Port, Fort, etc., place it next to the right of the rightmost Port, Fort, etc.
in your city, possibly off the physical board.
If you took a Development or an Expedition, place it above your
Development Track or Expedition Path.
If you cover a bonus with the Expansion, you receive it immediately (→ Appendix
Symbols).
A player can have multiple identical City Extensions.
Some City Expansions enlarge the city and provide more
space for the corresponding City Tiles.
Others extend your Development Track or your Expedition Path.
Choose a City Expansion and place it in the appropriate
place: next to your city (without gaps from left to right),
directly above the Expedition Path or above the
Development Track. If you cover a bonus with the
Expansion, you receive it immediately (→ Appendix
Symbols). You can have as many identical City Extensions
as you like, as long as they are available.
Note: City Expansions can also be placed to the right near the
City Map.
Place a Star from your reserve on the lowest free space of your Development
Track and immediately gain the benefit (→ Appendix Symbols)
from the corresponding bonus.
You place a Star from your reserve on the lowest free space of your Development
Track and gain the benefit from the corresponding bonus.
Bonuses are always onetime and immediate, unless otherwise described (→ Appendix Symbols).
Normally, you need a die with a "6" to advance on the Development Track.

Note: If you have a Star on the Development Track
space 1 with this symbol, you may now also develop
with a "5".
Take 1 or 2 Stars from the Star Cult space.
This action allows you to take 1 or 2 Stars, if still available,
from the Star Cult space and add them to your reserve.
Secondary actions may be performed only under certain conditions.
For each of your City Tiles containing a die image of the color and value of your chosen die,
including tiles you acquired during your current turn, you may make one special deployment.
Note: Die images on white Market Stalls match chosen dice of
the same value regardless of color.

The red 1 allows you
a special
deployment to the
Barracks (red 1) and to the
Market Stall (gray 1).
If the color and value of the chosen die is exactly the same
as that of any die images on the City Tiles you own (Ship: blue die, Barracks:
red die, Market Stall: any die, Farm: yellow die), you may
then make exactly one special deployment to each of these
tiles - even those you just acquired this turn.
Note: For the white Market Stalls, the value of the die is
sufficient for the special deployment to this tile; the color
of the die is irrelevant.
If the value of your chosen die corresponds to the current
location of the Seasons Boat, you receive the bonus shown
there:

place 1 Star from your reserve on the Expedition Path

move 1 step on the Aqueduct

take 1 Tower

take 1 Star from the Star Cult space

swap 2 Workers
You may place 1 Star
from your reserve on the
Expedition Path.
If the value of your chosen die corresponds to the current
location of the Seasons Boat, you receive the bonus shown
there:
place 1 Star from your reserve on the Expedition Path
move 1 step on the Aqueduct
take 1 Tower
take 1 Star from the Star Cult space
swap 2 Workers
If you take possession of your 4th or 6th City Expansion, you may take one of the
Privileges on display (→ 5. Privileges).
If you take possession of your 4th or 6th City Expansion, you may take one of the
Privileges on display and use it either immediately or permanently, depending on
its type (→ 5. Privileges).
This is printed on the bottom right of your City Map as a reminder.
Certain spaces of your Development Track or Expedition Path give you a
one-time or permanent bonus.
One-time bonuses must be executed immediately, unless otherwise
described (→ Appendix Symbols).
Certain spaces of your Development Track or Expedition Path give you a
one-time or permanent bonus.
One-time bonuses must be executed immediately, unless otherwise
described (→ Appendix Symbols).
On your turn or through an end-of-year event (→ 7.1.), you can
fulfill a Decree (→ Appendix Decrees).
Cover the lowest uncovered Decree space on your City Map with the decree.
Take the bonus (→ Appendix symbols) shown on that space.
If all of your Decree spaces are covered, you cannot fulfill anymore.
You fulfill the Decree,
flip it over and cover
the bottom space.
You receive the bonus
immediately.
On your turn or through an end-of-year event (→ 7.1.), you can
fulfill a Decree (→ Appendix Decrees):
Take the fulfilled Decree, flip it over, and use it to cover the
lowest uncovered Decree space on the left side of your City Map.
This may give you a bonus (→ Appendix symbols).
If all of your Decree spaces are covered, you cannot fulfill anymore.
Every year you may use each of your Manipulators one time
to increase or decrease the value of your chosen die
by 1 for purposes of your main and secondary actions (including 2.2.2.!).
You may use more than one Manipulator at the same
time to increase or decrease the value of a die by more than 1.
At the beginning of a new year, all Manipulators are reactivated.
Every year you may use each of your Manipulators one time.
Use it to modify your chosen die, without physically
changing it, by increasing or decreasing its value by 1 for
purposes of your main action and your secondary actions (including 2.2.2.!).
Then flip the Manipulator to its inactive (gray) side.
You may use more than one Manipulator at the same
time to increase or decrease the value of your chosen die by more than 1.
At the beginning of a new year, all Manipulators are
turned back to their active (yellow) side.
Note: A Manipulator can not turn a 1 into a 6 or vice versa.
When you are allowed to take a Tower, you always have
the choice between all Towers in the display. You place this
Tower above a Port (a Port has space for one Tower).
You may build a new Tower over an older one, the same as
with a City Tile.
Military Towers can provide space for Workers.
They are occupied in the same way as the Barracks.
Some Military Towers allow you to place a Star on the
Expedition Path when you build them.
A Military Tower counts the same as a Barracks for fulfilling
Decrees and can be occupied by a special deployment.
Military Towers can provide space for Workers.
These Towers are occupied in the same way as the Barracks.
Some Military Towers allow you to place a Star on the
Expedition Path when you build them.
Note: A Military Tower counts the same as a Barracks for fulfilling
Decrees, and it can also be occupied by a special deployment.
This Military Tower gives you permanent
strength 1 (→ 7.1.).
The red 1 allows you to make a
special deployment to this Military Tower.

You choose Deployment as
your main action and send 2
Soldiers to this Military Tower.
Trading Towers allow you to swap Workers if the value of
your chosen die matches the die value on the Trading Tower.
To swap, draw 3 or 4 Workers from the bag, and then place the same
number of Workers (possibly some or all of the drawn ones) into the bag.
When you build a Trading Tower, you advance 2 steps on the Aqueduct.
The 1 allows you to swap 3
Workers. You draw 3 Workers
from the bag and then discard
any 3.
Trading Towers allow you to swap Workers if the value of
the chosen die matches the value on the Trading Tower.
(The color of the die does not matter).
You first draw 3 or 4 Workers from the bag, and then place the same
number of Workers from your reserve back into the bag. These can
be Workers you have just drawn.
When you build a Trading Tower, you advance 2 steps on the Aqueduct.
One type of privilege permanently lets you deploy a particular
type of Worker in place of other types.
If you have two such privileges that are identical then
you can deploy all types of workers in place of others.

You own these two privileges?
All Workers are wild for you.
Privileges
either
give you a permanent advantage: a certain
type of Worker is "wild”, i.e. can be deployed in place of any other Worker,
Note: If you have 2 identical privileges with a permanent
advantage, all of your Workers are wildcards.
The other type of privilege can be used only one time.
Some let you advance on the Aqueduct and either the Development Track
or the Expedition Path.
Others give you two Stars and a Deployment to any tile.
You can use these one-time Privileges during either your current turn
or a later turn.
or
they give you a one-time bonus.
Some of these let you place a Star on either the Expedition Path or
Development Track and move one step on the Aqueduct. Others let you do a
Deployment to any tile and take 2 Stars.
You can use these one-time Privileges either immediately
or in a later turn.
After you used them, flip the Privilege over to indicate that it has been used.
Your position on the Aqueduct indicates the number by which
your infrastructure shortage is reduced at the end of the
year (→ 7.2.).
If you are awarded an Aqueduct step after reaching step 10, you cannot
advance farther. Instead, you may swap 2 Workers.
Move your Supply Ring on the Aqueduct. Through the hole
in the middle of the Ring, you can see the value by which
your infrastructure shortage is reduced at the end of the
year (→ 7.2.).
You can move up to step 10. For each additional step after that, you may
swap 2 Workers, but the Ring remains on step 10.
The year ends after Season 5.
Starting with the starting player and continuing in a
clockwise direction, each player performs the Germanic raid event.
Then in the same order, each player performs the Infrastructure shortage event.
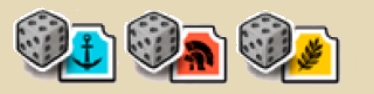
Compare the sum of the numbers on the two Germanic Tiles
(the Germanic strength) to the number of Workers on all your
Barracks and Military Towers that are completely occupied (your strength).
If your strength is greater or equal to the Germanic strength,
you receive the reward printed on the right (green) Germanic tile.
Otherwise, you suffer the damage printed on the left (red) Germanic tile.

Germanic strength: 2 + 1 = 3,
your strength: 0 + 1 = 1

 0 (the Barracks are not fully occupied) + 1 (Military
Tower): you lose one Star.
0 (the Barracks are not fully occupied) + 1 (Military
Tower): you lose one Star.
 If your Barracks were fully occupied (e.g. with the yellow
Worker), you would have strength 5 (4 + 1) and would
receive one Tower.
If your Barracks were fully occupied (e.g. with the yellow
Worker), you would have strength 5 (4 + 1) and would
receive one Tower.
Check to see if you can repel the Germanic raid.
Add up the strength of the two face up Germanic Tiles and
compare them with your own strength.
Your strength is equal to the number of Workers on all your
Barracks/Military Towers that are completely occupied.
If it is at least a tie, you receive the reward printed on the right (green) Germanic tile.
If you are not as strong as the Germans, you suffer the damage
printed on the left (red) Germanic tile.
However, the damage does not affect you if you do not
have the corresponding good.
Note: If necessary, you will get your reward in turn order.
Your Infrastructure shortage is the number of visible Infrastructure symbols
on your City Map plus the number of empty Worker spaces
(not the number of workers in the spaces) on your City Tiles
and Military Towers minus a possible reduction from the Aqueduct.
Draw one worker per infrastructure shortage from the bag and add them to your
reserve.
If your Infrastructure shortage is less than "0", you may return that
number of Workers from your reserve back to the bag.
Then place all Workers from your City Tiles/Military Towers
that are completely occupied into the bag.
There are 8 Infrastructure symbols left on your City Map
+ 3 spaces on City Tiles without Workers = 11.
Your Supply Ring on the Aqueduct shows -2,
so the Infrastructure value is 11 - 2 = 9. You must draw 9 new
Workers from the bag.
Determine the value of your Infrastructure shortage.
To do this, count all the Infrastructure symbols that
are visible on your City Map. Decrees, City Expansions, City Tiles
and Stars can cover some of the symbols.
Each space on your City Tiles/Military Towers that does
not have any Workers
on it increases this value by 1.
Decrease this value by the current Supply Ring location on the Aqueduct.
Starting with the Starting Player in clockwise direction, you draw as many
Workers from the bag as your value and add them to your reserve.
In the rare case that there aren’t enough Workers
in the bag, draw as many as you can and add them to your reserve.
If your Infrastructure shortage is less than "0", you may return that
number of Workers (of any color) from your reserve back to the bag.
Then place all Workers from your City Tiles/Military Towers
that are completely occupied into the bag.
(Workers on partially occupied tiles remain there.)
Before beginning the 2nd, 3rd or 4th year:
-
remove all the City Tiles in the top row from the game,
-
move all remaining City Tiles up one row then draw City Tiles to
fill all empty spaces,
-
flip all used Manipulators to their active side,
-
place the Seasons Boat back on the space of the 1st season (spring),
-
remove the two face-up Germanic Tiles from the game
and reveal the left (red) Germanic tile.
Count the Workers in your reserve.
Whoever has the most Workers becomes the new Starting Player,
takes the Starting Player Marker, and begins the new year
by becoming Maximus and rolling the 3 dice.
If there is a tie, give the Starting Player Marker to the next
player with the most Workers clockwise from the old year's Starting Player.
If you manage it to have no Workers in your reserve at any
time during the game, you win immediately.
Otherwise, you win if you have the fewest Workers in your reserve after the
end of the 4th year and its two end-of-year events (Workers
on City Tiles/Towers) are disregarded for this purpose).
In case of a tie, the tied player with the fewest Workers placed on
his City Tiles/Towers wins.
Own 5 different city expansions.
Own 2 pairs of identical city expansions.
Own 3 manipulators.

Own 3 towers.

Reach step 8 on the aqueduct.
Reach space 6 of the development track.
Reach space 6 of the expedition track.
Have a maximum of 2 different colors of workers in your reserve.

At least 12 workers are placed on your cities and towers.
At least 1 city of each type and at least 9 workers on cities.
(Treat military towers as barracks.)
At least 2 ships and at least 3 workers on ships.
At least 3 farms and at least 7 workers on farms.
At least 3 market stalls and at least 6 workers on market stalls.
At least 3 barracks and at least 5 workers on barracks. (Treat military towers as barracks.)
Deploy to any City
Tile, Ship, Barracks,
Market Stall or Farm.
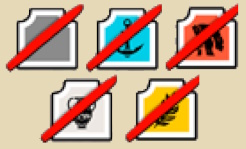
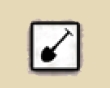
Tear down any City Tile, Ship,
Barracks, Market Stall, or
Farm and remove it
from the game.
If there are
Workers on that tile, they go back into your reserve.
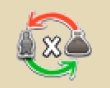
Swap X Workers: first draw Workers from
the bag, then put the same number from your
reserve back into the bag. You may return
Workers that you just drew.
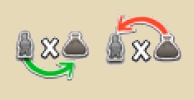
Put X Workers from your reserve into the
bag, or draw them from the bag and put
them into your reserve.

Place a Star from your reserve on the
next space of the Expedition
Path/Development Track.

Take a Star from Star Cult space and
add it to your reserve, or place a Star
from your reserve back onto the Star
Cult space.

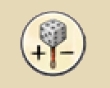
Move your Supply Ring 1 step forward
or backward.

Take any Tower from the display and
build it or tear it down and remove it
from the game.
Take a Manipulator from the display.

Take any Privilege
from the display.
Take any City
Expansion from the
display.
 Permanent
Special Deployment to a Ship,
Barracks, or Farm with any die
color.

Development also at dice value 5, not only at 6.
Note: Permanent advantages remain even if you have
reached a higher Development level.
After choosing a die, if the player has any unused manipulators then he is immediately given a chance to use them.
The die he chose will be highlighted in green and the dice after possible manipulation will be highlighted in blue.
The player must choose one of them.
So to choose a die and use its original value, a player who has any unused manipulators must click on the die twice.
A player's current infrastructure shortage is displayed in the player information.
It includes shortages from visible symbols on the player's city map and empty worker spaces
and reductions due to the aqueduct and expedition path extensions.
It includes a reduction from a year 4 green Germanic tile only after the player has received
that reward during the Germanic raid.
The order of items displayed in a single row above the boards is decrees, towers and privileges.
If two rows then decrees and military towers are in the top row and privileges and trading towers are in the bottom row.
Bonuses of stars and manipulators are always given automatically.
A player who has met the criteria for taking a particular decree can refuse it for the time being and take it later
if he still meets the criteria and no opponent has taken it during the interim.
A decree's bonus is awarded immediately after a player takes the decree.
There are only three opportunities to take a privilege, namely after adding a fourth city extension, after adding a
sixth city extension, and when reaching step 6 of the Expedition Path.
If a player declines to take a privilege at
any of these times, that opportunity to do so is lost.
So when you have an opportunity to take a privilege, take it.
A player's permanent privileges and unused one-use privileges are
displayed in the lower left corner of the player's city map board.
| |