This online version supports the standard game for 2–4 players, with optional animal scoring and the board sizes recommended in the rules for each player count. The printed variants below are included for reference and are not selectable online.
Rule translation: Rick Heli www.spotlightongames.com
Components
There are 76 path tiles:
The billabong tiles do not belong to any player. All of the other tiles
have paths in two colors, one in the player's color and one in gray
which does not belong to any player.
The gray parts of the straight and curved tiles each contain an icon,
one of a kangaroo (4 cases), emu (4 cases), duck-billed platypus (3
cases), rabbit (4 cases) or dingo (1 case). These animals are only
important for special scoring (cf. End of the Game and Scoring).
Goal of the Game
The goal of the game is to connect up path tiles in one's own color and
gray to form a single route. A player wins by completing the longest
route in his color inside a defined space. If playing with special
scoring, there are bonus points and reductions for the animals on the
route.
Preparing for Play
Each player receives all of the path cards of a single color and
separates the straight from the curved tiles (if using special scoring,
also group them by animal). The billabong tiles are placed nearby.
(They are only needed in special situations which in most playings do
not come up.)
The players decide the size of the playing area. Depending on the
degree of desired difficulty, these are as follows:
Degree of difficulty
|
2 players
|
3 players
|
4 players
|
| Easy: |
6x6 tiles |
7x7 tiles |
8x8 tiles |
| Recommended: |
5x7 tiles |
6x8 tiles or
5x9 tiles |
7x9 tiles or
6x10 tiles |
| Difficult: |
4x8 tiles |
4x10 tiles |
5x11 tiles |
Note that only the size of the playing area is defined, not its exact
position, which is only determined during the course of play (for more
information see The border comes into being).
Playing the Game
The Game Begins
The first player places one of his straight or curved tiles on the table. Each other player places a straight or curved tile of their own color adjacent to an existing tile, orthogonally or diagonally. Terminal tiles are not allowed in the first round.
Important:
A player may not place a tile so as to join together paths of two different player colors.
From the second round on,
On your turn, extend your route using the colored section of a tile from your own stock, not its neutral section.
If your route reaches an existing neutral section, that section becomes part of your route and you continue from its other end on a later turn. Several connected neutral sections can be incorporated at once, including the neutral section of the tile just placed. The colored section of each newly placed tile must still extend your own route.
The neutral section of your tile may also extend an opponent’s route, letting you influence its direction. Never connect routes belonging to different players.
Correct:
All of the yellow path tiles are connected together
The border comes into being:
The exact position of the borders of the playing area are determined
when the maximum numbers of horizontal and vertical tiles are achieved.
For example, suppose a 7x9 playing area was chosen. Now a player lays
the 8th tile in a direction. This has the consequence that this axis
will have a maximum of 9 tiles. The 9th tile can be placed on either
side and only when it is placed is the exact border on that axis
determined. The other axis will have a maximum of 7 tiles.
Only terminal tiles may be placed outside the pre-defined playing area.
End of the Road
Normally it is not a good idea to place a terminal tile on one's path because this reduces one's options for playing future tiles.
But a terminal tile must be placed when a player's route reaches the edge of the playing area.
Placing a terminal tile in this way counts as a normal turn. It is not required to place this tile as soon as the situation arises. It can be postponed if there are opportunities to play on the other end of the route.
Especially toward the end of the game, placing a terminal tile can be the only way to place a tile without connecting one's path with that of another player. For example, this is the case if one cannot place a straight tile because the route is blocked by an opponent's path and the curved tiles have been exhausted. This is the situation shown where Yellow wishes to place a tile at (a).
In this case, Yellow places a terminal tile as shown at (b).
The Blue opponent can then only place his own terminal tile above (c). Between the two tiles there is only a gray path.
Note: It is legal to use a "half" gray path to extend a route (see picture).
A Route is Ended
If both ends of a route are capped with terminal tiles, the player
cannot place any more tiles. The opponents continue to play, however,
until their routes are complete.
An Infinite Route ?!
It's possible that both ends of a player's route become connected
together, either during an opponent's turn or for tactical reasons by
the player himself. Obviously, this situation prevents the player from
extending his route.
In this case, he does not place a tile. Instead, he is permitted to
rotate by 90 degrees one of their own curved tiles already in the playing area, so that two new placement locations are created. Of course, after
the rotation the tile must obey the usual rules. If this is not legally
possible, then the player stops his participation in the game until
Scoring.
Using the
Billabong Tiles
Billabongs are used in the special situations below. They connect or end the participating routes as described; online, the system places them automatically.
|
 |
The following cases are possible:
1. Routes from three different players lead into the same space.
The player who was the last to place a tile that created this situation
immediately places a billabong tile in the space. Then he also
immediately extends his route out of the billabong tile (the billabong and required extension remain part of this turn). The routes of the other two
players end here.
2. Four route ends from at least three different players lead into the same space.
As above, the player who was the last to place a tile that created this
situation immediately places a billabong tile in the space. All participating route ends stop here.
3. Two routes each from two players lead into the same space, but one of the players no longer has any
curved tiles.
The player whose turn it is, and who has no curved tiles left, places a billabong instead of a curved tile; this consumes the turn. Now both players' routes
continue past the billabong tile.
End of the Game and Scoring
The game ends when all players have finished their routes. Without animal scoring, the longest route wins. With animal scoring, the highest total of route and animal points wins. Count connected path sections, including terminal sections, rather than physical tiles. Neutral sections score just like sections of your own color; both sections of one tile can belong to the same route and count separately.
Excerpt of the playing area:
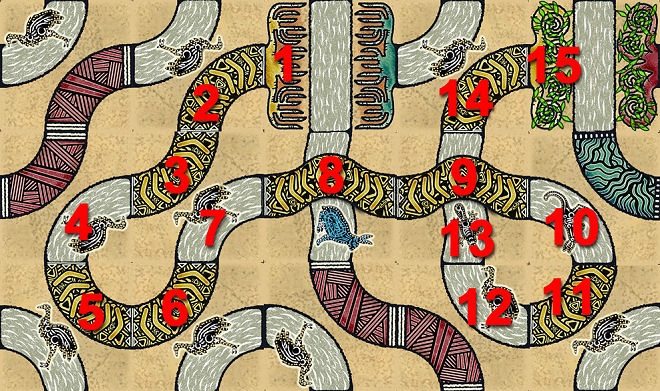
The yellow route consists of 15 paths.
Thus, without considering special scoring, Yellow receives 15 points.
Note that the 9th and the 13th path are on the same tile.
Using Special Scoring
The animal icons on the tiles represent rare animals discovered by the
player. They affect scoring as follows:
- For each set of an emu, kangaroo and duck-billed platypus on a
player's route, he receives 5 extra points. The location and order of
these icons do not matter. To determine the number of sets, simply
count which of these three types of icons appears on the route the
least.
- If a player has no dingo icon on his route, each rabbit on his
route subtracts two points (Rabbits are a plague, the dingo their foe).
- On Yucata, a player who has not played their own dingo tile by the end scores 0, regardless of the other scoring. This online rule was agreed with the author.
Additional note: The animal
designs of Japanese commercial artist Ro Sato share the X-ray style of
Aboriginal art. The Aborigines represent not only the outside shape of
an organism, but also the skeleton and organs.
|
Tactical Tips
-
In placing tiles the goal is to include as many gray tiles in one's
route as possible. However, having enough space in the long term should
always be carefully considered.
-
A route which reaches the edge of the playing area early has hardly any
chance to win. Also, if too many curved tiles are used at the start,
difficulties will soon follow. A curved tile always offers two
different possible directions, but a straight tile only one -- directly
to the edge.
DownUnder2 on Yucata
Invitation and variants
Play with 2–4 players. Choose a board size from the rule table for your player count. The first standard size is selected by default; changing the player count adjusts the selection accordingly.
- 2 players: 6×6 (easy), 5×7 (standard), 4×8 (hard).
- 3 players: 7×7 (easy), 6×8 or 5×9 (standard), 4×10 (hard).
- 4 players: 8×8 (easy), 7×9 or 6×10 (standard), 5×11 (hard).
The “With special animal scoring” checkbox adds animal points to route scoring. Without this variant, only route length scores. The question mark explains the additional scoring. The other printed variants are not selectable online.
Placing and rotating tiles
Select a tile from your stock, then choose a highlighted space. The two arrows rotate the available tiles clockwise or counterclockwise, even before selection. Selecting a tile keeps that orientation. Selecting the same tile again rotates it clockwise. Only targets legal for the selected tile and its current rotation are highlighted.
Each placement is one action. Undo, Redo and Finish turn remain available through the normal game controls. To open a closed loop, select a highlighted curved tile of your color to rotate it 90° clockwise. If exactly one action is legal, it may be performed automatically.
Billabongs
The system places billabongs automatically; they do not appear in your stock. In case 1, the billabong is placed as part of the triggering action even if another legal move would be available elsewhere. You must continue from its free exit in the same turn if a legal extension is possible. Case 2 is also resolved within the triggering action. Case 3 is a separate automatic action and consumes the turn.
Scores and player cards
The large number shows your current total score. With animal scoring, the compact breakdown before it shows a route symbol with route points and an animal image with animal points. Animal points include set bonuses and any rabbit penalties. Hover, keyboard focus or tap the breakdown to open its explanation.
While your own dingo tile remains in stock, your total score with animal scoring is 0. The breakdown still shows route and animal points; the dingo reminder explains the zero total. Having a dingo on your route prevents rabbit penalties, but does not replace the requirement to play your own dingo tile.
Numbers below your stock tiles show how many remain. With animal scoring, a second row shows transparent animal icons and their counts on your route. Emu, kangaroo and platypus form a group: amber outlines with “+1” mark the animals missing from the next complete set, worth 5 extra points. A set may use animals anywhere on the neutral sections of your route; they need not be adjacent.
Your player card appears first. The active player is outlined and the starting player has a star. Colors follow your personal color preferences.
Board display and log
The playing area may grow in either orientation until its selected dimensions are reached. Terminal tiles do not count towards that limit and may extend half a tile beyond it. Edges show full expansion spaces while growth is possible, then half spaces for terminal tiles.
The display uses the available space and may turn the entire board by 90°. Coordinates remain unchanged; stock previews and log images follow the view. Orientation stays stable during moves. After a viewport change, it switches only if that allows substantially larger tiles.
Wide layouts put player cards on the right. Narrow layouts show the board, then tile selection, then player cards. Small screens may require scrolling. The original logo appears when enough space remains.
The log shows placed tiles and announces newly completed animal sets. Hover, keyboard focus or tap a coordinate to highlight the matching cell on the current board without triggering replay. Other parts of the entry retain their normal replay/undo behavior. Older log entries may not contain set announcements.
Printed variants – not selectable online
Down Under Variants
Despite the simple components, Down Under is an especially variable
game. Not only does it offer rich tactical possibilities, but also many
rules variants.
Players can pick and choose from the following extra rules to create
their own favorite way of playing Down Under.
Simple Game for Younger Children
Play without the concept of a restricted playing area. A route is never
stopped by reaching a border. Note that it's still a good idea to stick
to the middle of the playing area, however, as there are many gray
paths available there.
Fixed Playing
Area (for 2-3 players)
The unused tiles of the fourth player can be used to form a line which
passes through the entire playing area. The line need not be straight
and may be serpentine, but it must start in the lower left corner and
end in the upper right corner. The locations of the tiles in the
corners thus define the length and width of the playing area. In order
to avoid making it too difficult to cross the line, straight tiles
should be employed in the middle sections of it.
When there are only two players, unused tiles can be used to completely
assemble a frame around the playing area. Place the gray curved tiles
in pairs so that they connect back into the playing area.
Paths Grow From Only One End (for 2-4 players)
In the first round of the game each player places a terminal tile, the
second player and the fourth players placing theirs at the back side of
the terminal tiles of the first and third players, respectively.
Two Routes Per Player (for 2 players)
With two players it's possible for each to play two routes. Each uses
two colors to accomplish this. First the players place for each of their
two routes a terminal tile so that each time two tiles form a square.
Then the starting player places a straight or a curved tile to extend
one of his routes. Then it is the next player's turn. Starting with this
turn, players always place two tiles, one of each color. The order of
these two tiles is up to the player.
This variant is also of interest when each player is only permitted to
place one tile per turn. One must decide which one of one's routes to
extend. (Terminal tiles should also be placed first in this version.)
Tactics: Now one player's short route may be pursued by the other's
long route. It's a good tactic to place a terminal tile between them
because then the shorter route's tiles can no longer be used. The
threat alone of such a move is a very strong weapon.