|
|
|
|
| 2-4 players |
| Authors | Simone Luciani (magobaol77)
Daniele Tascini |
| Illustrator | Dennis Lohausen |
| Published by | Hans im Glück |
| Online since | 2015-12-05 |
| Developed by | Bart De Cock (be_com4) |
| Boardgamegeek | 171623 |
| Yucata.de owns a license for the online version of this game. A big "thank you" to the copyright owners (publisher and/or author and illustrator) who make it possible to have this game for free online here! |
|
|
|
|
If you are reading these rules for the first time, ignore the text along the right hand side. These rules serve as a summary to help you quickly familiarize yourself with the game.
Show
→ summary only
→ detailed version only
→ both summary and detailed version

The Voyages of Marco Polo
The players embody one of the companions traveling with the famous explorer Marco Polo. Each player attempts to collect victory points by means of completed Contracts and visiting lucrative cities. A completed Contract also gives the player further benefits, and in the cities he had visited, he can use the privileges available there. Moreover, the players can complete secret Objectives to earn additional victory points during the final scoring.
The game is played with players taking their turns one after the other in clockwise order, over several rounds.
On each turn, the players roll their dice, and then place these dice on action areas on the game board in order to take various actions.
They take turns until all of their dice have been used, which signals the end of a round. The game consists of 5 rounds, and ends with a short final scoring.
We hope you enjoy following in the footsteps of this great explorer in “The Voyages of Marco Polo”!
Game Components
1
1 Start Player Marker (Hourglass)
4
6 Small Town Bonus Tiles
10 Large City Office Bonus Tiles
10 Character Tiles
40 Coins (20× 1, 10× 5, 10× 10)
44 Contract Tiles
4 50/100-Point Tokens
18 Objective Cards
31 Large City Cards
15 Gold Bars (12 small and 3 large)
15 Silk Bundles (12 small and 3 large)
15 Peppers Sacks (12 small and 3 large)
28 Camels (21 small and 7 large)
12 Player Figures (3 each in the player colors: blue, yellow, green, and red)
26 Dice (5 each in the player colors: blue, yellow, green, and red; 5 in black; 1 in white)
38 Trading Posts (9 each in the player colors: blue, yellow, green, and red; 2 in black)
1 Rulebook, Supplement, Setup Card
5 Overview Cards
Setup
Setup board
- Place the Game Board in the middle of the table. The 50/100-Point Tokens are placed next to the “50” space of the scoring track.
- The 18 Objective Cards are shuffled and placed in a stack.
- The Money (40 Coins with values of 1, 5, 10) is placed next to the game board as a general supply.
- The Goods (Gold, Silk and Pepper), and Camels are placed as a general supply next to the game board. The larger pieces have a value of 3 of the corresponding small pieces. Goods and Camels are not limited in quantity. In the unlikely event that you run out of any of them, you may substitute with any other available tokens.
- The 6 Small Town Bonus Tiles are distributed (according to their letters) on the 6 small towns on the board.
- The 10 Large City Office Bonus Tiles are shuffled, and 1 is placed on each of the 7 large cities on the board. The 3 remaining tiles are returned to the box.
- The 31 Large City Cards are shuffled, and 1 card is placed face up on each of the city card fields on the game board. A total of 9 cards are placed. All of the remaining unused Large City Cards are returned to the box. They will not be needed for this game.
- The 6 Starting Contract Tiles are initially set aside. See player setup below. The rest of the Contract Tiles are shuffled, and 30 of them are divided into 5 stacks of 6 Contracts each. From 1 of these stacks, 1 Contract Tile is placed face up on each of the 6 Contract spaces on the game board. The other 4 stacks are placed next to the game board. The remaining 8 Contract Tiles are placed in a “special” stack, and are also placed next to the game board, but set apart from the other stacks.
- The 10 Character Tiles are placed face up next to the game board in a display.
- Certain Characters have additional game components associated with them. Keep the 2 black Trading Posts, the white Die, and 1 Player Figure of each color in the box until needed. A description of each Character Tile can be found in the Supplement.
- The 5 black Dice are placed on the game board in the field with a black Die icon. The number of pips showing on these dice are irrelevant at placement.
- The player who has most recently traveled around the world takes the Start Player Marker (Hourglass).
The remaining game components are distributed to the individual players.
Setup player tableau
- Each player chooses a color, takes the Player Board in the chosen color and places it in front of himself.
- Each player then takes the 5 dice in his color and places them on his Player Board in the area showing a Die icon.
- Next, each player takes the 9 Trading Posts in his color. These are placed on his Player Board on the designated spaces for them.
- Each player receives a Contract from the previously set aside stack of Starting Contract Tiles From this face down stack, each player takes 1 Contract Tile and places it face up on his Player Board on one of the spaces for active Contracts.
- Each player takes 2 Camels and places them in the storage area on his Player Board. The starting player takes 7 Coins placed in front of him, and the other players in clockwise order each take 1 Coin more than the player to his right (8, 9, and 10 Coins for players 2, 3, and 4).
-
For your first game, only these 4 Character Tiles are needed, and they are distributed as follows:
- The starting player takes Raschid ad-Din Sinan,
- the 2nd player (clockwise) takes Matteo Polo,
- the 3rd player takes Berke Khan,
- and the 4th player takes Mercator ex Tabriz.
In the Advanced game, players choose their Characters.
- Each player takes 2 Player Figures in his color and places them on the game board: one is placed on the “50” space of the scoring track and the other is placed in Venezia.
- Each player draws 2 Objective Cards from the face down stack, and keeps them hidden from the other players. In the Advanced game, players choose their Objective Cards.
- Finally, each player takes an Overview Card. You are now ready to play the game!
3 Players
During the game setup, only 4 black dice are placed in the black dice area on the game board. In addition, 1 die
in the player color not being used is placed on the first action space in “The Favor of Khan” area, showing a “1”.
Note: This die remains in the first action space for the entire game; it is not removed!
2 Players
During the game setup, only 3 black dice are placed in the black dice area on the
game board. In addition, 2 dice (each showing a “1”) in the player colors not being
used are placed on the first and second action spaces in “The Favor of Khan” area.
Also, 1 die (showing any number) in a player color not being used is placed in the
“Take 5 Coins” action space.
Note: These dice remain in place for the entire game; they are not removed!
Game Play
The game is played over 5 rounds. Players take turns until all of their dice have been used, which signals the end of a round.
The game is played with players taking their turns one after the other in clockwise order, over 5 rounds.
On each turn, the players roll their dice, and then place these dice on action areas on the game board in order to take various actions.
They take turns until all of their dice have been used, which signals the end of a round.
At the Beginning of a Round
Determine a new start player (this is done by the system in the first round)
A new start player is determined every round. The player who performed the “Travel” action last in the
previous round becomes the start player for the new round. He takes the Start Player Marker (hourglass).
Note: Because the dice of different players are stacked on top of one another on any action space, the
player who has performed the “Travel” action last will be the one with his dice at the top of the stack.
Exception: If, in the previous round, no
player has performed the “Travel” action,
the start player does not change.
Exception: If the last player to perform
the “travel” action in a round uses a
black or white die, the players will need
to remember which player this was.
Alternately, the player in question can take the Start Player Marker as soon as he performs the “Travel” action.
Small Town and Character bonuses are collected
-
All Small Towns with a “!” now pay out their bonuses. Each player with a Trading Post in such
a Small Town receives the corresponding bonus. A description of the symbols on the Small
Town Bonus Tiles can be found in the Supplement.
- All Character Tiles with a “!” now pay out their bonuses. See the Supplement for descriptions.
Players retrieve their dice from the board
All players now take back all of their dice from the board and place them on their Player Boards.
All black dice are returned to the black dice area on the board.
Players roll their dice, and place them on their Player Boards (collecting compensation, if necessary)
Finally, all players roll their dice simultaneously. If any players roll dice totaling less than 15 he receives
compensation in the form of Camels or Coins.
After all players have rolled their dice again, the new round can begin.
Playing a Turn
- The player may perform 1 or more additional actions before his main action
-
The player must perform 1 main action by placing dice on the appropriate action space. The action is then
performed immediately
- The player may perform 1 or more additional actions after his main action
The players now take turns, beginning with the start player and moving clockwise. They continue to take turns
until all players have placed all their dice.
On a player’s turn, he must take at least 1 (previously
rolled) die from his Player Board, and places it/them on
an action space of his choice. He may place dice on either
an empty action space, or one that is already occupied.
He then immediately performs the corresponding action.
When performing one of the main actions, the following general rules must be observed:
- A player may only place his own dice on action spaces, never those of the other players
-
The number of dice placed on an action space must match the number of dice illustrated on it
-
A player may place his dice on either empty or occupied action spaces. (Exception: Large City Card Actions) In all instances in this rules, we will always first assume that an action space is unoccupied.
-
If an action space is already occupied, a player must pay Coins to the supply to be able to take the action.
This is explained in detail in the “Special Situations” section.
-
Each action space may only be used once by a player color (blue, yellow, green, red).
-
Once a player has placed his dice on an action space, he immediately performs the corresponding action.
-
The value of the dice placed on an action space indicates how often an action may be taken, or how much of
an item is gained. (Exception: Take 5 Coins, see below.) The deciding factor is always the lowest-numbered die.
-
If a player is allowed to perform an action more than once, or take more of an item, he may perform the
action less times than allowed, or may take less of an item. However, he must always use the action a
minimum of 1 time.
Before or after taking a main action, a player may perform
1 or more “Additional” actions. These actions are always optional.
A player must take exactly 1 main action on each turn, as long as he has any unused dice available on his Player
Board. Once he has no more dice, he automatically passes, and does not participate any further in this round!
At the End of a Round
- All Contract Tiles remaining on the board are cleared
- 6 new Contract Tiles are placed on the board
All Contract Tiles still on the board at the end of a round are placed underneath the “special” stack of Contracts.
Then, 6 new Contract Tiles are placed in their spaces on the board from the next stack of Contracts.
(If this is the end of 5th round, this does not happen.)
Game End
The game ends after 5 rounds have been played.
In the final scoring, players receive victory points for the following:
-
There are 2 ways to earn victory points with the Objective Cards
- The player has placed Trading Posts in both of the locations indicated on the Card
- The player has occupied a number of different locations with his Trading Posts
- 1 victory point per 10 Coins
-
Trading Post in Bejing
- Points corresponding to the space
- 1 victory point per 2 Goods remaining
The game ends after 5 rounds have been played. The number of rounds played and left to be played can be determined
by the number of Contract Tile stacks remaining next to the game board. The final round begins when the
last stack of 6 Contract Tiles (placed next to the game board during setup) is placed in the “Obtain Contracts”
area of the board. After the final round is played, the final scoring is performed.
In the final scoring, players receive victory points for the following:
-
For completing either or both of his 2 Objective Cards, each player receives victory points as
shown on the card. A description of the Objective Cards can be found in the Supplement.
- Each player receives 1 victory point per 10 Coins
-
Any player having a Trading Post in Bejing receives the number of victory points
corresponding to the space his Trading Post occupies.
-
Any player having a Trading Post in Bejing also receives 1 victory point per 2 Goods
of any type. Players without a Trading Post in Bejing do not receive any points for
their remaining Goods.
Note: Camels are not considered to be Goods!
- The player or players who have completed the most Contracts receive 7 victory points.
The player with the most victory points wins the game.
If there is a tie among the players, then the player with the most Camels remaining in his storage area is the
winner. If there is still a tie, then all tied players share in the victory.
Main actions
The Game Board contains areas for the following 6 Main Actions:
Take 5 Coins
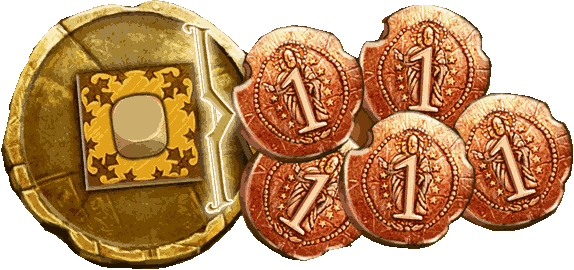
The player always receives 5 Coins for taking this action.
In order to get 5 Coins, the player must place exactly 1 die on the “Take 5 Coins” action space. The number on
the die does not matter for this space; it is not considered when taking this action.
The player always receives
5 Coins for taking this action. If the action space is already occupied, the player must pay the cost for placing
his die there
Marketplace
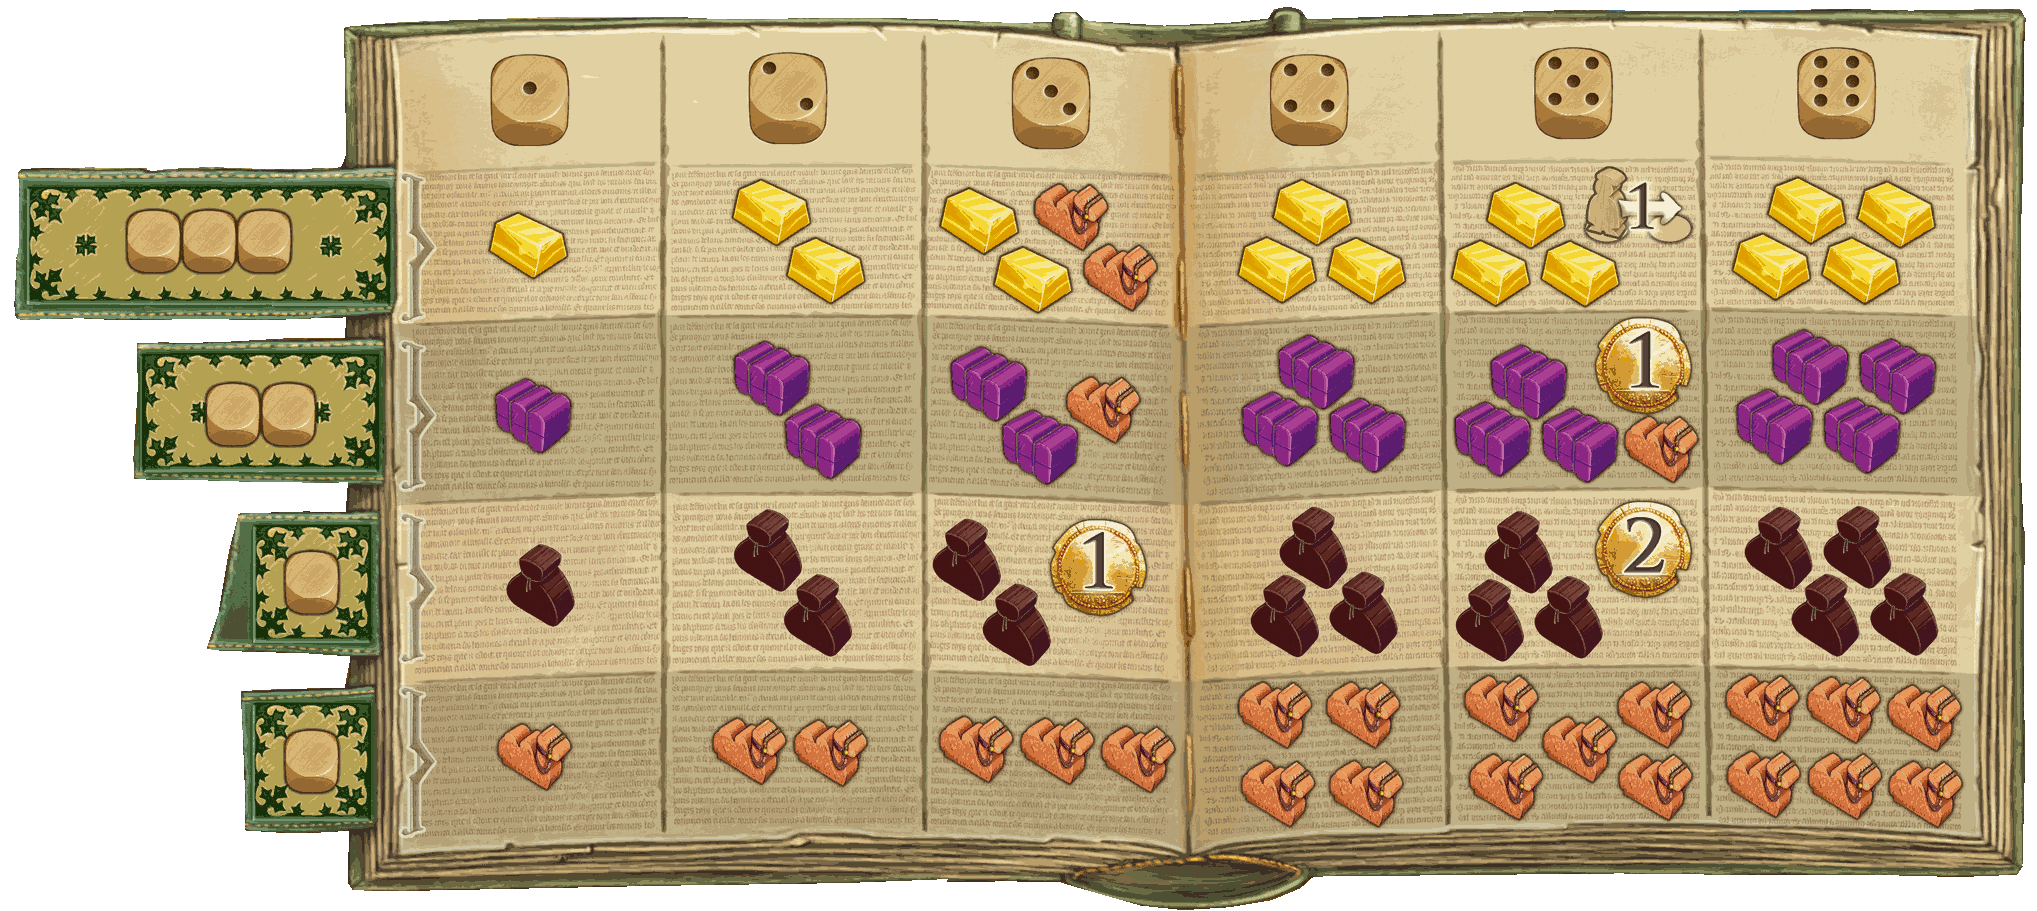
Example
Place 2 dice (showing a “4”
and a “5”) on the Marketplace
action space “Silk”.
Since the lowest-numbered die
placed on the action space by
Blue is a “4”, you receive 3 Silk
from the general supply.
Goods are needed to complete Contracts. In addition, certain Large
Cities may contain action spaces that allow players to convert Goods
into Coins, Camels, or even victory points. Goods may also earn
players additional victory points during the final scoring.
Procedure:
- The player places as many dice on the action space as specified in the illustration on the space
-
To the right of the action space, a table
shows the amount and type of Goods
received for each die value of 1 to 6. The
lowest-numbered die placed on the action
space determines which column shows the
maximum number of Goods received.
-
The Goods are taken from the general supply and placed in the Storage Area of his Player Board.
The player may choose to receive the Goods selection in any lower-numbered column than his lowest-numbered
die, if he wishes. (He may prefer one of the other selections available, for example.)
Camels are needed to complete Contracts, and are required to travel over certain routes on the map. In addition,
they may be needed to gain the benefits from certain Large City Cards.
A player receives Camels using the same procedure as gaining Goods:
He places 1 die (showing any number) on the Marketplace action space “Camels”, takes as many Camels
from the general supply as the number showing on the placed die, and puts them in the Storage Area of his
Player Board.
Note: When choosing to obtain Camels, there is no reason to select a lower-numbered column.
Favor of Khan
Example
Green places a die showing a “3” on the
first action space in the “Favor of Khan”
area. He then takes 1 Good and 2 Camels from the general supply.
Red must now place a die showing at least a “3”
in order to take this action. He places a die
showing a “4”, and takes 1 Good and 2 Camels from the general supply.
The player does not have to pay Coins if one or more of the dice
fields are occupied.
Here, the player places exactly 1 die on the “Favor of Khan”
action space. He then takes 1 Good of his choice and 2 Camels
from the general supply, and puts them in the Storage Area of
his Player Board.
Details:
The first player to use this area places a die showing any number on the leftmost
action space. The next player who wants to take this action places his die on the next
space, and the die must show an equal or higher number than the one to its left
(if this is not possible, he cannot take this action). He may then take 1 Good of his
choice and 2 Camels. Each other player wishing to take this action must follow the same placement rules.
Note: There are only 4 die spaces here. Once they are all filled, this action cannot be taken again this round.
The “Favor of Khan” action area consists of 1 action space made up of 4 dice fields. Therefore,
each player may only place a die of his color (blue, yellow, green, red) once per round in the
entire “Favor of Khan” action area. The player does not have to pay Coins if one or more of the dice
fields are occupied; the only placement condition is that the value of the placed die is equal to or higher than the one
to its left.
Exception: By using a black or white die, a player may perform the “Favor of Khan” action again in a round.
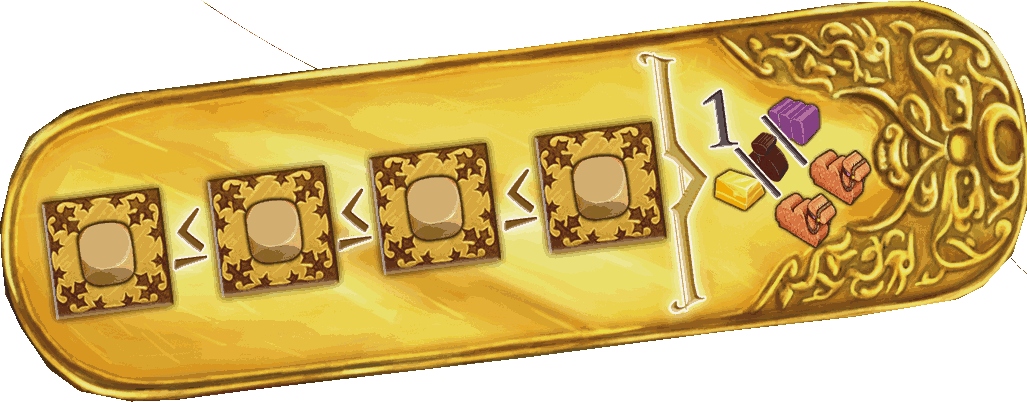
Obtain Contracts

Example
Green places a die showing a “5” on the
“Obtain Contracts” action space. He may
choose 1 or 2 Contracts from any column.
Green may now choose 1 or 2 of the
Contract Tiles in the “1”, “2”, “3”, “4” or “5”
column, and places them on his
Player Board.
Green takes the Contracts in the “2” and “5” columns, and
decides to take 1 Camel as his extra reward for column “5”.
In order to get Contracts, the player must place exactly 1 die on the “Obtain Contracts” action space. He may
then take 1 or 2 Contract Tiles from any of the Contract spaces on the board matching the number showing on
the placed die, or lower, and places it/them on any empty active Contract space (see below) on his Player Board.
If a player takes a Contract Tile from the “5” column, he also takes either 1 Coin or 1 Camel from the general
supply. If he takes a Contract Tile from the “6” column, he earns either 2 Coins or 2 Camels.
-
After a player has taken 1 or 2 Contracts, all Contract Tiles remaining on the board are shifted to the left to
fill any empty spaces.
-
If, during a round, there are ever no Contract Tiles remaining on the board, 2 tiles are drawn from the
“special” stack of Contract Tiles, and placed in the “1” and “2” spaces on the board.
-
Each Player Board has spaces for 2 active Contracts. Whenever a player takes new Contract Tiles, he must have
empty spaces in which to place them. If both spaces already contain Contract Tiles, one (or both) of them
must be placed face down underneath the “special” stack of Contracts. The Starting Contract Tiles ,
however, are removed from the game instead.
Notes:
-
A player may not take a Contract Tile from the board, and immediately place it underneath the “special”
stack of tiles. A newly taken Contract must always be placed on the Player Board first.
-
As long as a Contract Tile lies in an active Contract space on a Player Board, they do not earn anything
for a player. In order to gain the Contract’s benefits, it must be completed, as described on page 13
and on the Overview Cards.
Travel

Example
Red places 2 dice (showing a “2”
and a “4”) on the “Travel” action
space. He may move a maximum
of 2 steps on the map, as determined
by the lower-numbered of his dice.
Red would like to move 2 steps on
the map. The cost for this movement
is 7 Coins. Red returns this amount
to the general supply.
To travel on this route, the player must return
2 Camels to the general supply (in addition to
the cost shown on the selected action space).
In order for a player to move his Figure across the map on the game board, he must place exactly 2 dice on the
“Travel” action space. The procedure for movement is described below.
Procedure:
-
He may move a maximum
number of steps on the map
as shown on the lowernumbered
of the 2 placed
dice.
Note: He may always move fewer steps than his lower-numbered die allows, but he must move at least 1 step.
-
For each space in the “Travel” action area, a cost in Coins is shown for taking that number of steps. This cost must
be paid, but the player only pays the cost for the actual number of steps moved, regardless of the dice values. All
Coins paid are returned to the general supply.
-
Often, either a number of Camels or an amount of Coins are shown on the route between 2 locations. In such a
case, the player must pay what is shown (Camels and/or Coins) in addition to the cost on the action space.
-
The player now moves his Figure from location to location, the number of steps determined by his chosen action
space. The player will end his movement in an Oasis, a Small Town, or a Large City. He may not end his movement
between 2 locations.
Additional rules:
-
If a player ends his movement in a Large City, he must place a Trading Post (from his Player board) there.
Starting with his next turn, he may place a die on the Large City Card there, in order to take the action on the
card. The Large City Card itself always stays in the Large City; it is never taken.
-
If a player ends his movement in a Small Town, he must place a Trading Post (from his Player Board) there.
He immediately receives the bonus shown on the Small Town Bonus Tile (see Supplement for more details).
In addition, he will receive that bonus again at the beginning of each new round
- If a player ends his movement in an Oasis, nothing happens. The Oases simply slow down movement.
-
When placing Trading Posts on the map, the player always removes them
from his Player Board starting from the leftmost column, and then from
top to bottom. If a player moves through a Large City or Small Town, but
does not end his movement there, no Trading Post is placed there.
-
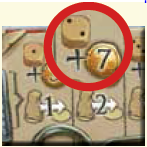
If a player places his 8th Trading Post, he immediately receives 5 victory
points , and moves his scoring Figure ahead on the scoring track. If he places his 9th Trading Post, he
immediately receives an additional 10 victory points
-
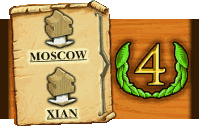
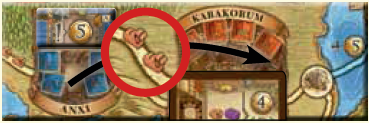
If a player moves his Figure to Bejing, he has reached his destination, and places a Trading
Post on the available space showing the largest number. At the end of the game, he will
earn bonus victory points as shown on that space (see page 14). Note: Even after a
player reaches Bejing, he may continue to perform the “Travel” action on future turns.
-
Backtracking to locations already visited on the map is allowed. That is, a player may
repeatedly pass through or end his movement on any location on the map.
Note: Each player may only have 1 Trading Post in any Large City or Small Town location.
Therefore, the same player may not have several Trading Posts in one location.
- The “Travel” action determines the Start Player at the beginning of each new round
Large City Office Bonus
The first player to place a Trading Post in a Large City receives the Large City Office Bonus
for that city. After gaining the bonus shown on the Large City Office Bonus Tile (from the
general supply), he removes the tile from the board and returns it to the box. It is no longer
needed for the remainder of the game.
Notes
-
At the beginning of the game, all players start their travels in Venezia. If, during
the course of the game, a player returns to Venezia by ending his movement there,
he may not place a Trading Post there.
-
If a player places all of his Trading Posts on the map, and later ends his movement in another location
requiring one, he must move one of his already placed Trading Posts of his choice to the new location.
Large City Card Actions
Example
Place a die showing a “3”
on this City Card’s action space.
You may take this Card’s action
up to 3 times.
pay 2 Camels
and 2 Gold to the
general supply and
receive 8 victory
points (2 x 4).
All of the Large Cities on the board contain a City
Card (Sumatra contains 3 Cards). To perform a Large
City Card action, a player must have a Trading Post in
that City. He must then place 1 die on the Card’s action
space, and performs the action on the Card. A description
of the symbols on the City Cards can be found
in the Supplement.
The item(s) to the left of the bracket indicate the cost to be paid or the condition to be satisfied.
The bonus offered by the City Card is
shown to the right of the bracket.
Important: A City Card’s action can only be used once per round, by one player only. Once a Card’s action space
has been occupied, that action may not be used again until the next round. Note: In most cases, the number
showing on the die placed on a Card action space determines the maximum number of times the action may be taken.
Additional actions
On a player’s turn, before or after taking one of the main actions, he may also take any number of the
following additional actions. However, these actions cannot be performed during a main action.
Additional rules to the additional actions
-
A player may take any additional actions any number of times on his turn (Exception: Take 1 Black Die). He
may, for example, first take 1 black die (3 Camels), re-roll 2 of his dice (2 Camels), and then adjust the value
of 1 of his dice by 1 number higher (2 Camels). For these actions, he returns a total of 7 Camels to the supply.
-
Remember: a player may not perform any additional actions during a main action on a turn. Additional
actions may only be performed before or after the main action.
- A player may re-roll or adjust the value of any black or white die he has on a turn.
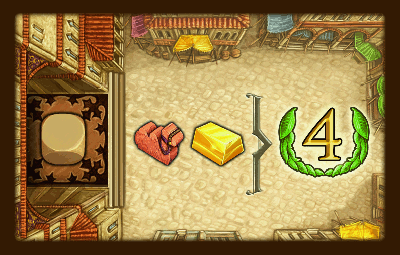
Complete 1 Contract
Example
pay 1 Camel
and 2 Silk to the
general supply and
receive 3 victory
points and 5 Coins.
First, we will explain the structure of a Contract Tile: On the left side of a Contract Tile, the required Goods and/or
Camels are shown. On the right side of the Tile, the reward for completing the Contract is shown. A description
of the symbols on the Contract Tiles can be found in the Supplement.
-
A player may only complete a Contract that he
has previously obtained, and is currently on an
active Contract space of his Player Board.
-
To complete a Contract, a player must have all
required Goods and/or Camels in the storage area
of his Player Board.
All required Goods and/or Camels are taken from
the storage area and placed back into the
general supply.
-
The player then receives all rewards printed on
the right side of the Contract Tile. A description
of the symbols on the Contract Tiles can be found
in the Supplement.
-
Finally, the player moves the completed Contract
Tile face down onto the drawer space of his Player
Board.
Take 3 Coins
The player places exactly 1 die on the Coin Bag illustration on the board, and then takes 3 Coins from the
general supply. Also note:
- There are never any additional costs for this action, even if other dice occupy the action space.
-
The number showing on the die placed in this action area is immaterial to the action. That is, the player
always gets 3 Coins for this action, no matter what numbered die he places there.
-
A player may perform the “Take 3 Coins” action as many times as he wishes on his turn, as long as he has
dice available to place. Any player may have multiple dice on this action space during a round.
Re-roll 1 Die
Return 1 Camel to the general supply and reroll 1 of your dice.
The player returns 1 Camel to the general supply, in order to re-roll 1 of his dice.
Adjust 1 Die Value +1/-1
Return 2 Camels to the general supply, in order to adjust 1 of your dice by +1 or -1.
The player returns 2 Camels to the general supply, in order to adjust the value of 1 of his dice by 1 number
up or down. Note: A die may not be adjusted from a “1” to a “6”, or vice versa.
Take 1 Black Die
The player returns 3 Camels to the general supply, in order to take 1 black die.
The player returns 3 Camels to the general supply, in order to take 1 black die from their area on the board. He
immediately rolls this die and places it on his Player Board with any still-remaining dice. This die may be used as
an extra die for placement during the current round. At the end of a round, any black dice that were taken must
be returned to their area on the board. They will be available to take again in the next round.
Important: Each player may only tak e 1 black die per turn.
Occupied Spaces
If a player wishes to use an occupied action space, he must pay a number of Coins
corresponding to his lowest-numbered die placed at that action space.
In general, almost all action spaces may be occupied by several players (Exception: Large City Cards actions).
If a player wishes to use an occupied action space, the following rules apply:
-
The player wishing to use an occupied action space must pay for its use. The cost is a number of Coins
corresponding to his lowest-numbered die placed at that action space.
This cost is regardless of the values of any other dice already placed at that space.
The number of dice already placed at that space also does not matter. Once the player has paid the placement
cost, he may perform the action as usual.
-
The player places his dice on top of the dice already occupying the action space. Thus, it can always be
determined who most recently performed the action. If the number of dice on an action space make stacking
them difficult, the dice can be placed side by side on or near the space, in order of player placement.
Exception: “The Favor of Khan” action area only has 4 total dice spaces available. When taking
this action, the dice are never stacked on one another.
-
The black and white dice do not count as one of the player colors (blue, yellow, green red). Therefore, a
player who obtains these dice may use them to perform an action a second time in a round, even if dice of
his player color already occupy that action space.
-
A player may combine black or white dice with dice of his player color when placing them on an action space.
Remember, however, that a player may only place dice of his color on an action space once per round.
Note: Any number of the black and white dice may occupy an action space in the same round.
Low Dice Roll
For each pip below 15 that he has rolled, the player may
take 1 Coin or 1 Camel.
If, when a player rolls all of his dice at the beginning of a round, the
total value is lower than 15, he receives compensation in the form of
Coins or Camels. For each pip below 15 that he has rolled, he may
take 1 Coin or 1 Camel. If he is able to receive multiple items, he may
take them in any combination he wishes.
Objective Cards
Each Objective
Card indicates 2 specific locations (Large Cities or Small Towns). At the end of the game, the player receives
victory points if he has a Trading Post in both of these locations.
If a player has placed Trading Posts in both of the locations listed on the Objective Card by the end of the game, he
will receive the victory points indicated on the right side of the Card. If he only has a Trading Post in 1 of the 2
locations on the card, he receives no victory points for it.
This is evaluated individually for both of a player’s Objective Cards.
For each different location (listed on a player’s 2 Objective Cards) that contain one of his
Trading Posts, he receives a number of victory points according to the table (See: end of the game).
Next, the table at the bottom of the Objective Card is evaluated. This table is the same on
every Objective Card. Since each Card lists 2 target locations for Trading Post placement,
and each player has 2 Objective Cards, it is possible to occupy up to 4 different locations.
For each different location (listed on a player’s 2 Objective Cards) that contain one of his
Trading Posts, he receives a number of victory points at the end of the game, according to the table. For example,
if he only occupies 1 location, he receives 1 victory point. For Trading Posts in 2 different locations, he receives
3 victory points, and so on.
Important: Locations must be different in order to score! Therefore, if both of a player’s Objective Cards list the
same location, and the player has a Trading Post there, it only counts as 1 different location.
Symbols
The symbols used throughout the game are described in detail below. They are always used in the same way; therefore
they always have the same meaning. If you come across a symbol you do not understand, you can find it here.
Goods
These are the symbols for 1 gold,
1 silk, 1 pepper, and 1 camel.
these symbols represent the
wooden pieces in the game.
Goods Choice
Here, the player has the choice of the shown Goods (Gold,
Pepper, or Silk). The number represents how many Goods
may be taken. However, when 2 Goods may be taken,
they must always be different.
Coins & Points
These symbols represent Coins or Victory Points.
Contract
The player takes the top Contract Tile from the “special” stack, and places it face up on an empty
active Contract space on his Player Board. If both spaces are occupied, he may replace 1 of them with
the newly-drawn Tile, or he may discard the new one. In either case, the Tile no longer being used
is placed underneath the “special” stack.
Move
The player moves his Figure on the map 1 step along any route. He does not use a “Travel” action for
this; therefore, he does not have to pay any travel cost. However, any additional costs (Camels or
Coins) he encounters along the way still must be paid. He still places a Trading Post as usual, if he
ends his movement on a Large City or Small Town (assuming he does not already have one there).
Important: If the player would need to pay an additional cost (Camels or Coins) to take the step
and he does not have what is needed, he may not make the movement, and the step is cancelled.
Note: Is is possible for a player to place more than 1 Trading Post on a turn; for example, by taking
a “Travel” action, and then completing a Contract which grants him 1 extra step.
Black Die
The player gains the use of 1 black die. He takes the die from the black dice area on the board, immediately
rolls it, and places it in the dice area of his Player Board. He may use this die during the current
round, and must return it to its area on the board at the end of the round. The black dice are limited;
therefore, if there are none on the board when a player earns one, he doesn’t take anything.
Round Bonus
An exclamation point (!) indicates that the bonus shown after it is earned at the beginning of
every round. This symbol can be found on the Small Town Bonus Tiles, as well as some of the
Character Tiles.
"Player Choice" Small Town Bonus Tile
If a player has a trading post in the small town containing this bonus
tile, he may choose at every payout one other Small Town and receive that bonus. He does
not need to have a trading post in the small town.
This symbol allows the player to exchange
Goods for Camels (or vice versa), or Coins
for Victory Points (or vice versa).
It is possible for a player to have a
negative amount of victory points.
The value of the dice determines what the player receives.
This symbol represents completed Contracts (Contract Tiles that are currently in a player’s drawer on
his Player Board). Important: The value of the die placed on a Card with this symbol determines the
number of completed Contracts that are taken into account. If a player has more completed Contracts than the
value of the placed die, he still only receives a number of victory points or Coins based on the value of the die.
Example: The player places a die showing a “3” on this Large City Card. He receives 2 Coins for each
completed Contract. He has 4 of them; however, only 3 of them are taken into account because of the
“3” value on the die, so he receives a total of 6 Coins.
This symbol represents Trading Posts that a player has placed on the map. Important: The value of the
die placed on a Card with this symbol determines the number of Trading Posts that are taken into
account. If a player has placed more Trading Posts than the value of the placed die, he still only receives
a number of victory points or Coins based on the value of the die.
The player selects 1 Small Town in which he has a Trading Post, and receives the bonus shown in that Small
Town. If a Large City Card allows a player to choose several Small Towns, he must choose all different
Small Towns (which must all contain one of his Trading Posts).
Per the value of the die placed on a Large City card with this symbol, the player may exchange
either 1 Camel for 3 Coins, or 1 Coin for 1 Camel. When taking this action more than once, he
must first decide whether to exchange Camels for Coins, or Coins for Camels, for the entire value.
The player receives twice the number of Coins as the value of the placed die.
Characters
Raschid ad-Din Sinan
The player holding this Character does not
roll his dice. Whenever the player wants
to perform an action, he may set the dice
to any value. This also applies to any
black dice the player acquires in the game.
Note: This player will never receive compensation
for a low dice roll.
Note: The player must still pay the costs for the "Travel" action
Matteo Polo
The player holding this Character
receives the white die at
the beginning of each round.
He rolls it with the rest of
his own dice. In addition,
he also draws a Contract Tile
from the “special” stack of
Contracts, at the beginning
of each round.
Mercator ex Tabriz (2 player)
The player holding this Character earns 1 item (Gold, Silk, Pepper, or Camel)
whenever another player performs the “Marketplace”
action. The item received is of the same type that the
other player receives on his action. The player always
receives only 1 of that item, regardless of how many of
that item the other player receives.
In addition, the player receives 1 Camel whenever another player performs “The Favor of Khan” action.
In addition, the player receives 2 Coins whenever another player performs “Take 5 Coins” action.
Mercator ex Tabriz (3 player)
The player holding this Character earns 1 item (Gold, Silk, Pepper, or Camel)
whenever another player performs the “Marketplace”
action. The item received is of the same type that the
other player receives on his action. The player always
receives only 1 of that item, regardless of how many of
that item the other player receives.
In addition, the player receives 1 Camel whenever another player performs “The Favor of Khan” action.
Mercator ex Tabriz (4 player)
The player holding this Character earns 1 item (Gold, Silk, Pepper, or Camel)
whenever another player performs the “Marketplace”
action. The item received is of the same type that the
other player receives on his action. The player always
receives only 1 of that item, regardless of how many of
that item the other player receives.
Berke Khan
The player holding this Character
may use any occupied action
space printed on the game
board without paying Coins.
Note: As in the usual rules, he
still may not use an occupied
Large City Card action.
Niccolo and Marco Polo
The player holding this Character
starts the game with a second Figure. Both of his Figures start
the game on the map in Venezia.
Note: If the player takes a
“Travel” action which allows
him to take several steps, he
may split the movement any
way he wishes between his 2
Figures. He also receives 1 Camel
at the beginning of each round.
Wilhelm von Rubruk
The player holding this Character
receives 2 additional Trading Posts
at the beginning of the game.
He adds these to the rest of his
Trading Posts on his Player
Board. If he is able to place all
11 Trading Posts on the board
by the end of the game, he receives an additional 10 victory points. In
addition, he may place a Trading Post in any location he passes through, even if he does
not end his movement there. That is, for every
Large City and Small Town he passes through,
he may place a Trading Post there.
Note: The
player may backtrack in his movement on any
turn, revisiting a location he had already passed
through. Nevertheless, he may still only place 1
Trading Post in each location.
Johannes Caprini
The player holding this Character may “jump”
his Figure from one Oasis to any other Oasis
on the map. When performing the “Travel”
action, he may therefore travel from one
Oasis to another. A jump between Oases
uses 1 step of movement. If he has enough
steps on his action, he may move out of a
location to an Oasis, and then jump to any
other oasis on the map. In addition, he receives 3 Coins
at the beginning of each round.
Kubilai Khan
The player holding this Character starts
the game with his Figure in Bejing
(instead of Venezia). Therefore, he starts
his travels from that city. In addition,
he starts the game with 1 Trading Post
on the “10” victory point space of
Bejing.
| |